Crystal Palace The Town Too Tough to Die

Crystal Palace - When we travel to Tombstone, we make a point of stopping in the Crystal Palace and admire its back bar.
Crystal Palace – When we travel to Tombstone, we make a point of stopping in the Crystal Palace to admire its back bar.

How adventurous are you? Do you try new things or stick with the tried and true when you return to a location? I’d say that Queen Anne and I are 25/75 split. We always seem to return to the joints we’ve enjoyed but try to see what else is out there. I’m unsure if that’s adventurous or what other people usually do.

That holds for Tombstone as well. It may not be a surprise that when we get to town, one of our first stops is a bar—not just any bar, but we specifically make a beeline to the Crystal Palace. We don’t go there because the beer is cold or the wine is vintage; let’s face it, beer is beer, and bar wine is—ugh. When we are belly-up to the bar, the alcohol is only a vessel for a toast to a great piece of furniture—the Crystal Palace back bar.

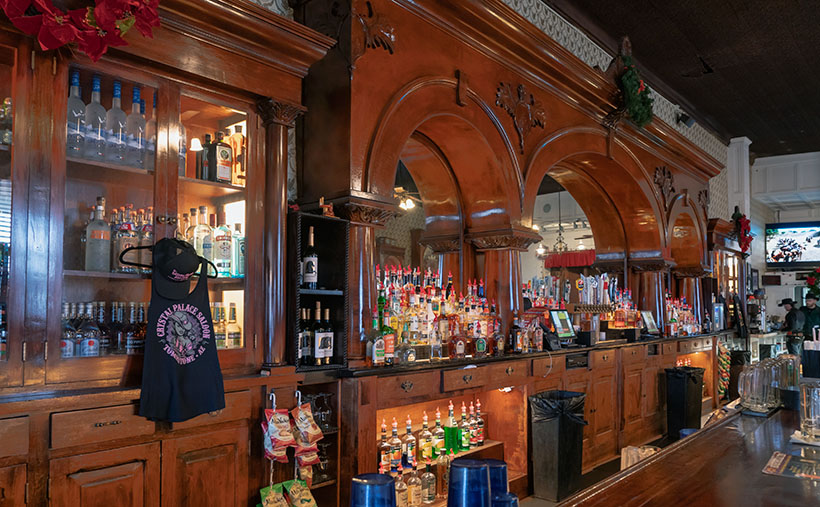
The Palace is on the south end of town on Allen Street. During winter, they keep the front doors closed, but you can bust your way through a pair of a traditional cowboy swinging doors during summer. As you look around the cavernous room, you’ll see a bigger-than-life roulette wheel hung as wall art. The ceilings are two stories high and covered in stamped tin tiles. There’s a stage along the back wall where rows of cancan girls danced. On the room’s left is a massive mahogany back bar dwarfing the bartenders. The room smells of stale beer, French fries, and hamburgers smeared on a leather saddle.

The cabinet that is the source of our admiration reaches about three-quarters of the way to the ceiling. It has three arches supported by Corinthian columns with mirror inserts. I wonder how often those mirrors were targets of bullets or flying cowboys. It looks like one piece, but I’ll bet there’s a seam hidden beneath the center trim and festoon. On each of its flanks are matching liquor hutches. If you don’t have time to drive to Tombstone, you can see its twin sister in one of Prescott’s Whiskey Row bars (I don’t recall exactly which bar it was because I spent too much of my life doing research for this article).

We don’t grow mahogany in Arizona or any other hardwood that would be nice enough for cabinets like this. This one was ordered from furniture makers in New England and then shipped around South America’s treacherous Cape Horn (no Virginia, the canal wasn’t yet built). Once the sailboat reached the Sea of Cortez, the bar was unloaded and carried overland by wagon.

If you’re hungry, you can order food. It’s not the worst place in town, but it’s still bar food. They prepare onion rings in-house, notably better than those awful versions at Jack’s or The King. If the tour busses are in town, the place will be packed, and the crowd can overwhelm the staff. Then you’ll have to be patient with your food and bill. But it’s not any better at the other restaurants.

There is one more thing about the Crystal Palace that I should warn you about—especially in spring. For some reason, enough couples are getting hitched in Tombstone; the town provides them with sideshows. On one of our visits, we noticed a table full of guys having a bachelor’s party. They had a great time drinking beer and being loud when suddenly an attractive woman dressed in a bright red dance costume burst through the swinging doors. She was followed by three men with handlebar mustaches wearing long black dusters and deputy badges. The young woman walked over to the groom-to-be and pointed her finger at him. She shouted for the entire world to hear, “That’s him! That’s the slime ball. Last night he promised to love me forever, and today he’s running off with another woman.”

Then the deputies grabbed the scoundrel under his arms and dragged him through the side door to the hanging tree out back. The crowd emptied the bar and filled the streets. Once there, the posse strung him up but stopped until someone fetched the bride.

Once she arrived (accompanied by her entourage), the lawmen presented their case. After hearing what they had to say, she promised that after their wedding, she’d set him straight, and he would never do it again. The sheriff polled the crowd, “Do you believe her?”

Most of the mob said yes, so he removed the noose, and we all went back into the bar and ordered another beer—on the groom.

I called this week’s picture Crystal Palace, and it’s of the cabinets described in my story. I was happy that my shot was sharp in such a dark room without using a flash or a tripod. I lightened the wood in post-production to show off its luster and grain. To get a clean shot, I had to wait for the bartenders to go to the kitchen window. Sometimes it pays to be patient.

You can see a larger version of Crystal Palace on its Webpage by clicking here. I hope you’ll join us next week when we come back with another Tombstone story.

Till next time
jw

BTW:

Are you ready for flowers? With the frequent rain this winter, we will have a bumper crop of wildflowers. Now is the time for you to come up with some strategery on where to go to photograph them.

My Summer Project Per Madsen Rackit style CD Drawers

CD Drawers

As I promised in Sunday’s post, I wanted to show off my summer project—well, it took most of the fall too. I have six new drawers that fit in my Per Madsen equipment and record racks. For an amateur, they came out fairly nice.

Home Made CD Drawer - This is one of the six matching CD drawers that I built over the summer using the Per Madsen Rackit concept.
Home Made CD Drawer – This is one of the six matching CD drawers that I built over the summer using the Per Madsen Rackit concept.

We’ve been in our Congress house for five years, and the living room seemed a little unfinished, sort of like we were going to move again soon. I’m not planning on ever leaving this house until they drag me off to the crematorium, but Queen Anne has begun obsessing with HGTV shows recently, and that usually means that there’s a moving van on its way. I decided to work on this project to see if I can forestall that—“head her off at the pass,” as it were.

I’ve talked about our record racks before in this blog, and we’ve been pleased with how they work, but Per up and retired about a decade ago, so he’s not making new stock. Other cabinet makers have taken up the challenge, and on Etsy, you can see how their versions if you search for RackIt Record Racks.

Even though they’re not making CDs any longer, I wanted a net set. I had two of Per Madsen’s drawers, but my collection overflowed into several Video Tape units (talk about obsolete), so it made for a mash-up of sizes. After mulling the problem over for a couple of years, I modified his design into something that works better. The first change that I made was to make the drawers out of half-inch Baltic Birch plywood instead of the 1/8″ that he used. That meant that I’d lose space for 3 or 4 CDs, but I made more units. The second difference is that I used dark hardwood for the drawer fronts. This batch was made from Tzalam—a species that comes from Mexico and Central America and is not on the endangered list. Besides, it was on sale, so I bought enough lumber for the drawers and a future top when I get to it.

I wanted to use ball-bearing slides for the drawers, but they don’t come in a 14” length (12” or 16” are the common choices. I found this out after I completed the stile-and-rail sides, so I had to insert panels for a place that the slide’s rear screw could mount. If I were to start over, I’d use Baltic Birch plywood for the sides (they’re hidden anyway) or mount the slides underneath the drawers and modify the bottom rails.

Installed Drawers - the six drawers installed in the entertainment unit.
Installed Drawers – the six drawers installed in the entertainment unit.

I’m satisfied with the results, but I’d do it differently next time, like any craftsman. As for their worth—the originals sold for a couple of hundred dollars, and that means I made these for less than minimum wage. The bright side of building these drawers—I had to keep busy doing something while quarantined during this pandemic.

Until next time — jw

Box-boy Builds A Drawer

I’ve been neglecting my social media for a couple of weeks because I was busy in the shop making my entry for the Worlds-Most-Expensive-Shelf contest. It took me a little over a week to make it—which is fast by my standards, and I installed in the closet yesterday. I didn’t make it expensive on purpose. My pocketbook just suffers because of my cabinetry skills.

I made the shelf to hold my Keith Monks Record Cleaning Machine. You probably do not know, I’m a fan of vinyl records and I have a substantial collection. Any serious collector knows the advantages of record cleaners and they care for their records by running them through washers. We geeks know that even new records sound better when you wash the mold release from them, and if you depend on the used market for new vinyl, a cleaning machine is essential.

The Library of Congress uses a Keith Monks for their records and I found mine at an estate sale at a fraction of its original price. I’ve had it in three houses now but I’ve never had a proper place for it. Our shack in Congress has an ideal spot. The previous owners replaced the original air conditioner with a version that sits on an outside slab. That left the utility closet next to the stereo empty, so I claimed it before Anne converted it into another junk drawer. The closet is wide enough for the machine to clear with a half-inch to spare, so I set the machine on the bottom shelf while I thought about the shelf design. After two years, I worked down my honey-do list far enough that I made this project a priority.

It’s possible to machine clean a record while it’s in the closet, but it’s hard to see in the dark—especially in the evenings when I do most of my listening, so my design had to have a slide, and a stout one at that. The thing easily weighs 50 lbs. At our Deer Valley house, I cut a piece of ¾ inch plywood which supported the weight, so I knew the general size I needed.

Drawer pushed in.
It’s possible to use the machine while it’s inside the closet, but space is cramped.

Last week, I set about measuring and drawing up the plans. I had a sheet of Baltic Birch Plywood and a plank of Cherry hardwood I bought for another project that’s still on the to-do list. There were two pairs of 100 lb slides collecting dust on my workbench. With plans in hand, I grabbed the wood and set out to make some sawdust.

With such a tight fit, I cut the side supports so they would just clear the opening … or so I thought. After mounting the outside rails, they rubbed, so I cut a shim out of scrap quarter-inch plywood to properly space the rails in the opening. After they were in place, I carefully measured the space between them so the drawer would be a perfect fit. I cut the piece of cherry to size and milled box joints on the corners to control the frame size. Then I cut a dado and dropped the plywood into the frame. The width was perfect, but the depth was short. To fix that, I cut another strip of plywood and glued it in place. With that done, my shelf was square and the exact size. All that I needed to complete the project was to sand and finish and sand and finish and sand and finish for the next two days.

Drawer Extended.
At full extension, it’s easy to see and work the machine so that I can get the best results.

On Friday, my shelf was on my assembly table all shiny and pretty and I was proud of how it came out. I carefully measured and installed the rail inserts and took it in the house to slide it in place. It didn’t fit. The rails would insert but they wouldn’t slide in. So I did the most logical thing; I got a bigger hammer. With a lot of pounding it went into place and now it wouldn’t come out. “Maybe the shelf is too wide,” so I sanded the sided with very coarse sandpaper. I gave up after a while and left it till morning.

Starting fresh on Saturday, I shaved each side .05 inches. The slides inserted but they’d stop with a clunk, so I looked closely at them and I saw that during my bout with the big hammer, I had damaged them. They were bent and some ball bearings had come out of their races. Then I saw that the right side was not parallel; when I put the ¼ inch shim in, I misaligned the track so it was binding.

After installing the second pair, the rails worked smoothly, but now the shelf was too narrow from all the trimming. Now I had to take the rails off again and use shims to space them correctly. It was late morning before I slid the shelf in place and worked it in and out. For a millisecond I thought about pulling it apart to finish the sides, but I decided to save that for another year when I get a round-two-it. I’m looking forward to next Friday’s music session when I get to relax while listening to clean records.

Till then … jw

New Video Project – Record Racks Box-Boy Is Lose In The Woodshop

Regular readers of this blog already know that I’ve been trying my hand at making videos. I’ve published ten of them on YouTube so far. All but one of them has been autocross recordings using a GoPro as an in-car camera. The other one was a time-lapse session of the gang raising our carport so that we could park The Ritz under it. That video is the only one so far that’s gotten more than a hundred views because it appeals to a broader audience. (If you’re curious, you can view them here.)

I’ve finally come up with a storyline that I can use to make my first video in earnest. It happens to involve music and woodworking, which are two of my other interests. My video will be ‘how-to’ on making some record racks (yes, Virginia, they still make records).

To give you some background, I a fair-sized record collection. I bought my first album when I was in high school, and I’ve been adding to it ever since. I started storing them in a neat system designed by Per Madsen that he sold as part of his RACKIT system. His bright designs efficiently solved media storage while fitting together to make an attractive media center that put our stacked cinder-block shelves to shame. As I collected more records, I’d just order another rack and add it to the pile.

Per Madsen facks loaded with records.
The Per Madsen style racks store up to a hundred records neatly. Yes, they are in alphabetical order.

Out of the blue one day, I got an email from him saying that he was going to retire. He said that he wasn’t going to make any new units and that all of the existing stock was on closeout. I bought up all that I could use, and then they were gone; that was over a decade ago. In our old home, I bought some IKEA shelves that worked, but those didn’t fit in our new home.

We’ve been in this house for over a year now, and Queen Anne has harped about the two unpacked boxes of records still in the dining room. After staring at my media center one evening, I decided that if I couldn’t add more storage horizontally, I needed to stack them higher and decided to make my version of the Madsen racks. I have enough woodworking equipment to replicate everything but his joints. I believe he used hidden glued dowels, but I can get around that with another type of fitting that’s at least as secure. Another significant advantage of making my own is that I don’t have to use red oak. I can use any hardwood that I want.

There are abundant videos on YouTube featuring artisans far more capable than I. It amazes me how some of these guys (and women) produce intricate wood pieces, sometimes without seemingly measuring. I guess that comes with experience. So, my video will be how a journeyman goes about making multiple pieces of furniture that have to fit together precisely.

Per Madsen's rack design.
The rack design is two healthy rectangular ends connected by rails along the bottom and back.

The first step in this project will be measuring and dissecting Per Madsen’s design and make some working drawings. Then I’ll need to come up with an outline of the steps. Finally, I will lay out a storyboard of the shots before I do any filming. I’m guessing that it will take a month to shoot, but then there’s post-processing, so give me till summer before I post it on YouTube. My goal is to have a video that gets more than a thousand views. I’ll update the blog with progress.

Update 05/13/2020

If you’ve been waiting on YouTube to see this video, it never happened. I’ve decided that although I’m competent behind the camera, I’m a bumbling idiot on stage. But, I have completed some of these record racks, and I’ve had traffic because of this post. Here’s how I made my version.

My Record Rack Version - This is the finished version of my record rack - well except for the wire separators.
My Record Rack Version – This is the finished version of my record rack – well except for the wire separators.

I made some minor changes in my design. First of all, I use mortice and tenons for the mainframes. I believe that Mr. Madsen used dowels to connect his, and I don’t have a precise tool to do that. The large surface area of the tenons provides a strong glue-joint, but I pinned each corner with a walnut plug to be sure.

Second, I added a back rail and spaced them equal to the bottom rails. I was afraid that at my age, I would mix them up, so this way, they are interchangeable. I also changed the way they attach to the mainframe. Instead of two wood screws at each joint, I used cross dowels. That means the rails will rotate if forced, but once the records are in, they work fine.

Finally, I drilled holes in the stiles so I can connect units. The significant advantage of using cabinet connectors is that the stacks don’t get unsightly gaps. Without those, the whole grouping has a professional look.

I used birch instead of oak because I prefer the wood to stay white instead of the nasty yellow that you get with aged oak. Besides, with Danish design, Baltic Birch is a natural choice. If that’s not your style, the racks could be made from walnut, cherry, oak, or something more exotic if you have the money. I have the dimensions on pdf if you’re interested. Just contact me via the contact page.

Today, I’m building a set of CD drawers that fit into this system. I have three of the originals, but I never liked how they looked. I changed my design, so the CDs sit like books on a shelf, but with two rows. That makes it easier to flip through my collection. It works better for me. If anybody’s interested, contact me, and I’ll post photos.

Till then . . . jw

Frame Making Part II

Murphy’s Law strikes again (you really didn’t see that coming?), and as a result, my three frames turned into two. I’m generally pleased with how they came out, but as you would expect, there’s room for improvement. It’s that strive for perfection that keeps us going.

In the last post, I had concerns about getting the size right, because I already bought mats and glass cut to 28×20 inches. I could shave a little off of the mats, but not the glass. I wanted them to drop in the ¼ inch rabbet, but not be too sloppy. Figuring out the cut length of each side was straight forward. If you managed to stay awake in high school geometry, you’ll remember that the sides of a rectangle add up to 360°, so the four corners are 90°. The cut angle on the frame ends is half that, or 45°. The geometry teacher also went off on something called The Pythagorean Theorem, you know, the square of the long side of a right triangle is equal to the sum of the squares of the other two sides.

By now I’ve made Queen Anne’s eyes roll into the back of their sockets. Don’t worry, you don’t need to know any of that, nor do you need your calculator with a square root key. Just remember that 45° is the magic number where both short sides of the triangle are equal. Since the width of my frames from the rabbet to the outside edge is exactly ½ inch, I need to add ½ inch to the length . . . at both ends. In my design, the frames outside dimensions are 29×21 inches. Since I wanted them to fit loose, I added another 1/32 inch.

Now that I had all the calculations out-of-the-way it was time to cut some wood. The first thing it did was to set my saw’s miter gauge to . . . 55°, and made two 29 inch cuts. Then I laid them out on the table, and like a dork, I tried for fifteen minutes to figure out why they weren’t square.

After I discovered my mistake, I thought that I could salvage the two cuts by cutting them again for the short side. About my Incra miter gauge; . . . it’s very precise with stops that can be set to 1/10°. I’ve added a Incra fence to it that helps me make repetitive cuts, but it’s kind of thick and its measuring tape pivots in front of the miter gauge, so it needs resetting each time the angle changes. It’s simple enough to do; I just set the stop to 10 inches, cut a piece of scrap wood, measure the actual cut length, and then adjust the tape to match.

Cutting The Frame Sides
With the Incra miter gauge and fence, it’s easy to make accurate repetitive cuts. The trick is getting the set up right in the first place.

Now, I’m already recovering from one mistake and I’m mentally beating myself up, so I’m not thinking about if I change one thing, how it affects another, and I’m rushing. I set the miter gauge to 45° and double checked it and made sure all the fine adjustments were set to zero. I set the stop to 10 inches, grabbed a piece of scrap off the rack and began my test cut. As the blade goes through the wood, I notice that my brand new Tenryu carbide blade is also cutting off the corner of my Incra aluminum fence. At 55° the fence cleared the blade, it didn’t at 45°. Fortunately, the blade went cleanly through the aluminum without exploding, but I’m sure it took a beating in the process.

Missing Fence Corner
Notice the 45 degree angle cut on the gold fence. It wasn’t there a minute ago. Fortunately, the carbide tipped blade took the cut in stride.

I had to take a moment and step back for a breath and a few well placed words normally spelled with symbol keys. When gathered, I adjusted the fence to clear the saw blade, and cut another piece of scrap. After correcting the tape, I was ready to shorten my first two pieces. I ran the piece through the saw and realized that I held it against the fence backwards. Now it was too short.

Believe it or not, I actually did wind up cutting the rest of the pieces correctly. Once I had everything set it was easy. I just had to focus. And with the fence stop, I could take a cut off a longer piece, by cutting the first miter, flip it over and cut the other side. They came out perfect. As I said, I wound up with enough for two frames and some pieces I can eventually use for smaller frames.

Glueing Up The Frame
The jigs that I have let me glue up two corners of the frame at a time while the other corners are held in place with right angle aluminum corners. A better solution would be a clamp that added lateral pressure while holding the miter in place.

The next step was to glue the four sides together. I have some aluminum jigs to hold the corners together at right angles. They work really well except they don’t exert any lateral pressure to the joints. The glue has to set up without pressure. End grain joints are not very strong, so I planned on making a spline joint after they dried. That would be strong enough to hold the glass.

Cutting A Slot For A Spline
This jig was the first that I made a couple of years ago. I didn’t expect that it would take this long to use. It holds the frame upside down so a slot is cut into each corner.

After getting a table saw a couple of years ago, the first jig I made was one for cutting spline slots in frames. It’s simply two pieces of plywood attached to a couple of mesquite runners. It holds a frame (or box) at an angle so you can run it through a saw. Then you cut wood in 1/8th inch slices and glue them into the open slot. After they dry, you trim off the excess, sand and finish. Since this was the first time I used it, I set the depth of the saw blade too deep. It needs to be less than the thickness of the wood piece you’re slicing. I was using standard one by (4×4), so I shouldn’t go any deeper than 5/8 inch into the frame.

Inserting Spline Into The Corner Slot
A piece of wood, cut to the thickness of the slot, is glued in the corner to reinforce the joint. After it dries, the excess then trimmed and sanded flush.

Finally there’s the finishing fiasco. I wanted to have my frames ready for the Museum Show last week, so I used materials on hand. I wanted a black stain with a clear top coat. The local hardware only had oil based stains on hand and I use normally use a water based finish coat, so mixing the two isn’t possible. I decided I could spray some shellac and lacquer for the last finish and bought a couple of cans of both. When I put a coat of shellac over the black stain as a sanding sealer, it looked good . . . until I started sanding it. The sandpaper took off the shellac and most of the black stain. It looked retched.

I didn’t have water-borne black stain, but I did have a very dark brown. I mixed it with the acrylic sanding sealer in a one to one mix and brushed it on the frames. After it dried, I tried sanding it, and even that quickly got down to the base wood. The stain hadn’t penetrated the poplar enough to keep the color during sanding. As a last resort, I applied two coats of the colored sanding sealer letting the frames dry after each coat.

On close inspection, they look awful, but are good enough at a distance. Fortunately they weren’t lit up with a hot spotlight at the show, so they looked good in the dark. After the show, we hung the framed prints in the bedroom where they look just fine.

Finished Product
Well, . . . they’re finished until I get the process under control and make better ones. I wouldn’t sell this pair, but as prototypes, they do what I wanted . . . raise the print away from the wall and simply set off the image.

I’m going to try another type of wood on my next frames. I’m thinking about birch or alder. They’re in the price range of poplar and neither of the former has the green streaks of the latter. I’m leaning towards the birch, because I understand it’s easier to work with than the maple I’ve worked with in the past.

I’ll keep you posted as I learn more.

Till then – jw

Frame Making

In my last post, I talked about getting some framed prints ready for a Jury Review. I had three frames that I repainted and printed the images to fit them. Although they came out nice and I got a positive comments about  them, I’m not really satisfied with store-bought frames. They chip and dent rather easily and the wood they used is hard to re-finish.  Besides, the ready-made frames don’t come in the format that I want to use for some of my 16:9 landscapes.

Since I have woodworking tools, I’ve decided to try making my own frames. I’m relatively new to woodworking, but after a few YouTube videos, I convinced myself to give it a shot. The worst that can happen is that I waste time and a couple sticks of lumber.

I think photograph frames should be simple and not upstage the art. I like the thin metal kit frames, but on a large image they‘re out of scale. I also want the image to stand away from the wall, and not be on the same plane. I want a black color, but with some grain, so I want them stained and not painted.

Milled Poplar
Out of the three pieces of poplar that I had, I was able to cut six lengths for my frames. That should be enough to assemble three frames.

I had several pieces of poplar left over from other projects so I pulled them out and began milling them to size. To keep the frame simple, I used the ¾” edge for the front face and cut uniform strips 1 ¾” wide. The next step was to route a ¼ rabbit for the glass, mat and backing to sit in. Finally I rounded off the front faces with a ¼” radius. With the pieces all cut, I put a black stain on them today.

The frame profiles
I want the framed image to stand away from the wall, so I cut the pieces deep with a generous rabbit.

I’m going to give the stain plenty of time to dry, so I set them aside until Friday. Then, I’m going to cut the angles to length and glue them together. Since I already have the glass for them, I’m a little nervous that I cut them to the right size. To make sure they are, I’ll cut them a little large at first and sneak up on the final length until they’re perfect. I’ll start by cutting one and when I’m convinced I’ve got the measurements right, I’ll continue with the other two.

This is the poplar with two coats of black stain applied. After I cut and assemble the pieces, I'll put a coat of sanding sealer and a couple coats of clear finish.
This is the poplar with two coats of black stain applied. After I cut and assemble the pieces, I’ll put a coat of sanding sealer and a couple coats of clear finish.

More later this week.

jw