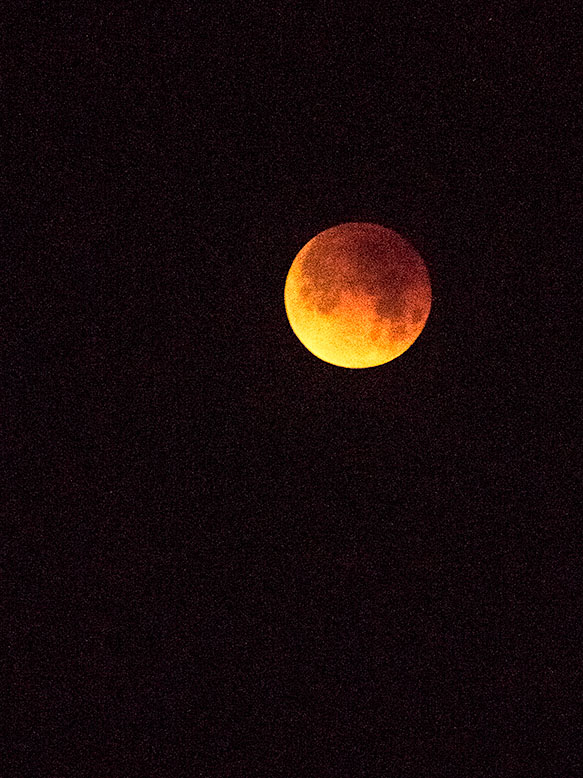
Some would call me a brave man. Foolish; maybe, but I’m not brave. You see, Queen Anne asked me to wake her at 5:00 am so she could see the Super-Blue-Blood moon this morning. It was another 100-year event that she didn’t want to miss. It seems to me that these once-in-a-life things happen often.
Super-Blue-Blood Moon – Another once in a lifetime event that we enjoyed on our walk this morning.
At the stroke of five, I did my duty by cracking the bedroom door and tossing a shoe in. When I didn’t hear bear growling, I entered and announced, “It’s started,” then I returned to my computer. Almost immediately, she was at my office door with her jacket on. “A walk? You want to go for our walk now?” I asked.
“Sure. Didn’t you?”
I put on my shoes and grabbed my coat and flashlight and we set off for our morning lap around the park. Venus was high in the east and Scorpio was rising out of the glow of the Phoenix lights. By this time, the moon already had a good bite out of the top as it began to enter earth’s shadow. As we walked, we watched the illuminated section shrink. It takes us about forty-five minutes to complete the two-mile trip and in the dark, I would shine the light before us checking for vermin. It was interesting to see how much light pollution our little community added with many LED ropes placed under trailers being the biggest culprit. They’re supposed to keep rodents from chewing the trailer’s exposed wiring, but I think their effectiveness is suspect.
By the time we got home the moon was only a red glow in the black sky. Rightly named the blood moon, I can see how our ancestors would have feared its omen. Anne grabbed a couple of lap blankets and me, a cup of coffee from the house. We pulled chairs out to the edge of our rear deck and watched while listening to the hoot of a great horned owl coming from nearby trees. We wanted to watch the moon emerge from the shadow, but it lost a race with dawn and to soon disappeared into the trees along the horizon. After it disappeared, we went inside and made breakfast so we could see instant replays on the morning news. All in all, it wasn’t a shabby way to start the day.
The Wickenburg Art Club photo classes have started and have brought some surprises that we hadn’t anticipated. We had more attendees than we expected. Over twenty people have shown up each week and they’re asking questions and fully participating. The other thing that surprised me was how many people want to learn how to use the camera on their smartphone. Stan Strange—our resident iPhone expert—conducted the phone class and he was surprised that in his session Android devices outnumbered the Apple phones three to one.
Since Stan didn’t have a lot of experience with the Android Operating System, I decided to do a little research to help out and because I’m ignorant about smart-phones I had to learn the basics. For me, that means getting the images out of the phone and into a computer so you can do editing on an adult size screen. With my old-guy eyes, I can’t see anything on those tiny phone screens. Besides, although I don’t own a smartphone—or any cell phone for that matter—Queen Anne does and she’s collected enough stuff in the last year that she was out of storage space, so we killed a couple of birds using one stick.
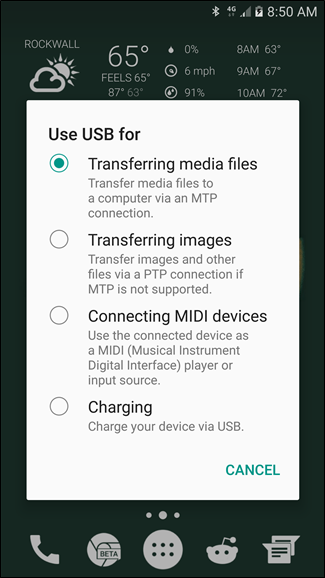
Android USB Configuration – Once you connect your phone and computer, you’ll need to root around in your configurations so the phone will allow files to be transferred.
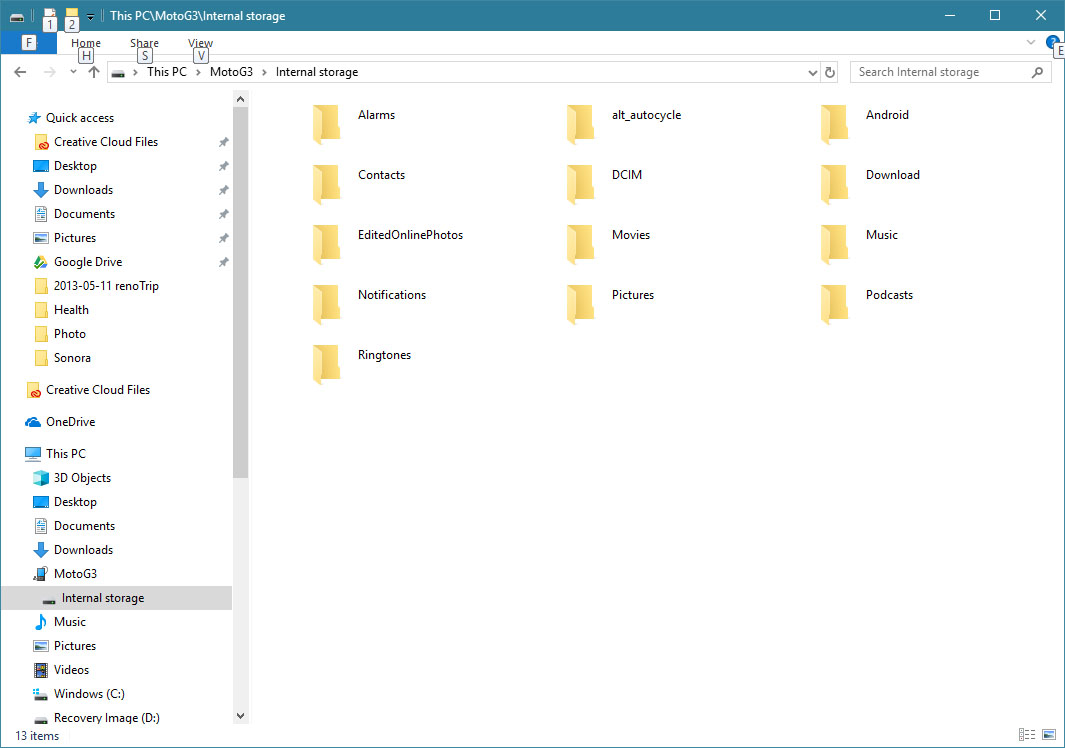
Having a computer background, I foolishly thought that all that I needed to do was to connect the phone and computer with a USB cable, but when I did that, I got a message in the file window saying, “This folder is empty.” What I didn’t know is that the phone has to be set up to talk with the computer. Anne’s phone was configured so the USB port could only be used for charging. This is an easy fix. While the phone is connected to the computer via USB cable, touch and hold the area at the screen’s top—where the time and battery icons are—then drag down toward the screen’s center. There should be a box labeled “USB Configuration.” If you tap on that banner, it will open an applet that exposes the settings to configure the port. For picture transfers, you want to select: “Transferring Media Files” Once you select that option the phone will expose the phone’s files to the computer. Now in Windows Explorer (if you’re using a Mac computer, you’ll need to get specific instructions elsewhere, but they’re generally the same) your phone’s data should show up (either as a phone or a storage device) as a new drive letter and when you open it you will see an item that says “Internal Storage” or something like that. Once you open that item by double-clicking it, there will be a display of the various folders inside.
Internal Storage – When properly connected, the phone’s internal storage is visible using Windows Explorer.
By consensus, camera manufacturers store images in the DCIM folder, either at the root level or, as in Anne’s phone, a sub-folder named Camera. Once you’ve found your images you are ready to copy or move them to your computer. Unless you have created a specific folder for holding your transfers, you can copy or move your photos from the phone to the computer’s Pictures file you can see in the left frame. You can either drag each image or manually copy and paste if that’s your preference.
App Folders – In the phone’s Internal Storage are the application folders. By consensus, camera manufacturers store images in the DCIM folder.
If you only shoot a couple of pictures a month, keeping your images in the Pictures directory will work, but if you’re like me and you’re shooting hundreds or thousands of photos a year, you may want to consider a better file strategy. That’s a topic that I’ll talk about in my next photo tip installment.
The winter solstice and the seasonal holidays are behind us. Instead of taking the tree down and packing the fake pine boughs away in the closet, we’re making strategery for next year. Judging from January’s schedule, 2018 will be a busy year.
One of my 2017 goals was to take part in four Art Shows. I thought that would be a big enough number to keep us busy throughout the year. We actually doubled the goal and finished the year doing eight shows. In 2018, I set the bar higher and set the goal at eight hoping to match last year’s success. With the New Year less than a week away, I’ve been framing prints for three January shows in Wickenburg.
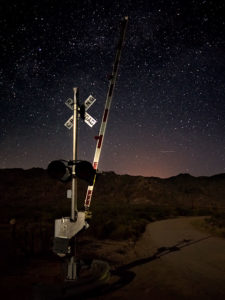
Alone and in the middle of nowhere, I found this crossing guard with enough moonlight on it to make a picture.On the high plains of Western New Mexico, puffy clouds cast a shadow on one of the cinder hills.
The biggest of the three is Wickenburg Art Club’s annual Double Takes exhibit. For several years now, the Art Club’s photographers submit photographs that the club’s sculptors, painters, and weavers use as creative inspiration. In January, the photograph and interpretation are displayed as pairs. This year, the newly formed Writers Group gets to gets to be part of the action. Artists have selected four of my photographs and I’m excited to see the results. The show’s grand opening is the evening of Saturday, January 6th from 1:00 to 4:00 pm. If you can join us, Queen Anne and I would love to see you. The show will run in the Clubhouse Main Gallery at 188 South Tegner Street through February 6th. I hope you can stop by and enjoy the show.
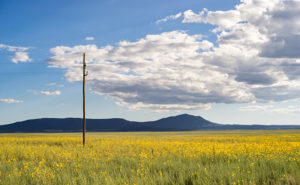
Just east of the New Mexico-Arizona border was a field of yellow flowers with Escudilla Mountain in the background.As the sun began to drop below the horizon, this beautiful thunderhead moved southward over the Weaver Range.
Then, starting on Thursday, January 11th, the Photography Group is hosting a series of eight basic photography classes. These sessions are open to club members and the public and they’re free. The informal classes will be held each Thursday at 1:00 pm in the Clubhouse meeting room and should last a couple of hours each. A different club member will lead each session and the classes cover a wide gamut of photo subjects including two meetings where you can bring in your camera or photographs and ask questions. The classes are intended is to take some of the mystery out of photography and help you understand your camera and the creative process. I hope to see some of you there.
It was nearly a century ago that Fred R. Barnard coined the phrase, “People say a picture is worth a thousand words.” I wonder if that statement is always true. Sometimes I look at photographs and they speak volumes, while others are silent. You may look at the same body of work and feel differently. That’s because we have different backgrounds, values, and tastes. We’re all unique. My point is that photographs, paintings, and art, in general, are a type of communication. They connect the artist with the viewer—sometimes across eons. We save art important to us on our refrigerators and in our museums because we like what they say.
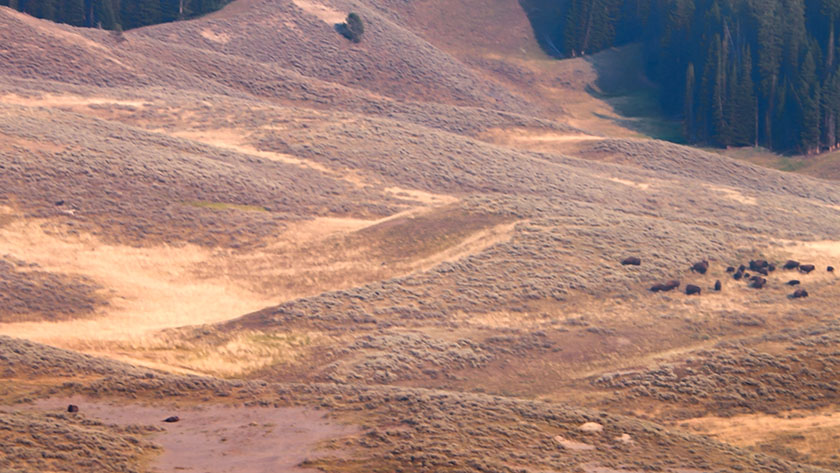
This is a photograph that would have thrown away but for the file name. It was taken at Yellowstone NP several years ago as we watched a pack of wolves try to separate a calf from the buffalo herd. Their efforts failed when the herd turned and stampeded into the Yellowstone River. I was in the right place at the right time with the wrong equipment. I only save this file because the moment was so great, but I’ve never published the image until now … as a bad example.
There are no language-like rules to help us understand this type of communication; it’s up to personal interpretation. Some messages are simple while others are cryptic. They may sooth or repulse the viewer. With most photographs—or snapshots at least—the story is simple, “At some time, I was here and this is what I saw.” There are millions of photographs just like that posted online and they have little interest to anyone but the person who pushed the camera’s button. When I was in a Pasadena City College class—more than a half-century ago—my professor called them Record Shots. They were a simple record of time and, on the spectrum of art, they belonged in the big pile on the left. On the opposite end of that imaginary line is a short stack of Masterpieces, and everything else fits in between. What separates the two extremes is how good the story is and how well it’s told.
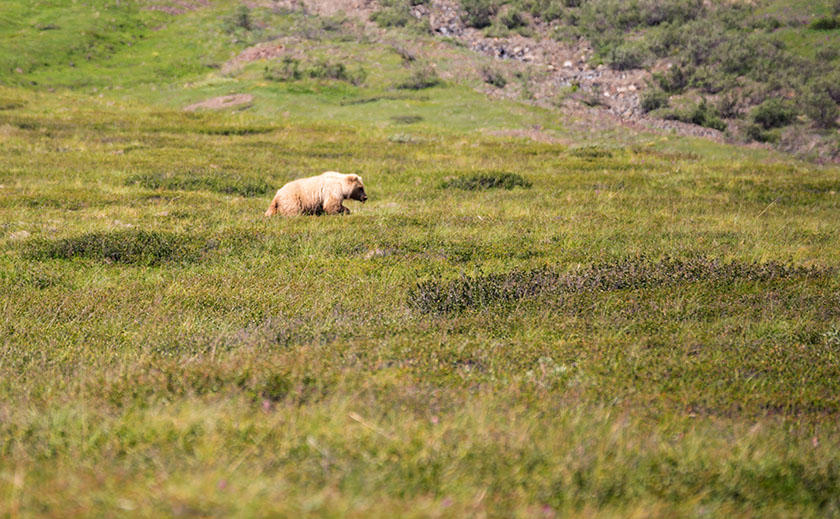
In Denali, a tour bus trapped us inside while we watched this grizzly sow trailed by three cubs. In the series of shots that I took, I didn’t get one that included all the family members. I finally gave up and concentrated on mom as she climbed out of a swale. I don’t consider it a prize shot, but definitely better than the one above. At least I’m progressing.
An artist’s job is to see a good subject and be able to skillfully capture it on a medium, photographers included. There are skills to help you along, but none are more important than thinking about what you’re shooting. I can plead guilty to mindless shooting, and I don’t know any photographer that isn’t also guilty. Unlike paintings, we create photographs in less than a second. We can squeeze the button and then walk away, never giving it a second thought. But when we look at the contact sheet or RAW image on the screen, we often ask, “What was I thinking?” The answer is, “I wasn’t.”
The idea that I’ve been leading up to is this: To move your work closer to the right-hand stack, begin to think about what you’re shooting. There is something in front of you that has caught your eye and it’s moved you enough to raise your camera and snap the shutter. Fine, go ahead. Maybe you’ll beat the Powerball odds and have one of those remarkable snaps that make the evening news. Odds are against you. But if you stop and think about your subject, you will improve your chances of capturing that lucky shot. What stopped you? Why did it make you stop? Think: “Is there something I can do to make the shot better?” Very few people shoot film any longer and certainly, you can afford to waste a few million electrons on extra frames. Here are some questions I have on my mental checklist:
Can I fill the frame—can I move in closer or zoom in to make the subject more prominent?
Can I get the subject to stand out better—if I walk to a different angle, does the subject become more prominent?
Could the light be better—do I have time for the light to change or should I come back when the light is better? This is difficult in travel photography because you’re usually on a one-way train.
Can I simplify the composition—do I need to change angles or wait for people (birds, cows, glaciers, etc.) to move, or maybe I need to pick up some garbage or close the bathroom door to hide someone on the toilet? Remember the discussion about scanning the entire viewfinder and deciding what to include.
Is there something that I’m leaving out that would make the shot more coherent?
Is the subject about to do something interesting—if I time it right, can I shoot when the subject jumps over a puddle?
To paraphrase a line that we saw on Mr. Robot last night. In the show, they were talking about the game of chess, but it works for photography as well. “If you see a good shot, look for a better one.” You’re probably thinking, “Great! Now I have to hang around for days for that to happen.” If you’re on assignment for National Geographic, you bet you do. That’s what you’re paid to do but unfortunately, neither of us works for them. Most of the time, what I’m saying takes an extra minute or two and, with practice, it eventually becomes second nature. With experience, you even save time because you don’t learn to omit the record shot.
Finally, I have a hard and fast rule: When you’re back at your desk, instead of a bunch of snapshots, you will have a photo series. Some better than the others. When you edit them, be ruthless and pick out the very best then get rid of the rest. If you can’t do that, keep them to yourself. Never show them to anyone. Only show your best. Of course, if you have an editor or art director that will be their job and you won’t have a choice. Then again, if you had an editor, you wouldn’t be reading this.
I’m a visual person. I learn quicker from one YouTube video than reading a stack of manuals. I like looking at pictures whether they’re drawings, paintings, or photographs. I look for several aspects of images; the locations, light quality, and creativity. As a photographer, I get inspiration from seeing other people’s work. I try to understand what the artist saw and learn, so I can blend those ideas into my work. As you would guess, a lot of frogs get tossed back in the water before a princess appears.
At times, when people find out that I’m a so-called photography expert, they’ll pull me aside to ask for my advice about cameras or shooting. I’m not a big equipment techie as I think most cameras are more capable than their users are, so when they ask me which body to buy, I just usually steer them to the brand they want. I really believe that newbies get more from learning technique first. Those skills transfer across camera brands. If my coaching is successful, the next thing that usually happens is that they treat me to a pile of their vacation photos (vacation, kids, pets, goats, etc. are all interchangeable here).
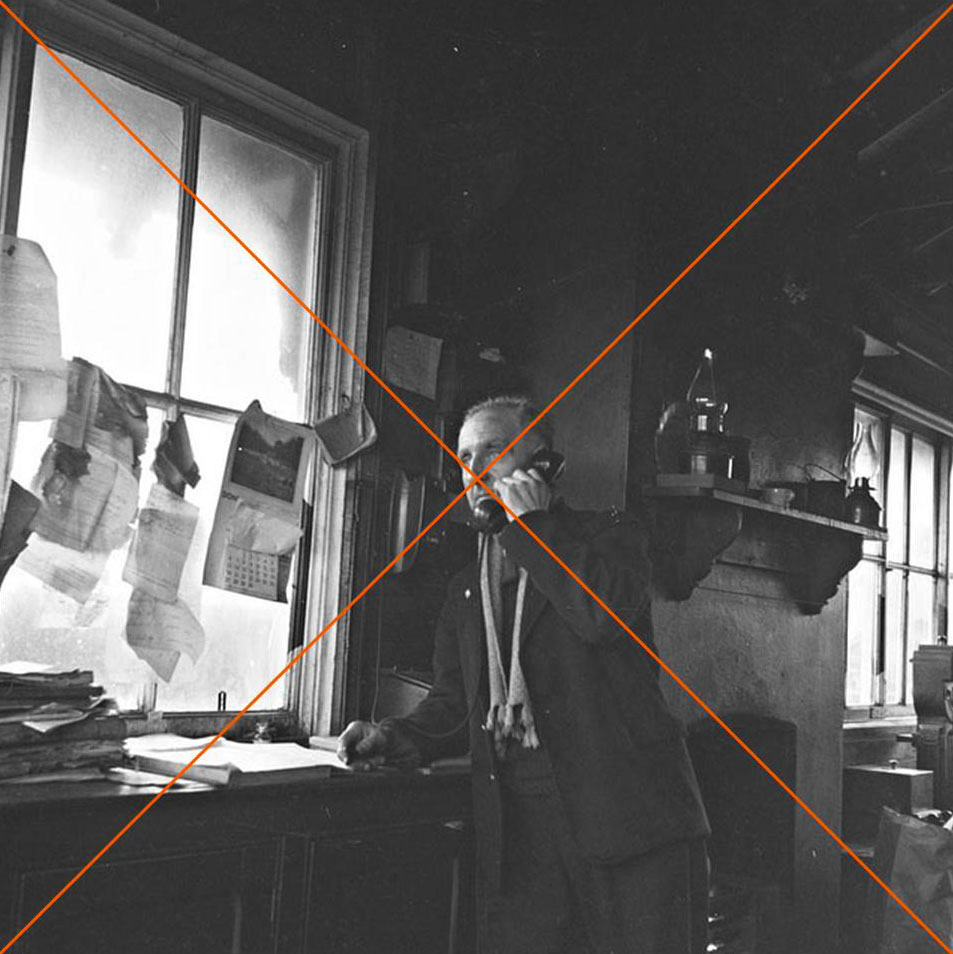
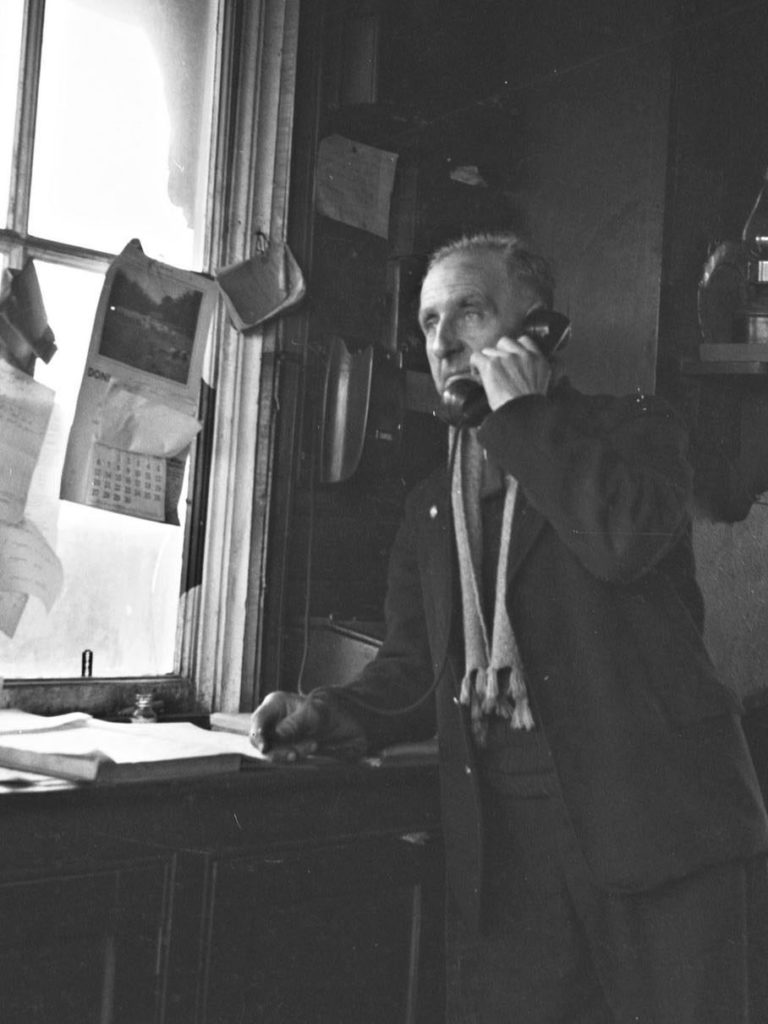
As I look through their image stack, I have so many suggestions that it’s hard to know where to start. A common thing I notice is subject placement, or more specifically, consistently centering the subject. It tells me that instead of composing, they’re aiming. I sometimes get in trouble when my stupid mouth automatically blurts, “Well, if you were using a gun, you would have killed (him, her, it).” As an example, I found an image on Flicker’s Public Commons section titled Christy Mahon on the Telephone. In spite of what I just said, I like this image; it works regardless of what I’m talking about, so I’ll use it to illustrate my point. As you can see from my markings, the poor ol’ railway signalman would have “taken-it” in the left nostril. The composition makes me wonder if the photo is a picture of the office or of Christy?
In this photograph from the archives, the photographer has centered the subject’s head. Is this the best subject placement for the story you’re telling?
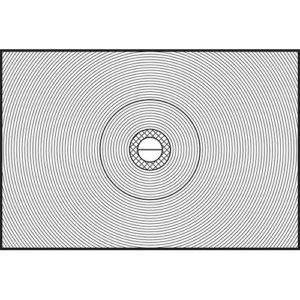
It’s easy to fall into this trap because cameras often have visual clues that trip you. The focus screen below is an example of what I mean. Although the circle is a focusing aid, it acts like the bull’s eye on a rifle scope urging you to center on your target. It’s a common beginner’s trap that photographers quickly learn to avoid.
Good or bad, many cameras have subtle cues that can encourage center placement.
So, what’s wrong with centering? Well, err … nothing, and if that’s what you want, then have at it. Centering is actually how we see. We go through life looking at a series of scenes on which our eyes stop for an instant before moving to the next. Our brain processes the information so fast that it seems to flow—like in a movie. We focus using our vision’s center, while our peripheral vision is fuzzy—out of focus. If we detect movement in the corner of our eye, our eyes instantly flick in that direction. For self-preservation, we need to know what was moving. If the movement’s not a threat, then all’s well and we relax. The brain is constantly centering the world around us. If a subject is centered and balanced in an image, we experience calm before we move on … or take a nap.
Now, if we move the subject off-center, our brain tries to restore equilibrium. In this micro-struggle we sense tension and that creates a wee bit of emotion. Remember back to your Psych 101 class when you learned that people remember things more intensely when there’s an emotional attachment. You want your viewers to stop in their tracks when looking at your work and that’s why artists have learned to intentionally use this tension in their work for centuries.
The point that I’m making is that the center of your viewfinder, screen, pad, paper, canvas, or whatever is unimportant. Instead, concentrate on how your subject relates to the edges or frame. Stop aiming and think about composing within that frame. Train yourself to scan the entire area and become aware of what you’re including in your composition. Equally important, is knowing what to leave out. Where are you placing your subject? Where is the horizon (if there is one)?
A question often asked at this point in this discussion is, “Where should my subject be if not centered?” Fortunately, it’s not a secret. Leonardo Da Vinci, Rembrandt, O’Keefe, et Al., used this technique. The ‘feel good’ spot is around the one-third mark, and recent scientific studies seem to confirm its validity (a topic I’ll save for another discussion). An accepted guideline is to divide your canvas into thirds—in a tick-tack-toe pattern. Where those lines intersect, are your composition’s power points and the most effective place for your subject. X marks the spot if you will.
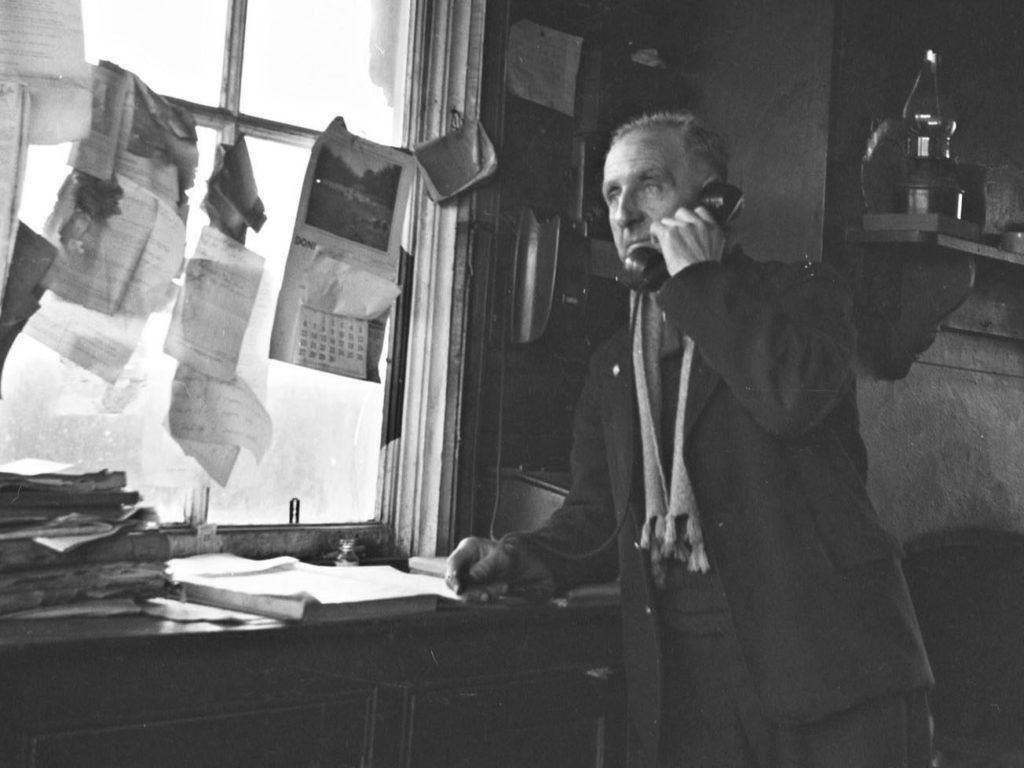
The shot is a vertical crop of the original moving the signal-man off-center. How does this story compare to the original?
Returning to the example photograph of Christy, I have two versions of the image cropped using the so-called Rule of Thirds; one horizontal and the other vertical. Look at the versions and see what you think. Each revision has the same two players; Christy and the depot. For you, how does the story change between the editions?
In this version, I’ve cropped the original image horizontally while leaving Christy off-center. Has the story changed? Is it for the better or is it worse?
In this post, we’ve discussed the camera’s viewfinder. Every camera has one and often it’s misused to aim the lens at the subject. I argue that it is a more powerful tool when used to compose your image as intended. A first step in seeing a photograph is intentionally placing your subject for the best impact on the story you’re telling. By choosing where to frame your subject, you’re beginning to see like a photographer. I know, the process seems cumbersome and tedious, but you wouldn’t still be here if you weren’t willing to try. I assure you that with practice, this skill becomes ingrained and you’ll stop thinking about it.