Storm-Lit Skies Over Date Creek Range Picture of the Week - Congress, Arizona

Golden-light silhouette of Joshua Trees with a dark, stormy sky over Date Creek Range in Arizona.
Storm-Lit Skies Over Date Creek Range – Caught in the golden embrace of the setting sun, the Date Creek Range and its Joshua Tree sentinel defy an impending storm. Can you spot the elusive rainbow?

In last week’s US 93 escapade, I put the pedal to the metal, racing the encroaching dark clouds to bask in the vanishing golden hour. I even detoured to Burro Creek campgrounds, where the only thing I found was…more clouds. Alas, as soon as I wrapped up my Burro Creek pit stop, those looming clouds won the race, swallowing the sun whole.

Disappointed, I set aside my camera’s relentless search for that perfect shot and started a leisurely drive home. No rush, right? Queen Anne was busy wallowing in precious metals at the jewelry store with her gal-pals, and I had miles of asphalt ahead of me. Soon enough, the highway carried me through the Joshua Tree Parkway, and then it began—Arizona’s version of ‘will it or won’t it’—raining from the sky.

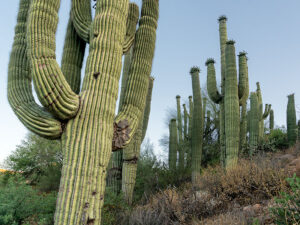
Yes, this arid state has two kinds of summer rain. First, there’s the gully washer, the frog strangler, the cob-floater, a torrential rain that I can’t even see the house across the street. This type of downpour is the VIP guest that shows up uninvited, fills up the washes, and turns rattlesnakes into accidental Olympians. You should see them. Snorkels on their snouts, doing the backstroke like they’re auditioning for ‘Snakes on a Swim Team.’

Then there’s the other kind, today’s specialty: a rain so indecisive it could give Hamlet a run for his money. It’s like the weather gods couldn’t agree, and we get this annoying drizzle that teeters on the edge of being useful. You find yourself in this wiper-limbo, perpetually toggling between ‘kinda need it’ and ‘oh, the horror of that screeching noise.’ The local washes don’t even bother to fill up; rattlesnakes smirk and break out their snorkels for practice laps, just waiting for the next aquatic extravaganza.

Just when I was about to award myself the title of ‘Arizona’s Rain Philosopher,’ the universe decided to show off. The sun, ever the dramatic artist, slipped beneath the heavy cloak of the western clouds, making a brief but stunning encore. It was as if it said, ‘You thought I was done for the day? Hold my solar flare.’ And just like that, the golden hour was back on stage for its final act.

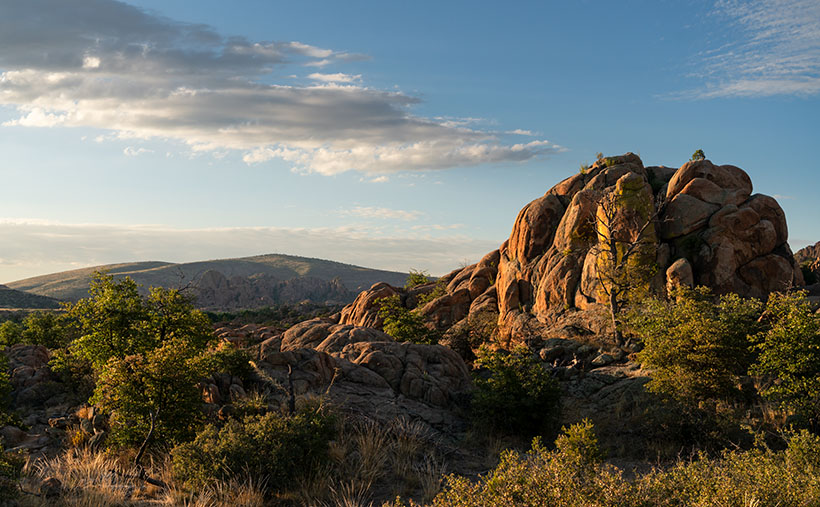
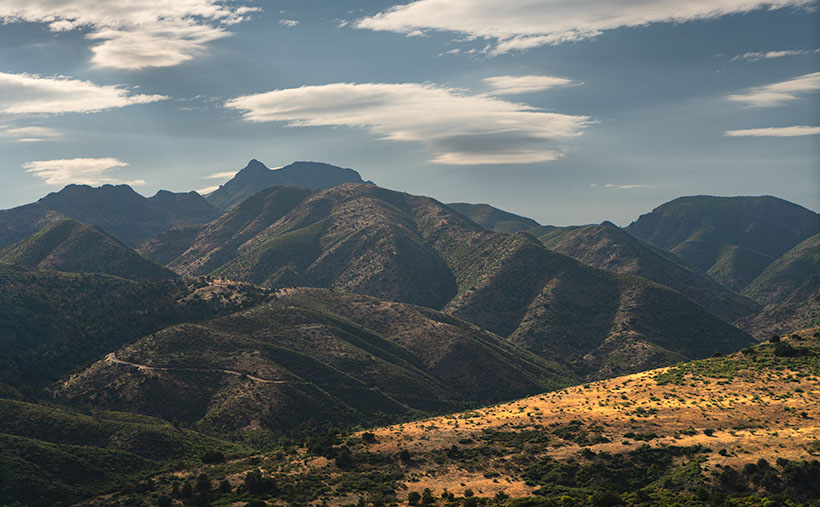
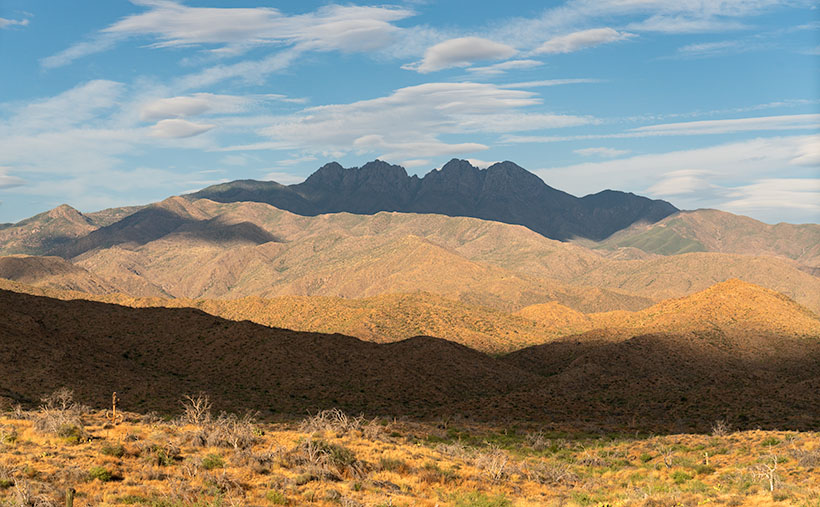
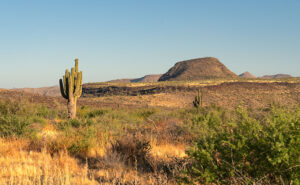
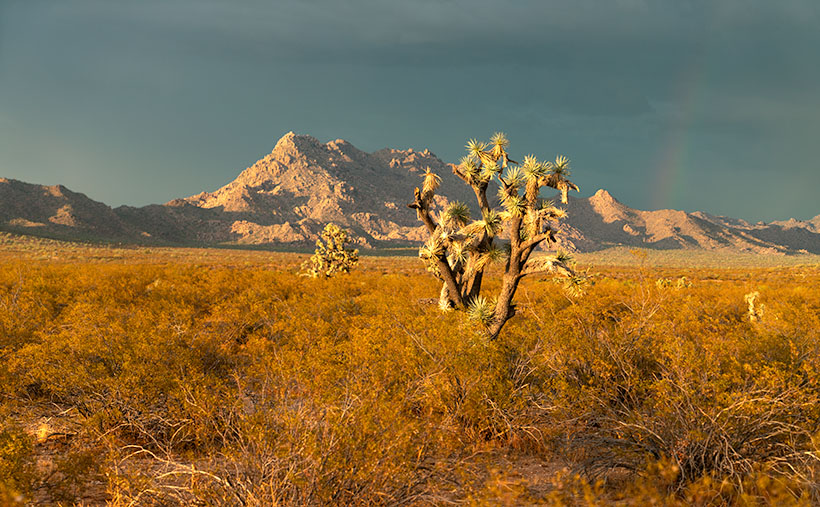
Dodging highway traffic and raindrops, I perched myself by a barbed-wire fence to capture what I’ve aptly named Storm-Lit Skies Over Date Creek Range. The Joshua Trees pop like jack-in-the-boxes from a golden sea of creosote, crowned by the glowing Castle Rock. For the eagle-eyed among you, squint a little harder. A subtle rainbow makes a cameo on the right of the taller Joshua Tree.

If you’re squinting at this on your smartphone, do yourself a favor—upgrade to a bigger screen. Trust me, this photo deserves it. You can see the bigger versions by browsing my website [Jim’s Page] or checking out my Fine Art America gallery [FAA Page]. Do make sure to swing by next week. The best is yet to come.

Till next time
jw

Techniques: Capturing Storms: The Drama Before, During, and After

Grab your umbrellas and wellies because today, we’re talking storms. And I don’t mean the kind you have with your spouse over who left the toilet seat up. We’re diving into the cinematic, the dramatic, the eye-candy kind of storms that would have made even Ansel Adams pause and say, “Well, would you look at that!”

Ah, the golden hour. That ethereal moment before the sky erupts into a Van Gogh painting or descends into gloom. But have you ever tried capturing a storm during this time? The universe throws you a curveball, saying, “Hey, here’s beauty and chaos, all wrapped in a corn tortilla of opportunity.” Remember Ansel Adams’ Clearing Winter Storm? The dude knew when to click that shutter.

You might think, “Jim, storms are just wet messes! How am I supposed to capture that?” Ah, my dry-weather fans, this is where things get electrifying. Capturing lightning requires some specialized equipment or mad reflexes. But the results? They’re shockingly good.

The storm has passed, but don’t pack up that camera yet. The sky now looks like hungover clouds meandering aimlessly, bumping into mountains, and trying to remember where they parked their cumulus cars. The aftermath can offer as many Kodak moments as the storm itself.

So, the next time you see those dark clouds looming, don’t just think about whether you’ve left the laundry out. Think about the once-in-a-lifetime shots that could be waiting for you. Embrace the wild mood swings of Mother Nature. After all, when the weather can’t decide, it might just be helping you make up yours about that next epic shot.

Do you have any of your own storm-chasing or weather-defying photography tales? We’d love to hear them! Please share your stories in the comments below, and let’s swap some epic weather adventures.

Awakening of the Granite Giants Picture of the Week

Golden morning light illuminating the rugged landscape of Granite Dells, with Glassford Summit in the background.
Awakening of the Granite Giants – A mesmerizing view of the Granite Dells under the soft glow of the morning sun, casting a beautiful light on the weather-worn rocks with Glassford Summit standing majestically in the distance.

My calendar page flipped to August this week, and that means that summer’s half over. In standard years, we would have been inundated with monsoon rains and antsy for the wet season to end. But, in this most unusual year, we’re waiting for the rains to start. We often see afternoon clouds here in Congress, Arizona, but they’ve only been a tease. The new month also means a new photo project, and I decided to stay in the high country—if you consider Prescott the highlands. We will wander the trails in the Granite Dells to capture its natural beauty and fill in my Website portfolio. The exposed cracked and worn boulders are common throughout Arizona, but this patch is the only city park.

The Granite Dells of Prescott, Arizona, is a geological wonder with around 1.4 billion years of history. Their formation began deep beneath the Earth’s surface, where molten magma slowly cooled and crystallized into hard, dense granite. Over hundreds of millions of years, erosion wore away the rock layers above, revealing the granite bedrock. Once exposed to the atmosphere, the granite underwent spheroidal weathering, a process that smoothed its corners and edges into the distinctive, boulder-like shapes we see today. This weathering, coupled with millions of years of further erosion, has sculpted the Granite Dells into their current, stunning form, with the boulders providing unique habitats for diverse flora and fauna.

Close-up study of Common Mullein stalks, brightly lit against a darker, out-of-focus background.
Majesty in the Ordinary – An intimate view of Common Mullein stalks bathed in the golden morning light, their unexpected elegance highlighted against the darker foliage of the Granite Dells.

We will start this month’s photo tour of the Dells with a long shot I took at dawn while hiking the Constellation Trail. At that hour of the morning, I thought I’d have the place to myself, but the parking lot was half full when I arrived, and true to form, I was in everybody’s way as I trudged along with my camera. I was in the middle of the loop when the sun emerged above the cloud layer along the horizon, casting a golden light on the rock formation before me. I can’t begin to tell you how delighted I was to see how it showed off the rounded shape and texture of the granite boulders. The Dells have a sense of anchor in their surroundings with the radio-tower-topped Glassford Summit. I call this week’s image Awakening of the Granite Giants.

We’re so glad that you joined us on the trail this morning. Throughout the rest of the month, we’ll share more images taken on tracks running through Prescott’s most significant city park. And you can count on us to dig up more interesting trivia about the Granite Dells. If you’d like to examine larger versions of Awakening of the Granite Giants, you can visit its page on my Website by following this link (Jim’s Website). You can also pixel peep on my Fine Art America posting by following this link (FAA Post). Be sure to return next week when we present another image of the intriguing Granite Dells.

Till next time
jw

Techniques: Restoring Dark Areas In Back Lit Images

In last week’s session, I showed how I manage shots to prevent blowing out the highlights when shooting in lighting conditions too broad for the camera’s sensor to capture—like the dawn, dusk, or back-lit situations. We concluded that discussion by predicting that the darker areas would be too dark to be pleasing. In this post, I will explain how I balance the exposure in Photoshop so the image looks natural.

Quick Selection Tool - I use this tool in the Tool Palate to select the areas that I want to work. It's the fastest and most accurate selection tool in Photoshop.
Quick Selection Tool – I use this tool in the Tool Palette to select the areas I want to work on. It’s the fastest and most accurate selection tool in Photoshop.

Artificial Intelligence (AI) has recently been in the news, with stories ranging from how it helps doctors find cancer in patients earlier to how it will eventually eat our brains—like Zombies. Well, Adobe has an AI-driven tool in Photoshop that enables you to select complex areas of your images. It’s called the Quick Select Tool. It seems to be mainly used to cut models—and their fly-away hair—from one background so they can be pasted into another. I use it to select the dark areas in my landscapes that need lightening. My process involves three steps: Selecting, Refining, and Correcting.

Refine Selection Workspace - With this tool, you can nudge and perfect which areas you want to be active within your adjustment layer.
Masking Workspace – With this tool, you can nudge and perfect which areas you want to be active within your adjustment layer.

After doing my color corrections and setting my Black and White points in my workflow, I try to balance my image’s exposure. Using the Quick Select (QS) Tool, I roughly select the area I want to work with, and that’s usually everything below the horizon. At this point, I’m not trying to be precise. After I drag the QS brush over the area I want to modify, I click on the Select and Mask button at the top of the workspace, which opens a Masking Workspace showing the selected areas of the image. I use a red mask set to 40% opacity to see which areas of the image will be affected by the following steps. Within the right panel, there’s a bunch of number settings that I’ve fiddled with over the years before settling on these: Radius=0, Smooth=2, Feather=2.5px, Contrast=25%, and Shift Edge=-2% (be sure to check the tiny little box tabled ‘Remember Settings‘ otherwise you’ll constantly have to reset these values). Using these values, I choose the Brush Edge Tool—the second from the top in the brush palate—and run it along the edge of the selected areas. What the AI does for me is pick out all of the little trees and other objects (like the leaves in the second photo this week) and separate them from the sky—an otherwise impossible task. Once I’m happy with the selection, I click ‘OK,’ the screen returns to the original workspace with the selected area now outlined with ‘dancing ants’—a term used to describe the animated dotted line showing the selection.

The next step is to correct for the darkness, and to do that, I choose a new Exposure layer from the list, which opens with the new mask in place. In the new layer, I use the slider to adjust the area to the lightness that looks good to me—usually between ¼ to a complete stop (.25-1.0), but with the sensor on my Sony camera, I’ve been able to lighten the dark areas by 2½ stops without causing a loss of detail in shadows or other unwanted digital artifacts (such as pixelation or banding).

Remember, by working with layers, you can go back and change your adjustments later. Also, remember to save your work frequently, especially after making significant adjustments.

Mount Ord’s Pine-Covered Heights Picture of the Week - Rye, Arizona

Mount Ord from the west side, showing its majestic peaks and pine-covered heights.
Mount Ord’s Pine-Covered Heights – Behold the awe-inspiring Mount Ord as it stands tall, adorned with lush pine-covered peaks. The afternoon sun casts its warm glow, revealing the rugged beauty of this majestic mountain.

Welcome back to the final episode of our Mazatzal Mountains tour. This week, our magic bus has made it over the last mountain pass, and we’ve stopped in Rye, the quaint community nestled at the bottom of the final grade leading to Payson. Here, the Beeline Highway exits the Mazatzals, bidding farewell to the majestic mountains that have enchanted us throughout our journey.

This week’s featured photograph, Mount Ord’s Pine-Covered Heights, captures the awe-inspiring grandeur of this majestic peak. Standing tall at 7,128 feet, its proud summit is crowned by a lush and verdant pine forest, gazing serenely at the world below. Mount Ord’s presence commands the landscape like a sentinel guarding the horizon. While it may not claim the title of the tallest peak in the Mazatzal Range (that honor goes to the 7,903-foot Mazatzal Mountain hidden behind the camera), being the highest point in Gila County is no small feat—perhaps deserving a participation trophy for its natural splendor.

Near the mountain top, the dark green foliage is an honest-to-goodness pine forest. It’s a sight to behold, and, unfortunately, a locked gate restricts access to this cool, refreshing forest on the unpaved service road leading to the summit. However, the image allows us to appreciate the beauty of this hidden gem from a distance.

Another fascinating feature in the photograph is a rugged and dramatic limestone layer emerging from the Earth’s embrace, seemingly carved by the hands of ancient giants. These yellowish rocks bear the story of a primordial ocean, etched into their very essence through eons of geological transformations. This layer of limestone formed millions of years ago in the sea and was later thrust into its current location during the continental crash that shaped the Rocky Mountains. This geological history makes the Mazatzals a part of the fender dent of that ancient collision.

Close-up of an exposed limestone ridge, showcasing its jagged and fractured formations.
Jagged Elegance: The Thrust of Limestone – Intricate and sharp, the exposed limestone ridge reflects the Earth’s geologic history. Bathed in the warm glow of the backlit sun, this natural sculpture reveals the forces of nature at work.

The second image we’ve posted this week is a closer look at the limestone layer on the west side of the highway. One particular jagged piece looks like a shard of glass ready to be used in a bar fight. I’ve also captured a beautiful Claret Cactus in full bloom for those seeking variety beyond the rocks.

Close-up of a claret cactus with its vibrant, sunlit flowers in full bloom.
A Burst of Color: Vivid Claret Cactus Flowers – Midst the desert landscape, the claret cactus graces us with its vivid flowers, glowing like radiant gems in the sunlight.

We hope you’ve enjoyed our magic bus excursion through the Mazatzals and that you’ll appreciate the beauty of these mountains, even more the next time you drive up to Payson. As always, I invite you to view larger versions of “Mount Ord’s Pine-Covered Heights” on my website by following this link [Jim’s Website] or on Fine Art America using this link [FAA Page].

Next week, prepare to venture off the beaten path as we leave the comfort of our magic bus behind. In embracing cooler climes and untouched wilderness, we’ll embark on an invigorating hiking adventure to uncover the hidden gems of nature’s gallery.

Till next time,
jw

Techniques: Mastering Back Lighting

In photography, an outdated rule advises shooting your subject with the light behind and to the side of the camera. While this approach works well in about 80% of cases, there’s still the other 20%—those tricky backlit situations. Today, I’ll share how I tackle such challenging conditions during the shoot, and next week, we’ll delve into post-processing in PhotoShop to perfect these images.

A common concern in modern digital photography is preserving the highlighted details in a scene. Overexposing the highlights can lead to blown-out areas and loss of detail and information. Fortunately, many cameras, including mine, have a helpful tool to address this—the zebra stripes.

Zebra Stripes - The stripes are an exposure tool that warn you when the light is too bright for the camera sensor to capture.
Zebra Stripes – These are an exposure tool that warns you when the light is too bright for the camera sensor to capture.

Zebra stripes are diagonal lines that appear in your viewfinder, indicating areas where the light is too bright to be captured by the sensor. You can control when and where these stripes appear by setting the zebra threshold in your camera’s menu. For my workflow, I put the value to 100% to ensure a clear indication of potential overexposure.

Zebra stripes might appear in the sky or other bright areas when shooting in backlit conditions or during early morning or sunset. To tackle this, I slowly point my camera toward the bright area the stripes indicate until they disappear. This process helps me find the minimum exposure adjustment needed to avoid blowing out the highlights. Once the lines vanish, I half-press the shutter button to lock in the focus and exposure.

While holding the shutter button half-pressed, I recomposed the scene to my desired composition before fully pressing the shutter to take the shot. Finding the right half-press point takes practice, but with digital photography, you can afford to experiment and learn from your results.

Remember that when you review your shots taken using this method, the sky, and clouds might look perfect, but the ground could appear too dark with limited details. Don’t worry; next week, we’ll explore post-processing techniques in PhotoShop to enhance these images and achieve the perfect balance.

Until then, practice your zebra dance and keep saving those highlights!

Saddle Mountain Silhouette: The View from Rincon Pass Picture of the Week - Sunflower Arizona

Majestic view of Mazatzal Range with Saddle Mountain silhouette at Rincon Pass.
Saddle Mountain Silhouette: A View from Rincon Pass – A picturesque landscape of the Mazatzal Range unfolds, revealing a symphony of layers and the iconic silhouette of Saddle Mountain at Rincon Pass.

Welcome back to the fourth installment of our Mazatzal Mountain tour via the Beeline Highway. With the current heat wave, our bus feels more like a scene from Romancing the Stone, filled with hot and sweaty people trying to stay cool with all the windows down. It’s so scorching outside that even chickens tied to the grill seek shade.

Of course, leave it to Queen Anne to pick the hottest week for our trip to the dentist in Algodones, Mexico. We left our comfortable haven in the Weaver Mountain foothills, where the air conditioner doesn’t run all night, only to be greeted by 115°F heat in Yuma, the lowest point in Arizona. Queen Anne’s flip-flops even melted away, forcing us to make an emergency shoe stop at a Zapata store. The trip’s highlight was the customs house with no waiting lines—small blessings in the sweltering inferno.

But enough of the heat woes; let’s escape to cooler grounds. This week’s destination is just a few miles north of our last stop, but we’ve left the Sonoran Desert behind. The newer section of the highway bypasses the shady beauty of Sycamore Creek, where there was always a respite from the sun. The creek lies on private property, and I imagine the owners are delighted to be rid of the traffic.

I pulled over near Iron Dike, a black rock mound, to capture this week’s featured image, Saddle Mountain Silhouette. In this shot, we gaze beyond the hilltop and the intricate jumble of mountains and canyons to Saddle Mountain—a fitting name for its distinct profile. Standing at 6529′, it doesn’t make the top ten of the Mazatzal’s tallest peaks, but its imposing presence seems to watch over the surrounding lesser hills.

Sycamore Creek flowing amidst lush greenery and tranquil waters.
Tranquil Waters: Sycamore Creek’s Verdant Beauty – Embrace the serenity of Sycamore Creek, where the gentle flow of water and vibrant greenery create a symphony of tranquility.

After capturing this shot, we took a refreshing detour down the old road, seeking relief from the heat under the cool canopy of sycamore leaves. Though the creek’s flow was modest, it still managed to cool the air, acting like nature’s swamp cooler.

We’re thrilled you’re along for the ride this week, and we hope to have you back next Sunday for the conclusion of our Mazatzals photo tour. Before we part ways, we invite you to visit my website and view the larger version of Saddle Mountain Silhouette by clicking this link (Jim’s Web Page) and exploring the second version on my Fine Art America site (FAA link). In the comments section below, we would love to hear how you’re coping with the heat.

Until next time,
jw

Techniques: The Advantages of Shooting in RAW

In the early days of digital photography, cameras were limited to saving images in JPEG format. However, modern digital cameras now offer the option to shoot in RAW format and JPEG, providing photographers with greater creative possibilities.

RAW files contain unprocessed and uncompressed data straight from the camera’s sensor. Unlike JPEG, which applies compression and processing, RAW files retain the original data, allowing for more flexibility during post-processing.

One of the significant advantages of shooting in RAW is its ability to provide a color depth of up to 16 bits per channel. The extra bits mean smoother gradations and a more accurate representation of colors in the final image. In contrast, JPEG images are limited to 8 bits per channel, which can lead to a loss of color information and visible banding in gradients.

RAW files are stored in an uncompressed format, ensuring that all the fine details and information captured by the camera sensor are preserved. In contrast, JPEG files are compressed, which can result in a loss of image quality and visible artifacts, especially in areas with high contrast or fine details.

RAW images can capture a more expansive color space, allowing for more vibrant and accurate colors in the final output. On the other hand, JPEG files, due to their compression and limited color depth, may exhibit color shifts and loss of detail, particularly in highly saturated or subtle color areas.

Shooting in RAW gives photographers more creative control over their images. It enables them to adjust to exposure, white balance, contrast, and other settings after you’ve taken the shot. This flexibility allows photographers to fine-tune their images to match their artistic vision and achieve the desired look.

When editing RAW images, the adjustments are non-destructive, meaning the original data remains intact. This safeguard ensures photographers can revisit their edits and make changes without compromising image quality. In contrast, directly editing a JPEG file can result in losing quality with each revision.

One of the significant benefits of shooting in RAW is the ability to convert and save images as PSD (PhotoShop) or TIFF (the Competition) files while retaining all the layers and adjustments made during editing. This feature allows photographers to maintain a master copy of their edited images, enabling future adjustments and re-editing without losing image quality.

While shooting in RAW is essential for maximum creative control and image quality, there are instances where photographers may need to save images as JPEGs. Converting the final edited image to JPEG format reduces file size and ensures compatibility for web uploads, social media sharing, or submission to specific platforms.

By shooting in RAW format, photographers have the flexibility to fully explore their creative vision and create stunning images that retain the true essence of the scene.

The Enigmatic Black Mesa: A Striking Basalt Landmark in Arizona Picture of the Week - Sunflower, Arizona

A view of Black Mesa, a pyramid-shaped basalt mountain in the Mazatzal Mountains
The Enigmatic Black Mesa – A stunning basalt pyramid rising majestically in the rugged beauty of the Mazatzal Mountains.

Welcome back to our exploration of the Mazatzal Mountains and the scenic journey along the Beeline Highway. As we continued our expedition, the changes in scenery required frequent stops for pictures. Although the scenery changes with each bend, over the years, the road has undergone its transformation—from a challenging back road to a modern highway.

My love/hate affair with the Beeline Highway began shortly after I arrived in Arizona half a century ago. At the time, I resided in south Scottsdale and had developed a passion for trout fishing. Despite my work obligations, I jumped at any opportunity to escape and make a Payson run. With a left turn at the end of McDowell Road, I could travel the picturesque route in just 90 minutes, reaching the tranquil Rim lakes where I would indulge in the serene beauty of nature and cast my fishing line.

However, weekends brought out the Beeline Highway’s dark side. State Route 87 north of Fountain Hills was a narrow, two-lane rollercoaster that could quickly diminish the joy of driving. While I found the route challenging and enjoyable under normal circumstances, the presence of holiday travelers towing trailers brought the fun to a screeching halt. A comfortable 90-minute journey became a tedious ordeal lasting several hours. These underpowered tow vehicles crawled up the grades at a snail’s pace, followed closely by a long line of frustrated drivers.

During my recent ride with Fred, I was pleasantly surprised by the Arizona Department of Transportation’s significant improvements to the Beeline Highway. The road has undergone a remarkable transformation. It now boasts four lanes for most of its length, except for a couple of long grades where they added a truck lane. The curve radius has been expanded, the shoulders widened, and other safety measures implemented, bringing the highway’s standard close to that of a freeway.

This week’s photograph was captured approximately 10 miles north of Four Peaks, featured in last week’s post. As we continue along the Beeline Highway, the elevation gradually increases, but at this particular spot, we find ourselves at the same elevation as Four Peaks Road. We haven’t gained much altitude because we recently drove over a pass at a large granite field, descending into another valley. Now, we’re beginning the ascent toward a second pass.

When I arrived at this location, the sun had just cleared the horizon, casting its soft light upon the mountaintops. It was the perfect opportunity to pull over and capture this week’s photograph of Black Mesa. Upon closer inspection of the photo, you can observe the traces of volcanism in black basalt trails running down the ravines on the mountain’s face. However, what truly caught my attention in this scene was the abundant presence of saguaro cacti on the southeast-facing slope. They outnumber the Palo Verde trees.

This is the last point on the road where saguaros thrive. Further up this grade, an imaginary frost line marks the limit for these majestic cacti to survive. As we ascend, the winters become too cold for the saguaros to endure. This splendid grove contrasts sharply with the sparse landscape and yellow grass we encountered last week. This week’s second photo was shot near where I stopped to look at a dense cluster of saguaros—the densest I’ve ever seen. It’s a testament to their resilience in this harsh desert environment, especially considering the recent wildfires that have thinned the surrounding landscape.

Close-up of a cluster of saguaro cacti in the Sonoran Desert
Desert Sentinels: Clusters of Saguaros Embracing the Sonoran Desert – A captivating ensemble of saguaros showcasing the beauty of the Sonoran Desert.

I hope you’ve enjoyed the ride so far. I appreciate your company as we explore the captivating landscapes of the Mazatzal Mountains. If you need a little break, I invite you to take some time to immerse yourself in the larger versions of The Enigmatic Black Mesa, available on my website (Black Mesa Webpage) or my Fine Art America upload (FAA Webpage). These images allow you to delve deeper into the beauty and details of this remarkable landmark. And remember, our adventure doesn’t end here. Join us next week as we explore the rugged Mazatzal Mountains on our way to Payson. There are more wonders to discover, and I look forward to sharing them with you.

Till next time
jw

Techniques: Mastering White Balance

Have you ever wondered at the wonky colors some of your photographs have? A simple answer could be the wrong White Balance adjustment. To the human eye and brain, a white sheet of paper looks white outside in the sun, in the shade, under house lights, or fluorescent bulbs. If you shoot using your camera’s raw data file, then you apply that fix in post-processing. But, if you’re shooting JPEGs or videos, the camera does the processing. Usually, cameras (and phones) have an Auto White Balance setting, but the color of a shirt, the distance of the subject, or even the wall color can easily fool it. It’s undependable.

Let’s look at it this way to keep this lesson short and sweet. The color of the sun we grew up and live with is white. If we lived on a different planet with a different sun, our brains would adjust to a new white in a few days. Scientists use the Kelvin scale as a way to measure relative color. It’s a numerical scale to measure the temperature of white light sources. A low Kelvin is warm and has a yellowish cast, so you add blue for balance. A higher Kelvin value is bluish and needs yellow for balance. For example, daylight is typically around 5500K, while tungsten lighting is around 3000K. So if you’re shooting outside, set your camera (or phone) to 5500k (or pick the sun icon), and if you’re using house lights, choose the light bulb icon (or around 3000k).

There are only a couple of exceptional instances. The first is in open shade—you’re out of the sun but under a blue sky, which are the conditions I had shooting this week’s pictures. Here, the light is being bounced off the sky, and the number needs to be higher to offset the additional blue cast. That Kelvin number is around 6500k, or the camera’s shade icon. The second exception is on cloudy days when there’s no blue sky. This is when you set the white balance to 6000k or use the camera’s cloud icon.

There is another infrequent situation that you may run into. It’s when you’re taking your eBay pictures in the garage, someone at a hospital, or a product in a retail store that has old fashion fluorescent tubes. They don’t emit red rays, so things look green. Not only do you have to adjust for the temperature, but you have to add the missing red. If your camera has a tube setting, you’re golden; otherwise, you’re alone.

If I’ve intrigued your interest and you’d like to dive deeper into white balance, numerous educational resources like this are available on YouTube (White Balance Video). You can also search YouTube for tutorials on “color correction” or “white balance” in your preferred post-processing software. There, you’ll find step-by-step guides and demonstrations to help you master this essential technique for getting natural color in your photographs.

Four Peaks: The Crown Jewel of the Mazatzal Mountains Picture of the Week - Fountain Hills, Arizona

Four Peaks in the Mazatzal Mountains: Majestic mountain range against a backdrop of lenticular clouds and blue sky.
Four Peaks: The Crown Jewel of the Mazatzal Mountains – A captivating view of Four Peaks and the dramatic play of lenticular clouds in the Arizona sky.

Yea! We’ve made it over the hump. Now we start whittling away the second half of 2023. But first, we must suffer through the insufferable—our monsoon season. As we enter the scorching summer months in Arizona, fleeing from the heat becomes a top priority for Phoenicians. We seek refuge in the pleasant mountain landscapes outside the city to beat the relentless triple-digit temperatures and humidity. But hey! I’m here to help, so July’s photo project involves one of the escape routes Phoenicians by the thousands use each weekend—the Beeline Highway.

It’s been at least a decade since I last drove Arizona State Route 87, but last month, my friend—and regular contributor—Fred asked me to help him fetch some trailer equipment in Heber—a small community on the Mogollon Rim. As he drove through the rugged mountains to Payson, I rode shotgun and thought, ‘I forgot how spectacular this scenery is. I need to come back with my camera.’ That’s when I decided to do July’s Mazatzal Mountains project and use the Beeline Highway for our trail. It sure beats hiking.

The name—Mazatzal—is a directive of a tribal word the Spanish picked up from the native Indians, Mazatzalli—meaning ankle bone. The Yavapai thought these mountains resembled an ankle when viewed from certain angles. Situated northeast of Phoenix, the Mazatzal Mountains stand as a rugged and formidable barrier, marking the gateway to the Rim Country. These majestic peaks serve as a scenic backdrop for Phoenicians as they embark on their journey to the Mogollon Rim and its surrounding areas. While the Mazatzals offer breathtaking vistas and a sense of natural grandeur, access to their remote backcountry is primarily reserved for avid hikers, horseback riders, and outdoor enthusiasts seeking a more adventurous experience. It’s important to note that due to the rugged nature of the terrain and limited facilities, the Mazatzals may present challenges in terms of accessibility, especially for individuals with mobility restrictions.

As we travel along the Beeline Highway, we traverse a physical distance and ascend through a tapestry of changing climates and vegetation. From the arid lowlands near Phoenix, we gradually ascend into cooler uplands adorned with diverse flora. We witness transition from cacti-dotted desert landscapes to lush pine forests and high-altitude meadows. This elevation-driven change in vegetation is a constant reminder of the varied ecosystems thriving within the Mazatzal Mountains.

This brings us to this week’s image—Four Peaks: the Crown Jewel of the Mazatzal Mountains. This image is my latest attempt to capture the highest point in Maricopa County. Well, they’re the highest four points in the county. From left to right, they’re named: Brown’s Peak (7657′), Brother Peak (7642′), Sister Peak (7572′), and Amethyst Peak (7524′). On the afternoon that Queen Anne and I stopped to take this image, it was windy, and the sky was filled with lenticular cumulus clouds (cirrocumulus clouds that look like lenses). As they crossed the sky, they cast shadows on the mountain, adding depth and drama to the composition. Without the shadows, the mountain would appear flat and featureless.

Thank you for joining us on this virtual journey through the Mazatzal Mountains. We invite you to share your experiences and memories of these stunning landscapes. Feel free to connect with us and the community as we continue exploring this magnificent region’s natural wonders. Stay tuned for our next installment, where we delve deeper into the heart of the Mazatzals.

Sugarloaf and Sycamore Creek: Impressive rock formation and desert landscape in Arizona's back-country.
Sugarloaf: A Gateway to the Majestic Mazatzal Mountains – When the Beeline Highway passes between Four Peaks and this landmark, you know you’re finally out of town and into the Mazatzals.

If you’d like to see a larger version of Four Peaks, you can do that in several ways. The first is to visit its Webpage using this link (https://www.jimwitkowski.com/newWork/fourPeaks.html). Miss Deb reported last week that the second method works only if you use a desktop computer. Follow this link (https://fineartamerica.com/featured/four-peaks-jim-witkowski.html) to my posting on Fine Art America. Please hover your mouse cursor over the image until a green square appears (they’re magically delicious). Select the area you want to inspect, and then click. A one-to-one preview window of that section will open on the screen.

Till Next Time
jw

Techniques: Embracing the Elements and Finding Drama in Nature’s Surprises

Photography is a dance with elements; sometimes, the most captivating images come from natural surprises. As photographers, we can embrace these elements and find beauty and drama in their presence. The photo of Four Peaks with its lenticular cumulus clouds and their resulting shadows is a prime example of how nature can add a touch of magic to our compositions. When faced with unique cloud formations, we may be tempted to wait for them to clear, fearing they will obscure the peaks. However, there is value in embracing the unexpected and capturing the scene as it unfolds. By incorporating the lenticular cloud shadows, the image takes on a new level of depth and intrigue. The shadows play across the rugged mountain terrain, accentuating its contours and adding drama to the composition.

When you find yourself amid nature’s surprises—a sudden storm, an unexpected play of light, or unusual cloud formations—embrace them. Explore their potential to add depth, drama, and a touch of magic to your photographs. Remember, breaking the rules or deviating from your initial plans can lead to some of your most captivating and memorable images.

Coastal Serenity: A Tranquil Afternoon at Spooner’s Cove Picture of the Week - Morro Bay, California

A serene view of Spooner's Cove beach and the hazy Santa Lucia Range in the distance.
Coastal Serenity: A Tranquil Afternoon at Spooner’s Cove – Experience the tranquil beauty of Spooner’s Cove, where gentle waves kiss the sandy beach under the hazy skies. The distant Santa Lucia Range adds a touch of mystique to this serene coastal scene. #Spooner’sCove #MorroBay #CoastalBeauty

I want to provide some relief from the daytime temperatures clawing past the century mark this week. Let me transport you to a secluded beach, where cool sea breezes caress your skin and the rhythmic sound of waves lapping against golden sand will lull your senses. In this week’s photo, we find ourselves just a stone’s throw away from our previous location, Montaña de Oro State Park, south of Morro Bay, where a picturesque cove straight out of the movies awaits your exploration.

This lovely piece of real estate is Spooner’s Cove, and I know how your mind works. You’re thinking, “It got that name because horny lovers come here to be alone and watch the offshore submarine races.” Well, you’re wrong. This gem, nestled along the coastline, derives its name from Captain Spooner, an early settler in the region. While historical records and accounts don’t offer many details, the Cove’s designation pays homage to Captain Spooner’s presence or influence in this coastal region.

Spooner’s Cove is an ideal spot for nature lovers and outdoor enthusiasts. The surrounding area offers various hiking trails, allowing visitors to explore the coastal bluffs and enjoy panoramic vistas of the Pacific Ocean. It is a paradise for photographers, with its breathtaking coastal scenery and opportunities to capture the interplay of light, water, and land. Whether you’re seeking solitude, a romantic outing, or a peaceful day by the beach, Spooner’s Cove offers a serene and captivating experience that showcases the beauty of California’s coastline.

In this photo titled Coastal Serenity, we are presented with a secluded beach gently kissed by the receding tide. As your gaze extends beyond the sandy shore, the town of Morro Bay discreetly hides behind the bluff, concealing its iconic rock that typically graces the horizon. Across the hazy backdrop, the majestic Santa Lucia Range emerges—the coastal mountains that stretch from Morro Bay to Carmel. Serenely tracing the base of these mountains lies the Pacific Coast Highway, a dream route for sports car enthusiasts seeking the thrill of a scenic afternoon drive.

I regret that Queen Anne and I didn’t have more time at the Cove. It would have been nice to bring a food basket and a bottle of wine for a romantic picnic on the beach. Who knows, that secluded moment may have resurrected our libidos, and we’d be carried away—perhaps channeling the legendary scene enacted by Burt Lancaster and Deborah Kerr in the 1953 film From Here to Eternity (YouTube clip: https://www.youtube.com/watch?v=Uzu_LezGQYQ ). But then, for the rest of the trip, I’d have had to hear her griping about all that sand in her bloomers—so, maybe not.

You have a couple of options to view a larger version of Coastal Serenity. Visit its dedicated webpage by clicking this link: (Webpage link: https://www.jimwitkowski.com/newWork/coastalSerenity.html). For a more detailed image examination, head to my posting on Fine Art America: (FAA link: https://fineartamerica.com/featured/coastal-serenity-jim-witkowski.html ). On the Fine Art America page, hover over the image to reveal a green square; clicking inside the square will grant you a one-to-one preview, allowing you to explore the intricate details of the photograph—an indulgence we photographers often call “pixel-peeping.”

We are delighted you joined us on this journey to Spooner’s Cove and hope you find solace in its beauty and tranquility. Stay tuned for next week’s installment as we draw our June project on San Luis Obispo County to a close. Keep your camera ready; the next breathtaking moment awaits your lens.

Till next time
jw

Techniques: Creating Depth with Atmospherics: Suggesting Distance in Your Photographs

Have you ever come across a photograph of mountains where the details appear to fade into the distance? Despite the lack of intricate features, the image still conveys a remarkable depth. This optical illusion is achieved through a technique known as atmospherics. The front mountains are rendered darker by utilizing varying tones and colors, while each subsequent layer of mountains behind gradually becomes lighter. This interplay of light and shadow creates a visual depth that immerses viewers in the expansive landscape.

Atmospherics, such as haze, fog, or mist, can be powerful tools in photography, enhancing the depth and suggesting distance within your images. This technique finds its roots in the works of impressionist painters, who often employed it to create a sense of three-dimensionality.

To maximize atmospherics, focus on weather conditions that offer the desired effects, such as misty mornings or hazy afternoons. These conditions can add a subtle veil to your photographs, softening distant elements and creating a gradual transition from foreground to background. The haze layers can suggest depth, guiding the viewer’s eye through the scene and immersing them in its captivating atmosphere.

When composing your image, consider how the atmosphere interacts with the elements in your frame. The distant mountains or shoreline can appear more subdued due to the atmospheric effects, creating a sense of distance and vastness. Leading lines or prominent foreground elements can further enhance the depth perception, drawing the viewer into the image and inviting exploration.

Experiment with different compositions and perspectives to emphasize the effects of atmospherics. Capture scenes where elements gradually fade into the distance, highlighting the layers of mist or haze. By balancing the interplay of light, shadow, and atmospheric conditions, you can create evocative photographs that transport viewers into a world of serene beauty.