It’s June already and our wall thermometer is reading over 100º so it’s time to shoot somewhere a little cooler. Queen Anne and I racked our brains to come up with a scene close enough for day trips, and we decided to focus on Jerome this month. It’s a ghost town close by, it is a mile high clinging to the side of Mingus Mountain, and it is cooler than here. I have personal recollections about Jerome that I plan on sharing later this week, but Sunday’s are reserved for new picture announcements, so let’s get on with it.
I’ve photographed Jerome several times over previous decades and I already have a library of the town’s familiar buildings, so on this trip, I wanted to look for details that give Jerome character—you know—the artsy pictures. I got some shots that fit that bill, but to set the stage for Jerome Month, I wanted to start with an image that would give people who have never visited the town an idea of its geographical placement, and I think this week’s featured image does that.
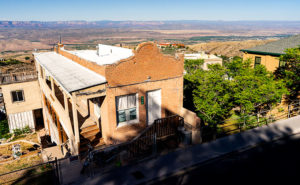
I call this image House with a View and it is one of the few private residences that has survived intact. It’s a modest home that is one story on the street but has three levels at the back. It’s a brick building indicating that it was home to a family of means—like a mine manager. To me, it shows how steep the slope of the lot it’s on and how much engineering it took to keep the house from sliding into Clarkdale below. Conversely, the upside of being tethered to a mountainside is the million dollar view of the Verde Valley two-thousand feet below—and to the north, the red rocks of Sedona. Can you imagine having cocktails on that veranda while watching the sunset on the southern edge of the Colorado Plateau?
You can see a larger version of House with a View on its Web Page by clicking here. I hope you enjoy viewing my newest entry and join Queen Anne and I as we show off Jerome this month.
Until next time — jw