As I promised in Sunday’s post, I wanted to show off my summer project—well, it took most of the fall too. I have six new drawers that fit in my Per Madsen equipment and record racks. For an amateur, they came out fairly nice.
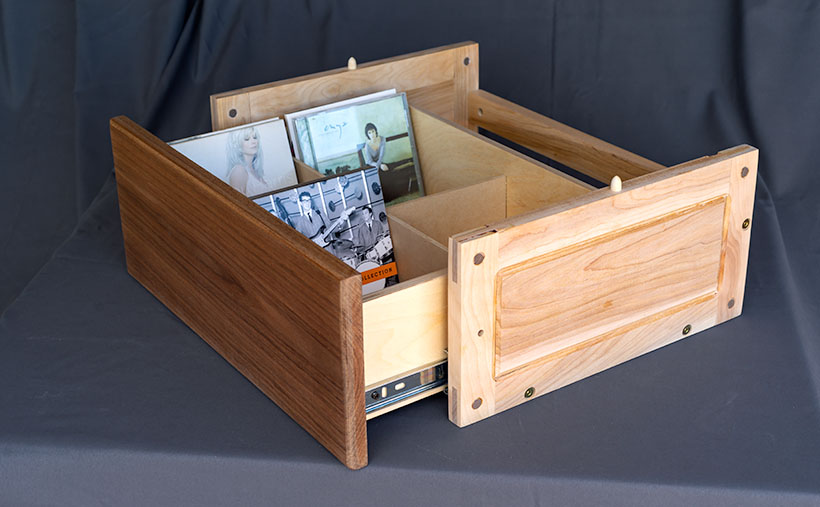
Home Made CD Drawer – This is one of the six matching CD drawers that I built over the summer using the Per Madsen Rackit concept.
We’ve been in our Congress house for five years, and the living room seemed a little unfinished, sort of like we were going to move again soon. I’m not planning on ever leaving this house until they drag me off to the crematorium, but Queen Anne has begun obsessing with HGTV shows recently, and that usually means that there’s a moving van on its way. I decided to work on this project to see if I can forestall that—“head her off at the pass,” as it were.
I’ve talked about our record racks before in this blog, and we’ve been pleased with how they work, but Per up and retired about a decade ago, so he’s not making new stock. Other cabinet makers have taken up the challenge, and on Etsy, you can see how their versions if you search for RackIt Record Racks.
Even though they’re not making CDs any longer, I wanted a net set. I had two of Per Madsen’s drawers, but my collection overflowed into several Video Tape units (talk about obsolete), so it made for a mash-up of sizes. After mulling the problem over for a couple of years, I modified his design into something that works better. The first change that I made was to make the drawers out of half-inch Baltic Birch plywood instead of the 1/8″ that he used. That meant that I’d lose space for 3 or 4 CDs, but I made more units. The second difference is that I used dark hardwood for the drawer fronts. This batch was made from Tzalam—a species that comes from Mexico and Central America and is not on the endangered list. Besides, it was on sale, so I bought enough lumber for the drawers and a future top when I get to it.
I wanted to use ball-bearing slides for the drawers, but they don’t come in a 14” length (12” or 16” are the common choices. I found this out after I completed the stile-and-rail sides, so I had to insert panels for a place that the slide’s rear screw could mount. If I were to start over, I’d use Baltic Birch plywood for the sides (they’re hidden anyway) or mount the slides underneath the drawers and modify the bottom rails.
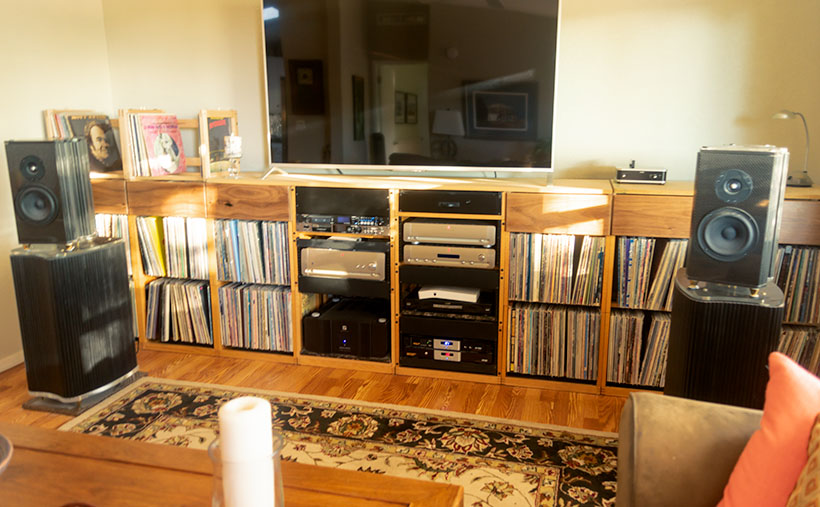
Installed Drawers – the six drawers installed in the entertainment unit.
I’m satisfied with the results, but I’d do it differently next time, like any craftsman. As for their worth—the originals sold for a couple of hundred dollars, and that means I made these for less than minimum wage. The bright side of building these drawers—I had to keep busy doing something while quarantined during this pandemic.
Regular readers of this blog already know that I’ve been trying my hand at making videos. I’ve published ten of them on YouTube so far. All but one of them has been autocross recordings using a GoPro as an in-car camera. The other one was a time-lapse session of the gang raising our carport so that we could park The Ritz under it. That video is the only one so far that’s gotten more than a hundred views because it appeals to a broader audience. (If you’re curious, you can view them here.)
I’ve finally come up with a storyline that I can use to make my first video in earnest. It happens to involve music and woodworking, which are two of my other interests. My video will be ‘how-to’ on making some record racks (yes, Virginia, they still make records).
To give you some background, I a fair-sized record collection. I bought my first album when I was in high school, and I’ve been adding to it ever since. I started storing them in a neat system designed by Per Madsen that he sold as part of his RACKIT system. His bright designs efficiently solved media storage while fitting together to make an attractive media center that put our stacked cinder-block shelves to shame. As I collected more records, I’d just order another rack and add it to the pile.
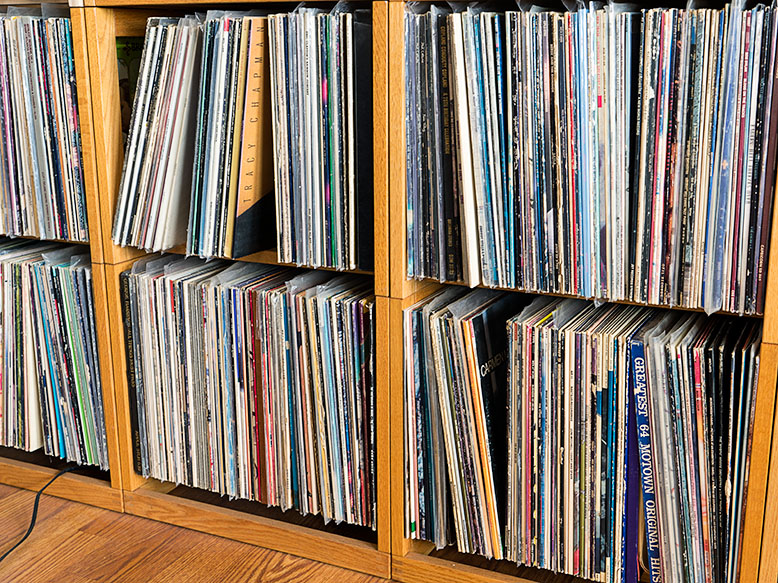
The Per Madsen style racks store up to a hundred records neatly. Yes, they are in alphabetical order.
Out of the blue one day, I got an email from him saying that he was going to retire. He said that he wasn’t going to make any new units and that all of the existing stock was on closeout. I bought up all that I could use, and then they were gone; that was over a decade ago. In our old home, I bought some IKEA shelves that worked, but those didn’t fit in our new home.
We’ve been in this house for over a year now, and Queen Anne has harped about the two unpacked boxes of records still in the dining room. After staring at my media center one evening, I decided that if I couldn’t add more storage horizontally, I needed to stack them higher and decided to make my version of the Madsen racks. I have enough woodworking equipment to replicate everything but his joints. I believe he used hidden glued dowels, but I can get around that with another type of fitting that’s at least as secure. Another significant advantage of making my own is that I don’t have to use red oak. I can use any hardwood that I want.
There are abundant videos on YouTube featuring artisans far more capable than I. It amazes me how some of these guys (and women) produce intricate wood pieces, sometimes without seemingly measuring. I guess that comes with experience. So, my video will be how a journeyman goes about making multiple pieces of furniture that have to fit together precisely.
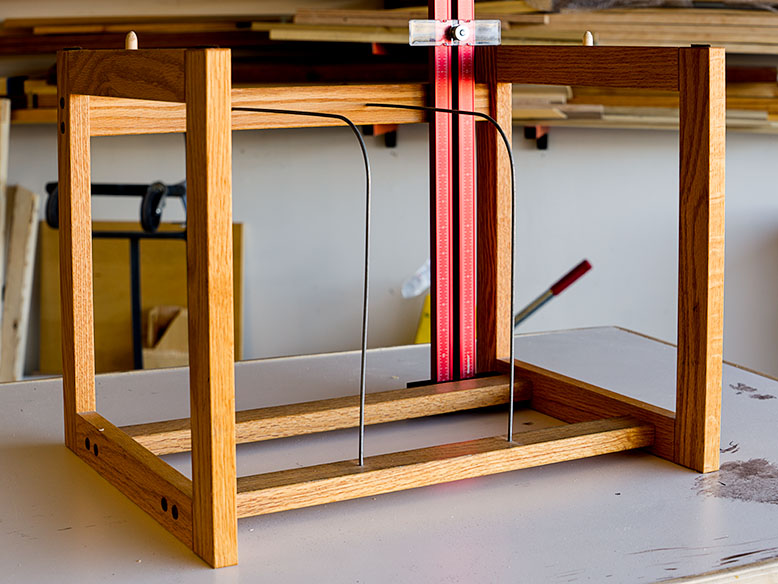
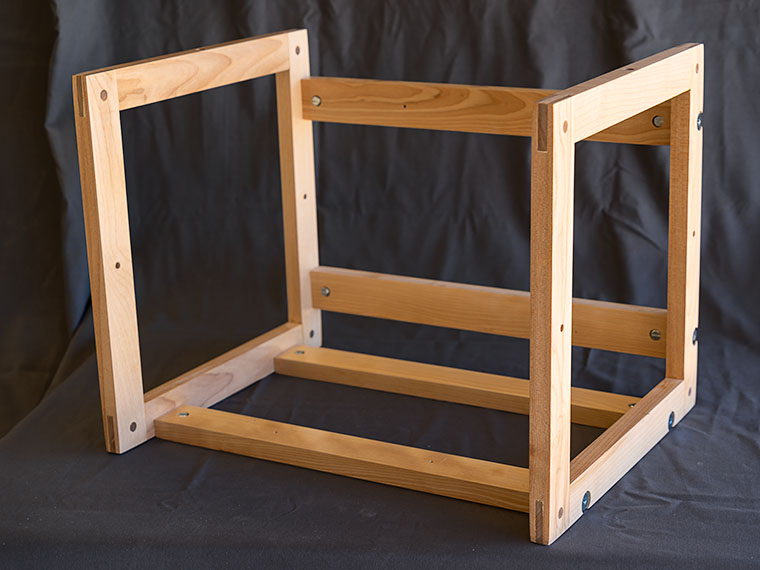
The rack design is two healthy rectangular ends connected by rails along the bottom and back.
The first step in this project will be measuring and dissecting Per Madsen’s design and make some working drawings. Then I’ll need to come up with an outline of the steps. Finally, I will lay out a storyboard of the shots before I do any filming. I’m guessing that it will take a month to shoot, but then there’s post-processing, so give me till summer before I post it on YouTube. My goal is to have a video that gets more than a thousand views. I’ll update the blog with progress.
Update 05/13/2020
If you’ve been waiting on YouTube to see this video, it never happened. I’ve decided that although I’m competent behind the camera, I’m a bumbling idiot on stage. But, I have completed some of these record racks, and I’ve had traffic because of this post. Here’s how I made my version.
My Record Rack Version – This is the finished version of my record rack – well except for the wire separators.
I made some minor changes in my design. First of all, I use mortice and tenons for the mainframes. I believe that Mr. Madsen used dowels to connect his, and I don’t have a precise tool to do that. The large surface area of the tenons provides a strong glue-joint, but I pinned each corner with a walnut plug to be sure.
Second, I added a back rail and spaced them equal to the bottom rails. I was afraid that at my age, I would mix them up, so this way, they are interchangeable. I also changed the way they attach to the mainframe. Instead of two wood screws at each joint, I used cross dowels. That means the rails will rotate if forced, but once the records are in, they work fine.
Finally, I drilled holes in the stiles so I can connect units. The significant advantage of using cabinet connectors is that the stacks don’t get unsightly gaps. Without those, the whole grouping has a professional look.
I used birch instead of oak because I prefer the wood to stay white instead of the nasty yellow that you get with aged oak. Besides, with Danish design, Baltic Birch is a natural choice. If that’s not your style, the racks could be made from walnut, cherry, oak, or something more exotic if you have the money. I have the dimensions on pdf if you’re interested. Just contact me via the contact page.
Today, I’m building a set of CD drawers that fit into this system. I have three of the originals, but I never liked how they looked. I changed my design, so the CDs sit like books on a shelf, but with two rows. That makes it easier to flip through my collection. It works better for me. If anybody’s interested, contact me, and I’ll post photos.