Lomaki Crater Picture of the Week

Lomaki Crater - When viewed from the far side, Lomaki's tall walls appear like the craters that surround the national monument.
Lomaki Crater – When viewed from the far side, Lomaki’s tall walls appear like the craters surrounding the national monument.

How did your Turkey Day go? I can see your eyes struggling to read these words, so at least you’ve come out of the tryptophan coma and gotten off the couch. That’s good. At least you didn’t turn into that weird uncle that kids are complaining about these days—or did you?

Hassayampa Inn - The four story red-brick hotel was opened in 1927 and is one of the State's historic inns.
Hassayampa Inn – The four-story red-brick hotel was opened in 1927 and is one of the State’s historic inns.

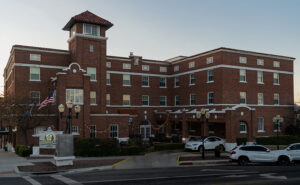
Queen Anne and I skipped our usual Denney’s Thanksgiving Day dinner. Instead, we drove up to Prescott and spent the night at the Hassayampa Inn. Since I’m a history freak, we thought it would be cool to dine at the historic hotel and stay for the night. The red brick hotel is far more charming inside than its block exterior suggests. Art Deco, Spanish Revival, and Territorial styles are all mashed together. Except for the scruffy Romanian bartender, I don’t believe anyone on the staff is over 30. They were so bright-eyed, cheerful, and eager to help that it was depressing.

Dinner—well, lunch, really—was uninspired. The special was a half of a Cornish Game Hen oven-roasted turkey style on a plate with a round lump of stuffing, another lump of mashed potatoes, and green beans. My favorite part of Thanksgiving dinner is gravy. Everything else on the plate supports the gravy, so we had to ask for more on the side. For dessert, the chef managed to duplicate a childhood recipe. My first bite of his apple pie brought a flood of memories of eating a Hostess fruit pie at the Circle K. The biggest sin of dinner was the omission of cranberry sauce molded in the shape of a can. An order of Buffalo wings would have been more satisfying.

With that aside, we had a great time in Prescott. We drank wine beside the lobby fireplace, snuck into room 426—where Faith, the ghost lives, walked around the town square, and ended the night by closing a karaoke bar. It’s not what you think; we literally got the bar shut down. We were in the middle of our version of I Got You Babe, when the health inspector bust through the door. He was there because of multiple complaints of howling dogs as far as three miles away. “That singing is not fit for human consumption,” he yelled to the bouncer. Then he took our mikes and told us to return to the hotel and stay in our room. He then padlocked the place until they got more safety training. I was devastated because Anne does a great Sonny Bono when she gets near the right key.

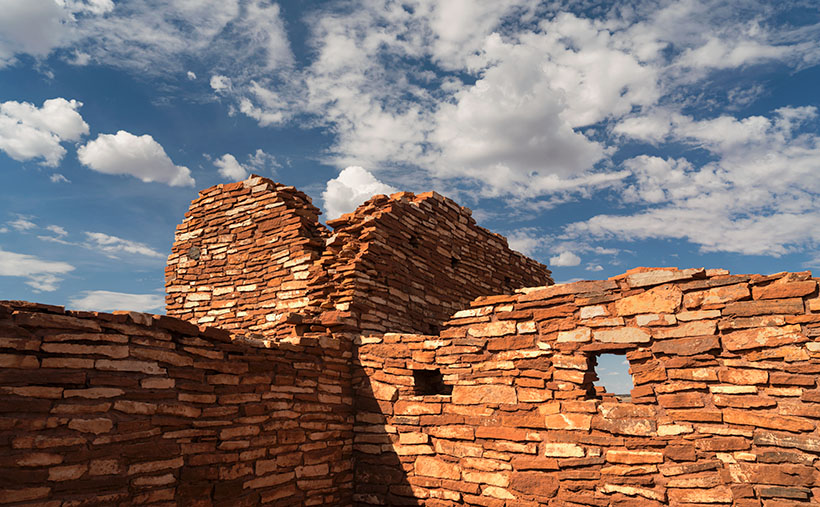
Enough of that; let’s talk about what you came for; this week’s picture. I call the image Lomaki Crater; it’s the last in our series from Wupatki National Monument. I took it on the far side of the pueblo ruin photo from a couple of weeks ago. With a bit of imagination, the tall wall corner resembles a crater like the ones we shot on our visit. There’s even a puff of smoke coming out of the cauldron. The bare walls are a mix of local limestone and Coconino sandstone. When they were built around 1100, they were most likely covered with plaster like the ruins in Walnut Canyon.

You can see a larger version of Lomaki Crater on its Webpage by clicking here. Next week, we start our final project of the year, and even I don’t know what it will be. So, when you come back next week, we’ll both be surprised at what I come up with. I’ll see you then.

Till next time
Jw

BTW:

No dogs were hurt in the making of this article, just my feelings.

Box-boy Builds A Drawer

I’ve been neglecting my social media for a couple of weeks because I was busy in the shop making my entry for the Worlds-Most-Expensive-Shelf contest. It took me a little over a week to make it—which is fast by my standards, and I installed in the closet yesterday. I didn’t make it expensive on purpose. My pocketbook just suffers because of my cabinetry skills.

I made the shelf to hold my Keith Monks Record Cleaning Machine. You probably do not know, I’m a fan of vinyl records and I have a substantial collection. Any serious collector knows the advantages of record cleaners and they care for their records by running them through washers. We geeks know that even new records sound better when you wash the mold release from them, and if you depend on the used market for new vinyl, a cleaning machine is essential.

The Library of Congress uses a Keith Monks for their records and I found mine at an estate sale at a fraction of its original price. I’ve had it in three houses now but I’ve never had a proper place for it. Our shack in Congress has an ideal spot. The previous owners replaced the original air conditioner with a version that sits on an outside slab. That left the utility closet next to the stereo empty, so I claimed it before Anne converted it into another junk drawer. The closet is wide enough for the machine to clear with a half-inch to spare, so I set the machine on the bottom shelf while I thought about the shelf design. After two years, I worked down my honey-do list far enough that I made this project a priority.

It’s possible to machine clean a record while it’s in the closet, but it’s hard to see in the dark—especially in the evenings when I do most of my listening, so my design had to have a slide, and a stout one at that. The thing easily weighs 50 lbs. At our Deer Valley house, I cut a piece of ¾ inch plywood which supported the weight, so I knew the general size I needed.

Drawer pushed in.
It’s possible to use the machine while it’s inside the closet, but space is cramped.

Last week, I set about measuring and drawing up the plans. I had a sheet of Baltic Birch Plywood and a plank of Cherry hardwood I bought for another project that’s still on the to-do list. There were two pairs of 100 lb slides collecting dust on my workbench. With plans in hand, I grabbed the wood and set out to make some sawdust.

With such a tight fit, I cut the side supports so they would just clear the opening … or so I thought. After mounting the outside rails, they rubbed, so I cut a shim out of scrap quarter-inch plywood to properly space the rails in the opening. After they were in place, I carefully measured the space between them so the drawer would be a perfect fit. I cut the piece of cherry to size and milled box joints on the corners to control the frame size. Then I cut a dado and dropped the plywood into the frame. The width was perfect, but the depth was short. To fix that, I cut another strip of plywood and glued it in place. With that done, my shelf was square and the exact size. All that I needed to complete the project was to sand and finish and sand and finish and sand and finish for the next two days.

Drawer Extended.
At full extension, it’s easy to see and work the machine so that I can get the best results.

On Friday, my shelf was on my assembly table all shiny and pretty and I was proud of how it came out. I carefully measured and installed the rail inserts and took it in the house to slide it in place. It didn’t fit. The rails would insert but they wouldn’t slide in. So I did the most logical thing; I got a bigger hammer. With a lot of pounding it went into place and now it wouldn’t come out. “Maybe the shelf is too wide,” so I sanded the sided with very coarse sandpaper. I gave up after a while and left it till morning.

Starting fresh on Saturday, I shaved each side .05 inches. The slides inserted but they’d stop with a clunk, so I looked closely at them and I saw that during my bout with the big hammer, I had damaged them. They were bent and some ball bearings had come out of their races. Then I saw that the right side was not parallel; when I put the ¼ inch shim in, I misaligned the track so it was binding.

After installing the second pair, the rails worked smoothly, but now the shelf was too narrow from all the trimming. Now I had to take the rails off again and use shims to space them correctly. It was late morning before I slid the shelf in place and worked it in and out. For a millisecond I thought about pulling it apart to finish the sides, but I decided to save that for another year when I get a round-two-it. I’m looking forward to next Friday’s music session when I get to relax while listening to clean records.

Till then … jw

New Video Project – Record Racks Box-Boy Is Lose In The Woodshop

Regular readers of this blog already know that I’ve been trying my hand at making videos. I’ve published ten of them on YouTube so far. All but one of them has been autocross recordings using a GoPro as an in-car camera. The other one was a time-lapse session of the gang raising our carport so that we could park The Ritz under it. That video is the only one so far that’s gotten more than a hundred views because it appeals to a broader audience. (If you’re curious, you can view them here.)

I’ve finally come up with a storyline that I can use to make my first video in earnest. It happens to involve music and woodworking, which are two of my other interests. My video will be ‘how-to’ on making some record racks (yes, Virginia, they still make records).

To give you some background, I a fair-sized record collection. I bought my first album when I was in high school, and I’ve been adding to it ever since. I started storing them in a neat system designed by Per Madsen that he sold as part of his RACKIT system. His bright designs efficiently solved media storage while fitting together to make an attractive media center that put our stacked cinder-block shelves to shame. As I collected more records, I’d just order another rack and add it to the pile.

Per Madsen facks loaded with records.
The Per Madsen style racks store up to a hundred records neatly. Yes, they are in alphabetical order.

Out of the blue one day, I got an email from him saying that he was going to retire. He said that he wasn’t going to make any new units and that all of the existing stock was on closeout. I bought up all that I could use, and then they were gone; that was over a decade ago. In our old home, I bought some IKEA shelves that worked, but those didn’t fit in our new home.

We’ve been in this house for over a year now, and Queen Anne has harped about the two unpacked boxes of records still in the dining room. After staring at my media center one evening, I decided that if I couldn’t add more storage horizontally, I needed to stack them higher and decided to make my version of the Madsen racks. I have enough woodworking equipment to replicate everything but his joints. I believe he used hidden glued dowels, but I can get around that with another type of fitting that’s at least as secure. Another significant advantage of making my own is that I don’t have to use red oak. I can use any hardwood that I want.

There are abundant videos on YouTube featuring artisans far more capable than I. It amazes me how some of these guys (and women) produce intricate wood pieces, sometimes without seemingly measuring. I guess that comes with experience. So, my video will be how a journeyman goes about making multiple pieces of furniture that have to fit together precisely.

Per Madsen's rack design.
The rack design is two healthy rectangular ends connected by rails along the bottom and back.

The first step in this project will be measuring and dissecting Per Madsen’s design and make some working drawings. Then I’ll need to come up with an outline of the steps. Finally, I will lay out a storyboard of the shots before I do any filming. I’m guessing that it will take a month to shoot, but then there’s post-processing, so give me till summer before I post it on YouTube. My goal is to have a video that gets more than a thousand views. I’ll update the blog with progress.

Update 05/13/2020

If you’ve been waiting on YouTube to see this video, it never happened. I’ve decided that although I’m competent behind the camera, I’m a bumbling idiot on stage. But, I have completed some of these record racks, and I’ve had traffic because of this post. Here’s how I made my version.

My Record Rack Version - This is the finished version of my record rack - well except for the wire separators.
My Record Rack Version – This is the finished version of my record rack – well except for the wire separators.

I made some minor changes in my design. First of all, I use mortice and tenons for the mainframes. I believe that Mr. Madsen used dowels to connect his, and I don’t have a precise tool to do that. The large surface area of the tenons provides a strong glue-joint, but I pinned each corner with a walnut plug to be sure.

Second, I added a back rail and spaced them equal to the bottom rails. I was afraid that at my age, I would mix them up, so this way, they are interchangeable. I also changed the way they attach to the mainframe. Instead of two wood screws at each joint, I used cross dowels. That means the rails will rotate if forced, but once the records are in, they work fine.

Finally, I drilled holes in the stiles so I can connect units. The significant advantage of using cabinet connectors is that the stacks don’t get unsightly gaps. Without those, the whole grouping has a professional look.

I used birch instead of oak because I prefer the wood to stay white instead of the nasty yellow that you get with aged oak. Besides, with Danish design, Baltic Birch is a natural choice. If that’s not your style, the racks could be made from walnut, cherry, oak, or something more exotic if you have the money. I have the dimensions on pdf if you’re interested. Just contact me via the contact page.

Today, I’m building a set of CD drawers that fit into this system. I have three of the originals, but I never liked how they looked. I changed my design, so the CDs sit like books on a shelf, but with two rows. That makes it easier to flip through my collection. It works better for me. If anybody’s interested, contact me, and I’ll post photos.

Till then . . . jw

Leonard Cohen – Leon Russell

Music is an important part of my life. I don’t have the talent to actually play an instrument, and as my grandmother once said to me, “You couldn’t carry a tune in a bushel basket.” I don’t even lip sync well. In spite of . . . or maybe because of that, I appreciate talented musicians.

My tastes deviate from the mainstream. I’ve commented on this blog about having found great radio stations on our Alaska trip, something seriously lacking in Phoenix. That wasn’t always the case however. In the early part of the 70’s under Bill Compton’s leadership, KDKB was a station that had a ‘free form’ radio format.  That was a radio style from San Francisco’s ‘hippie’ era. A set of music might contain The Beatles, followed by a classical cut, followed by Jessie Winchester, followed by someone obscure. Some of the sets were theme based while others were dependent on the DJ’s mood. It was KDKB that introduced me to Leonard Cohen and Leon Russell, both of which we lost in the past weeks. Today’s commercial and computer generated radio stations don’t teach anyone about music.

If you followed folk music, you knew the songs of Leonard Cohen. Numerous artiest covered his songs; Judy Collins to U2. His voice was an off-put to some, but I found it gritty and honest. Besides, the songs weren’t lullabies.

It was March 1976 that I attended my ‘best ever’ concert at Phoenix’s Celebrity Theater. It’s a 60’s holdover theater in the round where the stage slowly spins and most of the audience is close to the stage. Because of its size, the acoustics are easily overwhelmed by amplification (Larry Gatlin was the example I remember), but it works for an intimate group like Mr. Cohen’s. It was the last stop on his tour, so all the road’s technical bugs were worked out and the performers were relaxed. Each song brought enthusiastic applause and there were multiple curtain calls. After clapping till our palms blistered, Mr. Cohen returned alone to the stage and apologized that he had no more songs. Then he explained, “This is the last stop on our tour, and we too hate to see it end. We have nowhere to go tonight. Would you mind if we did the show again . . . from the beginning?” As I already said, the theater is easily overloaded with loud noise. The second show was even better than the first; I think it was because we knew we were witnessing something special. The concert finally ended a 3:18 am.

Leon’s music I enjoyed on KDKB, but never enough to run out and pick up an album at the time. A couple of years ago, I was flipping through the used record bins at the record store and happened across one of Russell’s albums in the ‘R’ bin. I thought to myself, “This was part of my life.” It was only three dollars, so I bought it. When I got it home and put it on my system, I was at first amazed at the production quality. Then the music started to flow it disappointed me that I’d waited so long to add it to my collection. Only recently I read about his career and how he contributed so much to the music industry.

It’s sad for me to look around to find those who’ve joined me on my life’s journey are falling to the wayside. It’s inevitable, I guess. If you’re a reader from a younger generation, none of this must seem important to you. Too soon, you’ll find people who influenced you will be gone from your life and you’ll find your immortality vaporizing (also, take care of your teeth).

Friday night is the night that the Queen lets me enjoy my scotch and listen to my music. She doesn’t have the patience to sit, listen and study the albums, so she either goes to the library or out to her girlfriends. Tomorrow is Thanksgiving. In addition to cooking a rotisserie turkey breast, I told Anne that my chore for the day was to assemble and tune the turntable. I already know Friday’s play list.

Till then – jw