Sipping with a View: The Panorama at DAOU Vineyards Picture of the Week - Paso Robles, California

A panoramic view of rolling vineyard hills under a clear sky from the DAOU Vineyards tasting room in Paso Robles, photographed by Jim Witkowski.
Sipping with a View: The Panorama at DAOU Vineyards – Gaze over the lush expanses of DAOU Vineyards, where every turn offers a view more stunning than the last, inviting you to a tasting experience graced with natural splendor.

I bought our first bottle of DAOU wine by accident. While choosing from the Safeway shelf selection, I looked a row above the cheap stuff and spotted a bottle of their chardonnay. I immediately noticed that it came from Paso Robles—our favorite wine region. It was more pricey than our house brand but not by much, and since it had been a rough week, I thought, “What the heck?” I grabbed it by the neck and placed it in the cart.

That was a couple of years ago, and since—when we wanted something a little nicer—we splurge on a bottle of DAOU. That’s why we were so tickled that a stop at DAOU was on our wine-tasting recommendation list this spring. Indeed, I thought we wouldn’t come home without buying the place out.

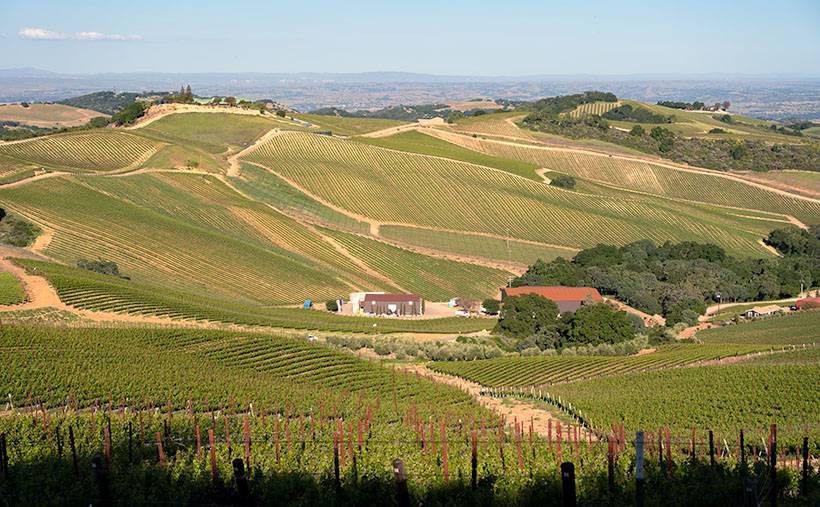
Driving up to the tasting room reminded me of the Clifton Hillclimbs of days past. A castle-like building sits at the summit of the family-owned mountain. Instead of orange pylon cones, the narrow, twisting road is lined with lavender, making the mountain look like it’s wearing a purple crown. The finish line is under an ornate wrought-iron arch at the top—just after a sharp right turn. After I parked the truck, I let the engine idle for a few minutes to let it cool, which gave Queen Anne time to stop screaming and hyperventilating. Our breaths were removed again when we stepped out of the truck—this time from the view.

Stepping out onto the hilltop patio of DAOU Vineyards, one can’t help but feel as if they’ve entered an exclusive retreat, a day spa designed not just for relaxation but for the epicurean at heart. With panoramic views that command the senses and an ambiance that whispers of indulgence, it’s a place where time seems to stand still, encouraging you to savor every moment. With their attentive grace, the staff are like sommeliers of comfort, offering tastings and a complete escape from the ordinary.

The distinguished sign marking the tasting room at DAOU Vineyards & Winery, inviting visitors to indulge in the art of wine, as photographed by Jim Witkowski.
Begin Your Journey: The Tasting Room at DAOU – The sign at DAOU Vineyards & Winery is not just a marker but an invitation to a world of exquisite tastes and shared stories.

For Queen Anne and me, this wasn’t just another stop on our wine trail; it was a moment of serendipity that had us seriously contemplating a permanent residence. The fusion of luxury and viticulture was intoxicating in its own right. And as the hot and cold running hostesses pampered us, each sip of DAOU’s exquisite wine seemed to erase any thought of a world beyond the vineyard’s embrace. It was here, amidst the laughter and clinking glasses, that we made our selections—wines that would forever remind us of the sun-drenched patio, the gentle breeze, and the feeling of absolute contentment.

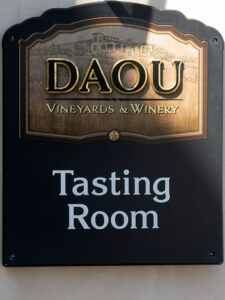
A visit to DAOU Vineyards is essential to any wine lover’s journey through Paso Robles. It’s an experience that transcends the act of tasting into an art form, set against a canvas of sweeping hills and skies that stretch into infinity. DAOU is renowned not just for its wines but for its ability to transport you to a state of awe with its mountaintop location, offering a view that could rival any famed landscape painting. Here, each glass is complemented by the vast vistas of the valley below, the verdant rows of vines narrating the terroir’s tale. The tasting room, an epitome of elegance, invites guests to savor each note of their carefully crafted wines wrapped in Paso Robles’ natural grandeur. This harmonious blend of sensory pleasures positions DAOU as a destination of choice for those seeking to indulge in the grand symphony of winemaking.

At the heart of DAOU Vineyards stand the founders, brothers Georges and Daniel DAOU, whose journey in winemaking is as rich and compelling as the wines they create. Their foray into grape cultivation was born from a shared vision to produce Bordeaux-style wines that would rival the world’s best. With roots stretching back to the mountains of Lebanon, the DAOU brothers bring a unique fusion of old-world charm and new-world innovation to their craft. They are known for their exacting standards, from fastidious vineyard management to the precision of their cellar practices, constantly pushing the boundaries of what’s possible in Paso Robles. At DAOU, it’s not just about maintaining quality but elevating it, ensuring that every bottle tells a story of excellence and ambition, a narrative that honors their heritage and the land they’ve come to cherish.

DAOU Vineyards has etched its name in the annals of fine winemaking with a portfolio of wines that speaks to the discerning connoisseur’s heart and intellect. Their flagship offering, “Soul of a Lion,” is a testament to the DAOU brothers’ father and embodies the winery’s pursuit of uncompromised excellence—a Cabernet Sauvignon that commands attention with depth and complexity. The “Reserve Chardonnay” marries the richness of Paso Robles fruit with the finesse of French oak, creating a harmonious profile beloved by those who favor a fuller-bodied white. Not to be overlooked, their “Estate Cabernet Sauvignon” stands as a pillar of their red wine collection, showcasing the perfect balance of power and grace that the region’s unique climate and soils can instill. These wines, among others, have propelled DAOU to the forefront of Paso Robles wineries, each vintage crafted not only to impress but to leave a lasting impression of the terroir’s potential.

I would love to tell you what bottles we bought during our DAOU visit, but as you can see from the prices below, we were well out of our league. But throughout our discussion of whether we could get adopted by the DAOU family, we enjoyed each of the five samples our hostess selected for us. Unlike our introduction to wine tasting—when the Carlo Rossi Burgundy came from the very jug you bought—these days, the samples served at the vineyards are the creme de la creme—If the wine you buy in a retail store were an AC Bristol, they tempt you with a Shelby Cobra here at the ranch. Had we the budget, here are the bottles we would have brought home.

    • 2021 Estate Chardonnay–$100.00. We liked this chardonnay. It had the same characteristics as our Safeway version but more of everything. Unfortunately, it was clearly out of our price range, so we passed and bought four bottles of the normal chard from Total Wine instead.
    • 2020 Reserve Eye of the Falcon–$75.00. This Cabernet Sauvignon is made from a blend of Cabernet Sauvignon and Verdot grapes grown on the valley floor. It had excellent color and a great taste of black fruits and aromatics.
    • 2021 Cuvee Lizzy—$89.00. This was another Bordeaux-style wine using the estate-grown grapes. It’s a blend that starts with Malbec grapes and is then blended with Petite Verdot, Cabernet Franc, and Cabernet Sauvignon stock. This was our favorite of the flight. If possible, we’d buy a bottle, but we haven’t found one in our local stores. If we want to enjoy a bottle, we must win the lottery and return to Paso Robles.

Beyond enjoying DAOU’s wines, the experience at the vineyards was breathtaking. Sitting in those red patio chairs with attendants passing frequently with another offering was the definition of indulgence. We would have stayed the night if we’d brought our sleeping bags. At the end of our visit, our wine guide noticed that I was using my USAA credit card to pay the tab. She asked, “Oh, you’re a vet?” When I confirmed that I was, she waived the tasting fees. If I had known that was possible, we might have sprung for one of their Eye of the Falcons.

We hope you enjoyed our month of wine offerings as much as we did. If you’d like to pixel-peep this week’s Image, you can visit the larger version on my website < Jim’s Web> or its FAA page <FAA Link>. Be sure to put us on your holiday calendar next month because we’re going to a place where no man has gone before—well, not many have been there. Join us next week when we take you off the beaten path—it’ll be an adventure, I promise.

Till next time, keep your spirits high and your humor dry
jw

Techniques: Leveling the Horizon on Sweeping Vistas

A common pitfall I’ve noticed in many online landscape photos is a slightly tilted horizon, which can unintentionally give the impression that the scene is off-balance. Remember, even the Pilgrims relied on the horizon to align their buildings at Plymouth Rock. Getting this right in-camera is critical, as it preserves the natural balance of your shot.

For those looking to ensure a perfectly level horizon, modern technology offers a helping hand. My camera, for instance, comes equipped with an in-built level in the viewfinder. As you adjust the angle, the level’s indicators align, turning green at the perfect balance point. It’s a small step in the setup but makes a difference, especially for scenes like the one in this week’s photo where the horizon plays a starring role.

If you capture a slightly askew horizon, don’t fret—software like Photoshop can come to the rescue. Use the ruler tool to draw a line along the horizon, then select Image> Image Rotation > Arbitrary. Photoshop cleverly calculates the necessary adjustment, automatically realigning your Image. A quick crop to tidy up any resulting white edges, and your photo is ready to impress with a horizon that’s true to reality.

BTW:

I released the fourth video in my On the road with Jim on YouTube on Friday. This one covers the images in my Sonoran Desert portfolio. As a subscriber to this newsletter, you get a sneak preview before I add any links. If you want to view my latest effort, you can use this link to get to the video: https://youtu.be/QDc9fXnccy8

New Drone Film – The Weaver Mountains The third film in my ongoing series of Arizona Desert Mountain Ranges

I have some excellent news this morning. I posted my third YouTube Video, and it’s ready for you to watch. I admit that in these troubling times, my films are little more than eye-candy, but I’m hoping they give you something nice to watch on TV for a change of pace.

The video is the third in my desert mountain series, and this episode features the Weaver Mountain Range. Those are the mountains that I see every day from my front porch, so in these times of stay-at-home orders, they were a convenient subject.

The reason that I’m producing these films is two-fold. When I look on the net for background on my weekly blog posts, I usually only find a two-paragraph entry in Wikipedia, and if I’m lucky, it may have a photograph or two (usually of historic value). I’m trying to capture these mountains in the ‘now’—a specific season and year—so viewers can see their aesthetic beauty as I do. I’m trying to fill the void of context that these lower ranges are missing. My other reason for these projects is purely selfish. Queen Anne said I could have a drone if it got me out of the house and left her alone. Done and done!

You can view this seven-minute film in several ways. The easiest is to click on the embedded link here in the post above. Or you can see it on your computer by typing this link in your address bar: (https://youtu.be/09knCZ9HY4c). And finally—and I think the best—is to watch it on your smart 4K TV by going to YouTube and search for Jim Witkowski (there are several, but I’m the old guy in the baseball cap). Then, navigate to my Arizona Desert Mountains channel. I hope you enjoy seeing it. Please consider sharing it with your friends and family and clicking on the thumbs-up icon (like-button).

Until next time — jw

Vulture Mountains Film Debut

Have you ever wanted a new tool (toy) so bad that it hurt, and your mother (wife) was a jerk about it? “Please, please, please. I’ll pick up my clothes. I promise to take the garbage out. I’ll eat all of my peas.” Pleading didn’t help. All you got in response was, “You’ll shoot your eye out, kid.” That’s what I endured last year.

I wanted a drone—one of those helicopter things with a camera mounted on it. I’m sure that a lot of people feel they’re a noisy Radio Controlled model airplane only useful for spying on your neighbors. I saw it differently. It’s a camera that can fly, and it would let me shoot places and viewpoints that, because of my age, I can’t get to any longer.

So, I studied them. I learned which ones would support my abilities. I knew their costs, and I harassed Anne for one for Christmas, birthday, anniversary—I had a reason for each occasion. Anne started saying no—even before I uttered a sound.

I lurked on eBay looking for a second hand one, and eventually one came up, so I put a stupid bid on it. You know—an effort that surely wouldn’t win. Days passed with no other bidders, so with shoulders slumped and head bowed, I told Anne what I had done. My stupid offer had won, and now I own a low mileage DJI Inspire 1 v2 with a 4k camera.

I was excited about taking it out and learning how to fly it. Not so fast. The Feds are cracking down on drones. All drones over .55 grams have to be registered, and if I wanted to sell videos, I needed an Operator’s License. I got a registration number for my drone from the FAA, and then my drone sat in the garage for three months while I studied to pass a certification test. I passed the exam in October, and I was free to let my wings soar. Not so fast, now I had to learn how to fly one of these things.

To keep this story short, I’m learning to control my Unmanned Aerial Vehicle (UAV). Because I’m enamored with mountains, I’ve been practicing in the mountains south of town. Filming is a different mindset from shooting a photograph. As a photographer, I can go out and capture an image that I see. With film, you waste your time flying hither and yon. You have to plan your shots. Because mine is an older model, I only get 15 minutes of air time on a battery, so I’m happy to get a minute of footage from each flight. The rest of the time, I spend setting the exposure, flying to and back from my target.

After a couple of months in the field, and over a dozen propellers later, I’m getting the hang of it. I have a long way to go, but that takes time. Now, I’ve collected enough footage to piece together a four and a half minute film that I posted to YouTube. It premièred at midnight last night. How’s that for starting the new year fresh. It is an aerial portrait of the Vulture Mountains, and I call it Vulture Mountains because I’m so clever with titles.

You should be able to watch the clip embedded in this post, but here is the direct link to YouTube (https://www.youtube.com/watch?v=j6ABgBUjldQ). If you bought a new 4k TV for Christmas, that’s the best way to see it. I hope you enjoy watching it.

Until next time — jw

Starring Queen Anne YouTube Video Announcement

As you all know by now, Queen Anne and I spent August last year so that I could photograph along Utah’s State Route 12 (wrote a book about it—wan’ a see it—here goes). What you didn’t know is that one morning we drive to Torrey for lunch, and we filmed a time-lapse video with a GoPro stuck to Archie’s roof. It took a while, but I finally assembled all the clips into a 14-minute video that I posted on YouTube this morning.

Thor's Hammer And Sunset Point
Thor’s Hammer And Sunset Point – Bryce Canyon is the reason most visitors ever drive SR 12, but the video shows what to see before and after Bryce Canyon.

The video shows all of SR12’s 122 miles, and I spliced in spots along the route that are waiting for you to see and photograph. Queen Anne stars in her YouTube debut that will most likely break the Internet. Finally let me say that although it looks like a mad man was driving, I can assure you that the cruise control was set to the speed limit—of course, that may not absolve me from being a crazy person.

You can see Utah’s State Route 12 on YouTube by clicking here. I hope you enjoy watching it and please share your comments or at least give it a thumb up or thumb down.

Until next time — jw

New Video Project – Record Racks Box-Boy Is Lose In The Woodshop

Regular readers of this blog already know that I’ve been trying my hand at making videos. I’ve published ten of them on YouTube so far. All but one of them has been autocross recordings using a GoPro as an in-car camera. The other one was a time-lapse session of the gang raising our carport so that we could park The Ritz under it. That video is the only one so far that’s gotten more than a hundred views because it appeals to a broader audience. (If you’re curious, you can view them here.)

I’ve finally come up with a storyline that I can use to make my first video in earnest. It happens to involve music and woodworking, which are two of my other interests. My video will be ‘how-to’ on making some record racks (yes, Virginia, they still make records).

To give you some background, I a fair-sized record collection. I bought my first album when I was in high school, and I’ve been adding to it ever since. I started storing them in a neat system designed by Per Madsen that he sold as part of his RACKIT system. His bright designs efficiently solved media storage while fitting together to make an attractive media center that put our stacked cinder-block shelves to shame. As I collected more records, I’d just order another rack and add it to the pile.

Per Madsen facks loaded with records.
The Per Madsen style racks store up to a hundred records neatly. Yes, they are in alphabetical order.

Out of the blue one day, I got an email from him saying that he was going to retire. He said that he wasn’t going to make any new units and that all of the existing stock was on closeout. I bought up all that I could use, and then they were gone; that was over a decade ago. In our old home, I bought some IKEA shelves that worked, but those didn’t fit in our new home.

We’ve been in this house for over a year now, and Queen Anne has harped about the two unpacked boxes of records still in the dining room. After staring at my media center one evening, I decided that if I couldn’t add more storage horizontally, I needed to stack them higher and decided to make my version of the Madsen racks. I have enough woodworking equipment to replicate everything but his joints. I believe he used hidden glued dowels, but I can get around that with another type of fitting that’s at least as secure. Another significant advantage of making my own is that I don’t have to use red oak. I can use any hardwood that I want.

There are abundant videos on YouTube featuring artisans far more capable than I. It amazes me how some of these guys (and women) produce intricate wood pieces, sometimes without seemingly measuring. I guess that comes with experience. So, my video will be how a journeyman goes about making multiple pieces of furniture that have to fit together precisely.

Per Madsen's rack design.
The rack design is two healthy rectangular ends connected by rails along the bottom and back.

The first step in this project will be measuring and dissecting Per Madsen’s design and make some working drawings. Then I’ll need to come up with an outline of the steps. Finally, I will lay out a storyboard of the shots before I do any filming. I’m guessing that it will take a month to shoot, but then there’s post-processing, so give me till summer before I post it on YouTube. My goal is to have a video that gets more than a thousand views. I’ll update the blog with progress.

Update 05/13/2020

If you’ve been waiting on YouTube to see this video, it never happened. I’ve decided that although I’m competent behind the camera, I’m a bumbling idiot on stage. But, I have completed some of these record racks, and I’ve had traffic because of this post. Here’s how I made my version.

My Record Rack Version - This is the finished version of my record rack - well except for the wire separators.
My Record Rack Version – This is the finished version of my record rack – well except for the wire separators.

I made some minor changes in my design. First of all, I use mortice and tenons for the mainframes. I believe that Mr. Madsen used dowels to connect his, and I don’t have a precise tool to do that. The large surface area of the tenons provides a strong glue-joint, but I pinned each corner with a walnut plug to be sure.

Second, I added a back rail and spaced them equal to the bottom rails. I was afraid that at my age, I would mix them up, so this way, they are interchangeable. I also changed the way they attach to the mainframe. Instead of two wood screws at each joint, I used cross dowels. That means the rails will rotate if forced, but once the records are in, they work fine.

Finally, I drilled holes in the stiles so I can connect units. The significant advantage of using cabinet connectors is that the stacks don’t get unsightly gaps. Without those, the whole grouping has a professional look.

I used birch instead of oak because I prefer the wood to stay white instead of the nasty yellow that you get with aged oak. Besides, with Danish design, Baltic Birch is a natural choice. If that’s not your style, the racks could be made from walnut, cherry, oak, or something more exotic if you have the money. I have the dimensions on pdf if you’re interested. Just contact me via the contact page.

Today, I’m building a set of CD drawers that fit into this system. I have three of the originals, but I never liked how they looked. I changed my design, so the CDs sit like books on a shelf, but with two rows. That makes it easier to flip through my collection. It works better for me. If anybody’s interested, contact me, and I’ll post photos.

Till then . . . jw

Learning Video

Yesterday, I posted a new video on YouTube. In August 2015, I bought Adobe’s Premiere Pro, a video editing software, and since then, I’ve been trying to learn how to use it. A lot of photographers complain about how complex Adobe’s Photoshop is, but Premiere Pro is way more challenging.

This is my tenth post on YouTube and the first since April. All but one of them is about the amateur car racing that I do. It’s a natural subject for movies. Besides, I can rationalize making the films as a tool to improve my driving skills.

One of the cameras that I own, the Sony A7r, shoots video in ultra high-definition, that’s the format on newer TVs now. So, last season, Jeff (who was co-driving my car at the time) and I bolted it to the passenger side headrest. I made a clunky bracket out of wood that held the camera securely; although there’s still some vibration. We filmed several events with mixed results and gave up on the Sony because we couldn’t get the metering or microphone to work correctly. Instead, I picked up a used GoPro off eBay. It’s a small video camera made for shooting action videos. The focus is set, there are very little other adjustments, and at one tenth the weight of the Sony, the camera mount is now overkill.

Shooting in-car video is very common on YouTube. Mostly, they’re a record of the driver’s best run. They have a beginning title, and the film clip . . . that’s it. They’re of little interest to anyone except the small community of autocrossers.

Because I was learning film making techniques, I wanted to go beyond documenting a single run. I tried to make simple stories out of my videos. With each new video, I added new refinements. I learned how to do fade, cross fades, titles, end slides, and as hokey as it sounds, I worked on creating my brand . . . a simplified interpretation of the MGM lion, as it were.

For this video, I made off-screen commentaries to help make the story-line clearer. To do that, I wrote little scripts and then recorded them using an audio program. After editing the snippets, I inserted them into the video at the proper places. As a result, I see improvement although there is a lot more work to do. If you care to see my new video, here’s the link: https://youtu.be/YdeNB7kr98s

I welcome any comment you have . . . it is a learning experience after all.

Till later . . . jw