Shadows and Spires: An Afternoon on Big Sandy River Picture of the Week - Wikieup, Arizona

Two sedimentary cliff prominence eroded to form preliminary hoodoos, captured during the golden hour near Big Sandy River, Arizona.
Shadows and Spires: An Afternoon on Big Sandy River – Captured during the golden hour, these eroding cliffs along the Big Sandy River reveal nature’s ceaseless artistry. With preliminary hoodoos and soft evening light, it’s a visual spectacle that evokes the grandeur of Bryce Canyon on a smaller scale.

Have you ever heard the saying, “Necessity is the mother of invention?” Let me tweak that: “Frustration is the father of discovery.” A couple of weeks ago, Queen Anne and I were on a quest to pick up her “new-to-us” car from Henderson, Nevada. Ah, the optimism. The plan was simple: drive up, sign paperwork, and zoom back to Congress. We were convinced we’d be home by 3:00. But reality had other plans: car dealerships—the black holes where time and patience vanish. So, our speedy mission morphed into an all-day ordeal, and instead of a quick casino lunch, we settled for an early Mexican dinner in Kingman.

Life’s little curveballs aren’t all bad. The Universe threw us a photographic bone: we were heading back during the golden hour. Of course, I’d left my camera back at the ranch. Insert a string of inventive curses here. Cut to a few days later, and I’m driving that route again, camera in hand and tank full of liquid gold, catching that magical golden hour. Trust me, the encore was worth every cent and expletive.

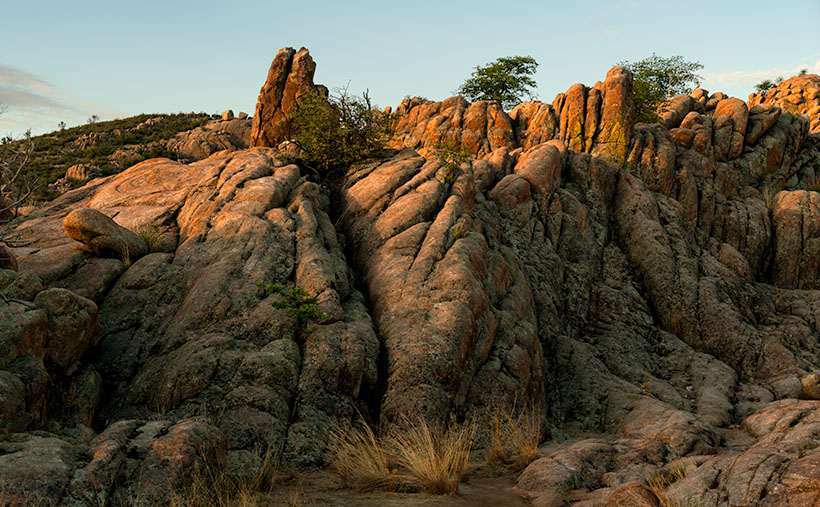
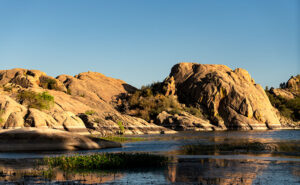
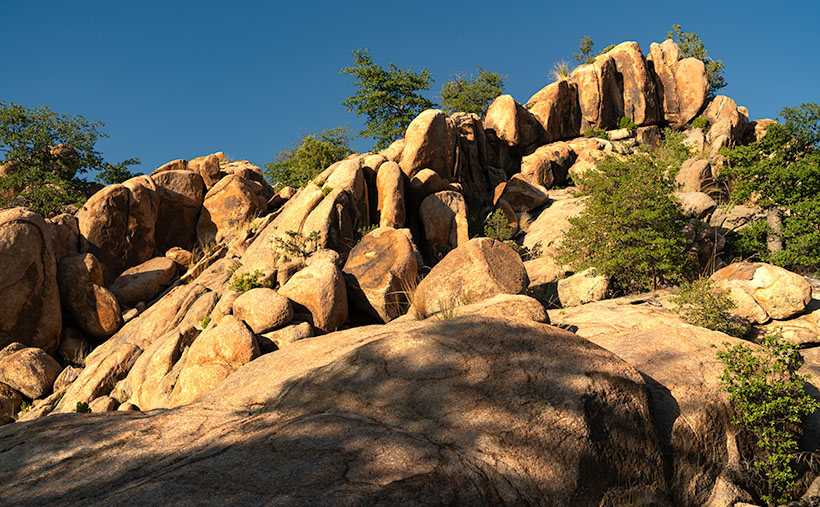
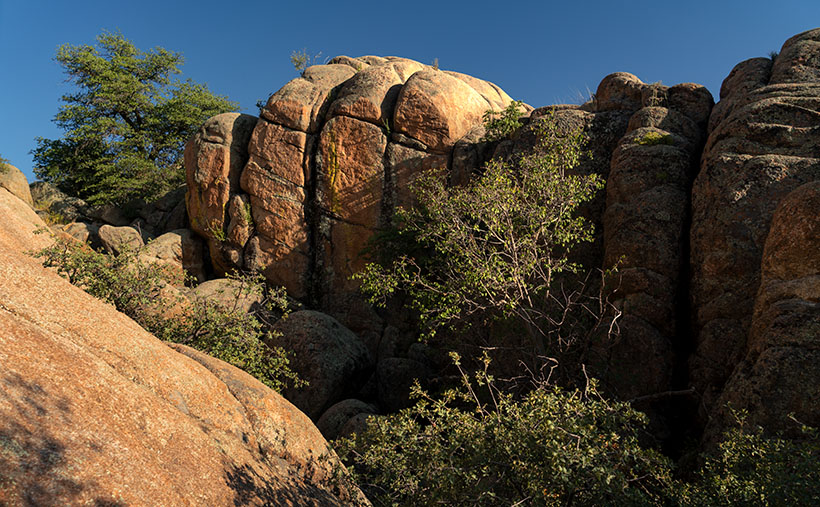
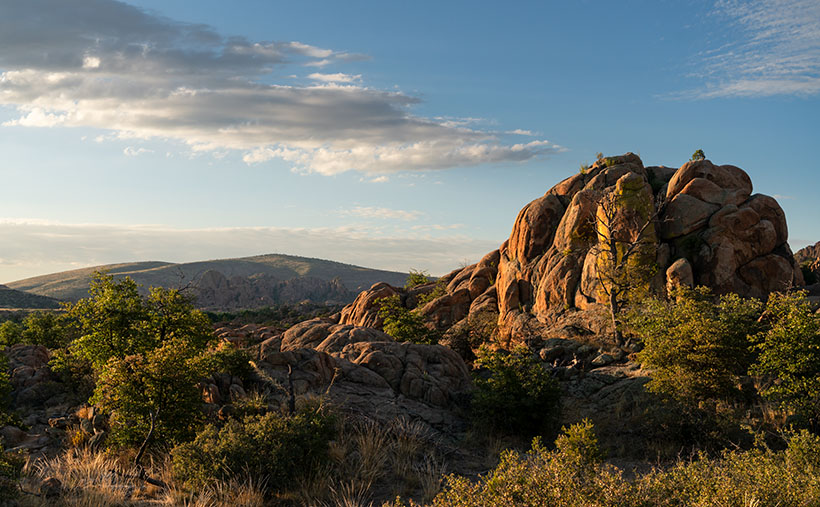
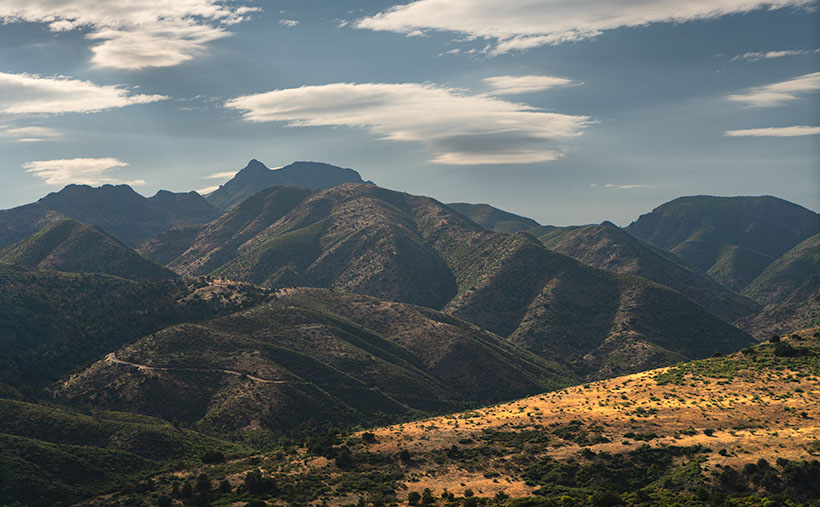
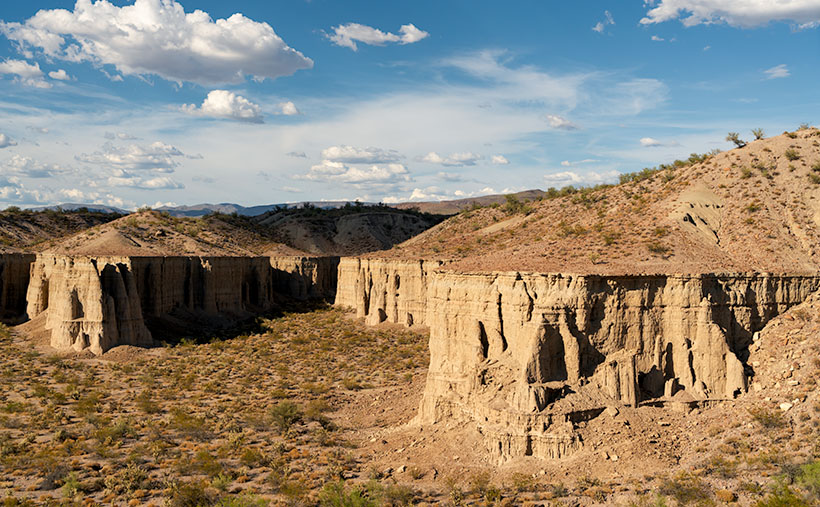
Situated just a stone’s throw south of Wikieup—Arizona’s self-proclaimed ‘Rattlesnake Capital’—we stumble upon an intriguing spectacle: silt cliffs carved by nature’s endless waltz of wind and water. But the real artist here? The Big Sandy River has been doing its chisel work for millennia, crafting an earthen canvas rich with geological stories. The formations boast early signs of hoodoo development, but erosion’s speedy pace keeps them from becoming full-fledged, free-standing wonders. Think of them as Bryce Canyon’s more humble cousins.

Veteran followers might recall a rookie error I made some years back: driving out here in the dead of night to shoot these west-facing cliffs at sunrise. Yeah, not my brightest moment. But this time, bathed in a warm honeyed glow, these cliffs were showing off for my camera. The low sun cast deep shadows, revealing the intricacies of erosion and the potential of fledgling hoodoos—sort of like teenagers eager to bust out on a Friday night.

Thanks for tagging along on this picturesque journey through Arizona’s road to Sin City—remarkable US 93. This highway, often buzzing with travelers darting between Phoenix and Las Vegas, has hidden gems that’ll soon vanish as Interstate 11 takes over. So catch these scenes while you can! For a high-definition experience, check out the larger version on my website (Jim’s) or peruse it on my Fine Art America page (FAA Page). And join us next week, where we’ll explore another sun-kissed snapshot from the drive on US 93 (boy, wouldn’t ‘drive on 95’ have rhymed so much better?).

Until next time
jw

Techniques: The Art of Capturing the Golden Hour

Ah, the golden hour—nature’s very own Instagram filter. This fleeting window right after dawn or before dusk can magically transform even the most drab scene into a masterpiece. Unlike the harsh glare of the midday sun, the golden hour bathes everything in a soft, ethereal light. It’s like Photoshop, but Mother Nature is at the helm.

Wake up early or set an alarm for the evening. Please make sure you’re in position well before the golden hour begins because, let me tell you, this light waits for no one. I’ve made that mistake before, and it was as frustrating as finding a rattlesnake in my boot.

Personal Note: On our Alaska expedition, I discovered that as you venture away from the equator, the golden hour stretches, much like a cat in a sunbeam. That hour of perfect light can become two during summer, and it’s an all-day thing north of the Canadian border in winter. However, it’s over in the blink of an eye in the arid southwest deserts, as if someone flipped off a celestial switch. Timing and location can throw some delicious curveballs into your golden hour captures, so be prepared.

And remember, while nature’s giving you a fantastic light show, your camera still needs some fine-tuning. Since the light is dimmer than mid-day, tripods can help stabilize long exposures, and a wider aperture can draw focus to your main subject. So, pack wisely, set up carefully, and prepare to create magic.

A New Day’s Glow at the Granite Dells Picture of the Week - Prescott, Arizona

A subtle sunrise over the Granite Dells in Prescott, Arizona, highlighting lichen-covered rocks resembling toes and victory signs.
A New Day’s Glow at the Granite Dells – A playful sunrise at the Granite Dells, where imagination meets nature. The subtle glow highlights formations that evoke toes and victory signs, making for a captivating morning scene.

As an undergraduate in college, I signed up for a class in art history for three automatic credits. Many students complain that this required course is lame. Still, I must have accidentally learned something when I thought I was napping in the classroom because now and then, I’ll spot something on TV, and I get to turn to Queen Anne and spout some useless trivia to impress her—it doesn’t work, and I get the usual eye-roll. One of the things I wondered about in that class was why were so many of the Greek and Roman era statues damaged. Later, I found out that looters damaged them when they ripped the artwork from their pedestals. But I still wonder, “What happened to Venus de Milo’s arms, and where are those missing hands and feet?”

I may have found a partial answer, and it’s in the final image from our Granite Dells project. On my morning outing, when it wasn’t hot, and I had plenty of water, my brain was operating at its peak as I followed the well-worn trail before dawn. My primary focus was not falling, but that still left time for me to snap photos when I wasn’t moving. One of those shots is A New Day’s Glow at the Granite Dells—this week’s featured image. Like last week’s picture, I later saw things in this image that weren’t there when I was on the trail.

At first glance, the image may look like just another example of weathered granite in the Dells. But on closer inspection, it’s as if the place is a secret stash for all those missing statue appendages I wondered about in college. Along the ridge left of the center, there’s a right foot with two toes jutting into the air, obscured partially by the bush. To the right of the center, there’s a left foot, complete with a visible toenail on the big toe. The more you look, the more toes start appearing throughout the photo. Eureka! It’s like I’ve stumbled upon the lost’ foot locker’ of ancient art—a clandestine graveyard of dismembered statue feet! Perhaps they hide it under a blue tarp during the day; otherwise, it would have been discovered by now.

I’m not alone when I look at the Dells and see things that aren’t there. Another group of visionary men did the same thing over a century ago. They were farmers from Chino Valley and Prescott, looking for reliable water sources to irrigate their expanding agricultural lands. Ignoring the rugged beauty of the Granite Dells, they recognized an opportunity in the flow of Willow Creek and Granite Creek. In 1900, they constructed the first dam, damming Willow Creek and forming what is now known as Willow Lake. A few years later, in 1908, they dammed Granite Creek, creating Watson Lake. These manufactured reservoirs transformed the wasteland into valuable water storage and provided the area with dependable year-round water, fueling growth and prosperity. Today, the lakes and the surrounding Granite Dells continue to be a vital resource, offering a balance between human needs and natural beauty.

Evening sun illuminating the granite domes over Lake Wilson, contrasting the rugged rocks with the serene ripples of water.
Water and Rock: Evening at the Dells – A tranquil evening view of the Granite Dells, where the golden light dances on the domes and the calm waters of Lake Wilson whisper reflections. The balance of serenity and strength is captured in a moment.

This week’s second photo shows Willow Lake waters lapping the Dells’s eastern shore. When the City of Prescott bought the lakes and surrounding land in 1997, they intended to preserve the area as a recreational preserve. And that’s how it worked out. Hikers, rock climbers, and old photographers use the dry sites, while other outdoor types like to get out on the water.

Granite Dells are more than just a collection of impressive rocks. Their charm lies in the subtle details and the stories they seem to tell. From imaginary toes to victory signs, from the gentle embrace of lichen to the lively dance of water plants, every visit unveils a new layer of beauty. We’re glad you joined us on the trails of Granite Dells, and we hope that you didn’t get frightened by the shape-shifting rocks. I have published two larger versions of this week’s image online, should you want to count the little piggies with roast beef. The first is on my Website (Jim’s web page), and the second is on my Fine Art America Page (FAA web page). I think it would be great to hear how many toes you found by leaving your count in the comments section below—of course, any snide remarks are welcome, too. We hope to see you back here next week when we begin a new project to get us through September—usually the last of our hot summer months.

Until next time
jw

Techniques: Playing with Reflections in Water

Capturing reflections in water can transform an ordinary photograph into a visually captivating image, providing a unique perspective and adding a sense of symmetry and depth. Whether it’s the clear reflection of a mountain in a calm lake or the distorted ripples of buildings in a bustling city canal, water reflections can be a photographer’s tool to create a sense of harmony and intrigue.

In this week’s second photo—Water and Rock: Evening at the Dells—the reflections in Willow Lake offer a mirror-like portrayal of the rock formations, doubling the visual impact and delivering a parallel world beneath the surface. These reflections emphasize the rock’s unique shapes and capture the colors and textures of the sky and landscape, enhancing the overall composition. Utilizing reflections requires keen observation and sometimes even waiting for the right moment when the wind calms and the water surface becomes still. Consider the angle of the light, the state of the water, and the composition to maximize the reflective effect. By experimenting with different perspectives and settings, reflections in water can become a decisive element in your photographic storytelling, elevating a simple scene into something extraordinary. Despite all that planning, sometimes you have to have dumb luck, as I did with this photo of the Ruby Range and Kluane Lake while on our 2016 Alaska adventure (see it here).

The Escalator Effect: Rock Formations in the Granite Dells Picture of the Week - Prescott, Ariozna

A golden stairway of rock formations ascending to a blue sky in the Granite Dells during sunset.
The Escalator Effect: Rock Formations in the Granite Dells – A natural escalator of golden rock formations, leading the eye toward the serene blue sky. A captivating example of the Dells’ rugged beauty captured at day’s end.

Thanks for tuning in to the third installment of my tromp through Prescott’s Granite Dells. We’ve moved to the park’s west side this week, north of Wilson Lake, where the trails are more challenging (physically and mentally) for an old coot like me. Despite the park departments placing white dots along the route as breadcrumbs, this Hansel managed to get lost three times. When I wasn’t lost, I scrambled over rocks and through thickets. To add to my misery, I started my hike in the afternoon, when the temperature was hot—even for Prescott.

Ah, the granite of Arizona, often found lounging in the sun, unbothered and with a certain rough charm. Unlike its posh cousin in Yosemite, it’s not entirely dressed to impress. While the Yosemite granite is a refined mix of quartz, feldspar, and biotite, giving it a smooth, elite look, Arizona’s granite is laid-back.

Arizona’s granite likes to hang out with some low-life friends, like mica and other composite minerals. It’s a mixed bag of characters not found in the high-end stuff. It’s a bit like the rebellious teenager of the geological world, not entirely fitting into the pristine and orderly world of Yosemite’s elite granite or New Hampshire’s distinguished, old-world charm.

Where other granites may be used for grand monuments or chic interior design, Arizona’s granite prefers the simpler life—gracing landscapes, lounging in gardens, or even being crushed into gravel for driveways. The added presence of mica gives it a bit of sparkle, but it’s more of a casual glint rather than a dazzling shimmer. It may not have the star power of its Yosemite counterpart, but it’s got character, grit, and a unique Southwestern flair that makes it stand out in its own right. And who doesn’t love a good underdog story? Especially one with a bit of sparkle!

When hunting down picture subjects, I look for unusual things that interest me. It may be a pattern, shape, texture, or something ordinary, but with exceptional lighting, photography loosely translates to ‘painting with light.’ But when I try to explain to others what I see in an image, my audience frequently gives strange looks, and they often raise their hands in defense before taking a step back for safety. For example, I was drawn to the inclining row of vertical rocks behind some horizontal slabs in this week’s image, titled The Escalator Effect: Rock Formations in the Granite Dells. My brain shouted, “Oooh! Oooh! Rock go up and down—rock go side to side.” That was enough encouragement for me to snap the shutter.

The composition still pleased me enough to process it this week, but as I worked on it, I began seeing things that could get me locked up. As I looked at the incline of vertical rocks, I wanted to push the right one over and watch the pile topple in a chain reaction—like a row of dominoes in a time-wasting but addictive video. Then, the rocks morphed into a flight of stairs or an escalator I wanted to climb. Then, to my horror, I saw the shape of a man covered in a leafy shadow blanket lying face-down at the foot of the stairs. Has he fallen? Is he injured? The city should put up handrails for us to hold onto. It’s a lawsuit waiting to happen.

A singular rock, bathed in golden light, resembling a deflated beach ball or Yosemite's Half Dome, in the Granite Dells.
One Among Many: A Golden Hour in the Granite Dells – A unique rock formation stands out against a backdrop of green pines and blue sky, its golden hues reminiscent of a beach ball or Yosemite’s Half Dome, frozen in time.

This week’s second image—One Among Many: A Golden Hour in the Granite Dells—isn’t nearly as complex. It’s only a round rock that climbed on top of a larger one to catch the last rays of the evening sun. That’s all there is. There’s nothing more or nothing less—except perhaps it’s a flattened bowling ball, deflated beach ball, or it could be an off-scale model of Yosemite’s Half Dome. I’m not sure—maybe the hot sun is getting to me.

Thanks for stopping by this week. I hope this week’s image and exploration of the photographic eye have piqued your interest. The world is full of wonders waiting to be captured by your lens, even in the most unexpected places like Arizona’s rebellious granite. If you’re brave enough to examine the dead body in “The Escalator Effect” (if you can find it), you’ll find larger versions on my website (Jim’s Website) and my page on Fine Art America (FAA Page). Join me next week for my final Granite Dells photo story. I’ll be back if I don’t get caught up in a butterfly net before then!

Till next time
jw

Techniques: Developing Your Photographic Eye

Back in the stone age, when attending night classes at Pasadena’s ArtCenter College of Design, I befriended a fellow student who was an exceptional photographer. We’d brainstorm ideas about our weekly assignments, spend time in the darkroom together, and learn techniques from one another. Vince’s work made everyone’s jaw drop when we sat for our professor’s weekly critiques. The instructor would allot ample time to hold up the photos Vince turned in as a shining beacon to which the rest of the class should aspire. Then he’d critique my work with, “That’s nice too,” before moving on to the students who need more help. Vince had the eye.

Since then, I’ve been part of many discussions centered on talent—either you got it, or you don’t was the consensus. Talent is innate and can’t be learned—to which I say rubbish. Talent isn’t a binary thing like a light switch—on or off. Like most traits in life, it’s a continuum, a line that everyone fits on. It’s easy for a select few, but we must work harder to grow.

There are helpful rules in photography that you have to learn, like beginners practicing scales on a piano. We’ve previously touched on some of those rules in this forum: framing and composition, the rule of thirds, manipulating the light, and so on. Understanding and following these rules doesn’t make our work great. Early in our careers, we work hard to master the rules so they become intrinsic, and we stop thinking about them while we’re shooting—like the musician who doesn’t need to look at the piano keys to play a tune. It’s then that your mind begins to see beyond the obvious. Instead of asking, “What should this tune sound like?” you can ask, “What should this tune feel like?” When you don’t think about the rules and trust your imagination, your work speaks with your voice. So, when I hear someone say they don’t have talent, I don’t believe them. Everyone has some talent; they have to decide if they’re willing to do the extra work—is the trade-off worth it?

It all begins with observing the world and finding what speaks to you. Whether it’s the rebellious charm of Arizona’s granite, the unexpected formations that emerge in the sunlight, or the whimsical ideas that come to mind when a rock resembles a flattened bowling ball, your unique vision will set your work apart. So take your camera, wander the trails, get lost if you must, and let your imagination guide you. Embrace the unexpected, and you might discover the extraordinary in the ordinary. Keep pushing, keep experimenting, and never doubt your ability to see the world in a way that’s uniquely yours.

The Dells’ Drama: Light, Shadow, and Stone Picture of the Week - Prescott, Arizona

A sunlit canyon at Granite Dells with angular rock formations, highlighted by shadows and a blue sky backdrop.
The Dells’ Drama: Light, Shadow, and Stone – On the Constellation Trail at Granite Dells, angular lines of sunlit rock formations converge, telling tales of erosion and time. Amidst the rugged terrain, trees rise, contrasting against the textured granite, all under a vast blue Arizona sky.

Thanks for joining us on the Constellation Trail in the Granite Dells this morning. Of all the paths I’ve dared to tread, the Constellation Trail welcomes both the adventurous explorer and those of us who occasionally confuse a hiking boot with something you’d wear to a dinner party. Located off Arizona Route 89, it’s a sizeable, well-marked loop with several cross trails that make it easy to tailor your hike to your abilities. As you know, I’m not too fond of physical exercise, but I know that my best photos come from getting out of my truck, and once I’m out in nature, my senses become heightened. Last week’s photo showed an example of the views you can see along the trail’s high points, while this week, we explored the shadows on canyon walls where the trail cuts through the Dells’ ravines.

In the heart of the Granite Dells, life thrives against all odds. Amidst ancient boulders that are silent witnesses to millennia gone by, scrub oak and sumac tell a tale of nature’s indomitable spirit. They’ve evolved to survive and flourish, sipping sustenance from the unforgiving granite, striking poses of raw, untamed beauty against a backdrop that laughs in the face of gentleness. As the morning sun casts the canyon in a gentle glow, their silhouettes emerge sharper, paying tribute to nature’s ability to find pockets of life even in the most challenging environments.

Interestingly, the Granite Dells aren’t just a feast for the eyes but a geologic wonder. Estimated to be around 1.4 billion years old, these ancient formations are composed of a type of rock known as Precambrian granite. What you see on the surface only scratches the surface of their actual complexity. These stones have witnessed countless eras, weathered innumerable storms, and survived the ever-changing dance of geological forces. As a photographer, capturing these ageless guardians feels like stepping into a time machine, where every click of the shutter connects you with a history that transcends human comprehension. While the vibrant hues and shadows make for stunning imagery, the timeless wisdom in these stones adds an ineffable quality to the photographs. That’s the unseen charm of the Granite Dells, a joy that plays hide-and-seek with your senses and challenges you to see beyond the obvious.

The path lured me to a breathtaking cataract surrounded by boulders that must have been hand-placed by giants. Navigating through the canyon was as easy as following a breadcrumb trail—if the breadcrumbs were the size of small cars and strewn by a mythical creature with a flair for drama. Surprisingly, navigating through the canyon wasn’t challenging, thanks to the downward trail. I found the perfect vantage point on a ledge after clearing the gorge. From there, the sunlight playing on the rocks created an arresting visual that resembled a mighty fist. I had toyed with the title “Pow” but felt The Dells’ Drama: Light, Shadow, and Stone captured the essence far better.

I have posted two larger versions of this image for your enjoyment. The first is on my Website, of course, and you can see it by following this link (Jim’s Weblink); the other option is the page I made on my Fine Art America page, and the easiest way for you to get there is via this link (FAA link). Each click will transport you deeper into the heart of the Dells’ magic. Queen Anne and I want to thank you for stopping by this week. If we’ve piqued your interest, tune in next Sunday. We’ll uncover more mysteries of the trail, provided I don’t get lost or distracted by something shiny.

Till next time
jw

Technique: Saturation as a Photographer’s Opioid

In photography, playing with saturation is like walking a tightrope – thrilling, daring, and slightly less likely to end in a dramatic tumble. When applied with precision, it can elevate an image, adding depth and vibrancy. Yet, the temptation to overindulge can be difficult. Excessive saturation risks rendering photographs unnatural, pushing them into the realm of ‘Disney-chrome’—a world where colors are too intense to be accurate. This impacts the aesthetic appeal and can be problematic when printing. Over-saturated photos, significantly beyond a medium’s color gamut, lose their subtle gradations, often resulting in blotchy areas that mar the final product, like a print or book.

Hue and Saturation Pallet with this Photoshop tool, you can add saturation to a photo until it had day-glow colors, or you can remove the color to make the image pastel or even black and white.
Hue and Saturation Pallet With this Photoshop tool, you can add saturation to a photo until it has day-glow colors, or you can remove the color to make the image pastel or even black and white.

For the photography enthusiasts, here’s a peek behind the curtain: When tweaking the saturation in this week’s photograph, I worked with values that might seem conservative to some. The overall saturation was subtly lifted to a value of +5, while the green hues were enhanced a second time using a slider value of +10. These numbers aren’t pulled out of a magician’s hat but result from countless trials, errors, and what some might call an unhealthy obsession with color balance. Like a chef’s secret recipe, these values are part of what makes the image uniquely mine. Feel free to experiment with your concoctions, but remember: With great power (or slider control) comes great responsibility.


Awakening of the Granite Giants Picture of the Week

Golden morning light illuminating the rugged landscape of Granite Dells, with Glassford Summit in the background.
Awakening of the Granite Giants – A mesmerizing view of the Granite Dells under the soft glow of the morning sun, casting a beautiful light on the weather-worn rocks with Glassford Summit standing majestically in the distance.

My calendar page flipped to August this week, and that means that summer’s half over. In standard years, we would have been inundated with monsoon rains and antsy for the wet season to end. But, in this most unusual year, we’re waiting for the rains to start. We often see afternoon clouds here in Congress, Arizona, but they’ve only been a tease. The new month also means a new photo project, and I decided to stay in the high country—if you consider Prescott the highlands. We will wander the trails in the Granite Dells to capture its natural beauty and fill in my Website portfolio. The exposed cracked and worn boulders are common throughout Arizona, but this patch is the only city park.

The Granite Dells of Prescott, Arizona, is a geological wonder with around 1.4 billion years of history. Their formation began deep beneath the Earth’s surface, where molten magma slowly cooled and crystallized into hard, dense granite. Over hundreds of millions of years, erosion wore away the rock layers above, revealing the granite bedrock. Once exposed to the atmosphere, the granite underwent spheroidal weathering, a process that smoothed its corners and edges into the distinctive, boulder-like shapes we see today. This weathering, coupled with millions of years of further erosion, has sculpted the Granite Dells into their current, stunning form, with the boulders providing unique habitats for diverse flora and fauna.

Close-up study of Common Mullein stalks, brightly lit against a darker, out-of-focus background.
Majesty in the Ordinary – An intimate view of Common Mullein stalks bathed in the golden morning light, their unexpected elegance highlighted against the darker foliage of the Granite Dells.

We will start this month’s photo tour of the Dells with a long shot I took at dawn while hiking the Constellation Trail. At that hour of the morning, I thought I’d have the place to myself, but the parking lot was half full when I arrived, and true to form, I was in everybody’s way as I trudged along with my camera. I was in the middle of the loop when the sun emerged above the cloud layer along the horizon, casting a golden light on the rock formation before me. I can’t begin to tell you how delighted I was to see how it showed off the rounded shape and texture of the granite boulders. The Dells have a sense of anchor in their surroundings with the radio-tower-topped Glassford Summit. I call this week’s image Awakening of the Granite Giants.

We’re so glad that you joined us on the trail this morning. Throughout the rest of the month, we’ll share more images taken on tracks running through Prescott’s most significant city park. And you can count on us to dig up more interesting trivia about the Granite Dells. If you’d like to examine larger versions of Awakening of the Granite Giants, you can visit its page on my Website by following this link (Jim’s Website). You can also pixel peep on my Fine Art America posting by following this link (FAA Post). Be sure to return next week when we present another image of the intriguing Granite Dells.

Till next time
jw

Techniques: Restoring Dark Areas In Back Lit Images

In last week’s session, I showed how I manage shots to prevent blowing out the highlights when shooting in lighting conditions too broad for the camera’s sensor to capture—like the dawn, dusk, or back-lit situations. We concluded that discussion by predicting that the darker areas would be too dark to be pleasing. In this post, I will explain how I balance the exposure in Photoshop so the image looks natural.

Quick Selection Tool - I use this tool in the Tool Palate to select the areas that I want to work. It's the fastest and most accurate selection tool in Photoshop.
Quick Selection Tool – I use this tool in the Tool Palette to select the areas I want to work on. It’s the fastest and most accurate selection tool in Photoshop.

Artificial Intelligence (AI) has recently been in the news, with stories ranging from how it helps doctors find cancer in patients earlier to how it will eventually eat our brains—like Zombies. Well, Adobe has an AI-driven tool in Photoshop that enables you to select complex areas of your images. It’s called the Quick Select Tool. It seems to be mainly used to cut models—and their fly-away hair—from one background so they can be pasted into another. I use it to select the dark areas in my landscapes that need lightening. My process involves three steps: Selecting, Refining, and Correcting.

Refine Selection Workspace - With this tool, you can nudge and perfect which areas you want to be active within your adjustment layer.
Masking Workspace – With this tool, you can nudge and perfect which areas you want to be active within your adjustment layer.

After doing my color corrections and setting my Black and White points in my workflow, I try to balance my image’s exposure. Using the Quick Select (QS) Tool, I roughly select the area I want to work with, and that’s usually everything below the horizon. At this point, I’m not trying to be precise. After I drag the QS brush over the area I want to modify, I click on the Select and Mask button at the top of the workspace, which opens a Masking Workspace showing the selected areas of the image. I use a red mask set to 40% opacity to see which areas of the image will be affected by the following steps. Within the right panel, there’s a bunch of number settings that I’ve fiddled with over the years before settling on these: Radius=0, Smooth=2, Feather=2.5px, Contrast=25%, and Shift Edge=-2% (be sure to check the tiny little box tabled ‘Remember Settings‘ otherwise you’ll constantly have to reset these values). Using these values, I choose the Brush Edge Tool—the second from the top in the brush palate—and run it along the edge of the selected areas. What the AI does for me is pick out all of the little trees and other objects (like the leaves in the second photo this week) and separate them from the sky—an otherwise impossible task. Once I’m happy with the selection, I click ‘OK,’ the screen returns to the original workspace with the selected area now outlined with ‘dancing ants’—a term used to describe the animated dotted line showing the selection.

The next step is to correct for the darkness, and to do that, I choose a new Exposure layer from the list, which opens with the new mask in place. In the new layer, I use the slider to adjust the area to the lightness that looks good to me—usually between ¼ to a complete stop (.25-1.0), but with the sensor on my Sony camera, I’ve been able to lighten the dark areas by 2½ stops without causing a loss of detail in shadows or other unwanted digital artifacts (such as pixelation or banding).

Remember, by working with layers, you can go back and change your adjustments later. Also, remember to save your work frequently, especially after making significant adjustments.

Saddle Mountain Silhouette: The View from Rincon Pass Picture of the Week - Sunflower Arizona

Majestic view of Mazatzal Range with Saddle Mountain silhouette at Rincon Pass.
Saddle Mountain Silhouette: A View from Rincon Pass – A picturesque landscape of the Mazatzal Range unfolds, revealing a symphony of layers and the iconic silhouette of Saddle Mountain at Rincon Pass.

Welcome back to the fourth installment of our Mazatzal Mountain tour via the Beeline Highway. With the current heat wave, our bus feels more like a scene from Romancing the Stone, filled with hot and sweaty people trying to stay cool with all the windows down. It’s so scorching outside that even chickens tied to the grill seek shade.

Of course, leave it to Queen Anne to pick the hottest week for our trip to the dentist in Algodones, Mexico. We left our comfortable haven in the Weaver Mountain foothills, where the air conditioner doesn’t run all night, only to be greeted by 115°F heat in Yuma, the lowest point in Arizona. Queen Anne’s flip-flops even melted away, forcing us to make an emergency shoe stop at a Zapata store. The trip’s highlight was the customs house with no waiting lines—small blessings in the sweltering inferno.

But enough of the heat woes; let’s escape to cooler grounds. This week’s destination is just a few miles north of our last stop, but we’ve left the Sonoran Desert behind. The newer section of the highway bypasses the shady beauty of Sycamore Creek, where there was always a respite from the sun. The creek lies on private property, and I imagine the owners are delighted to be rid of the traffic.

I pulled over near Iron Dike, a black rock mound, to capture this week’s featured image, Saddle Mountain Silhouette. In this shot, we gaze beyond the hilltop and the intricate jumble of mountains and canyons to Saddle Mountain—a fitting name for its distinct profile. Standing at 6529′, it doesn’t make the top ten of the Mazatzal’s tallest peaks, but its imposing presence seems to watch over the surrounding lesser hills.

Sycamore Creek flowing amidst lush greenery and tranquil waters.
Tranquil Waters: Sycamore Creek’s Verdant Beauty – Embrace the serenity of Sycamore Creek, where the gentle flow of water and vibrant greenery create a symphony of tranquility.

After capturing this shot, we took a refreshing detour down the old road, seeking relief from the heat under the cool canopy of sycamore leaves. Though the creek’s flow was modest, it still managed to cool the air, acting like nature’s swamp cooler.

We’re thrilled you’re along for the ride this week, and we hope to have you back next Sunday for the conclusion of our Mazatzals photo tour. Before we part ways, we invite you to visit my website and view the larger version of Saddle Mountain Silhouette by clicking this link (Jim’s Web Page) and exploring the second version on my Fine Art America site (FAA link). In the comments section below, we would love to hear how you’re coping with the heat.

Until next time,
jw

Techniques: The Advantages of Shooting in RAW

In the early days of digital photography, cameras were limited to saving images in JPEG format. However, modern digital cameras now offer the option to shoot in RAW format and JPEG, providing photographers with greater creative possibilities.

RAW files contain unprocessed and uncompressed data straight from the camera’s sensor. Unlike JPEG, which applies compression and processing, RAW files retain the original data, allowing for more flexibility during post-processing.

One of the significant advantages of shooting in RAW is its ability to provide a color depth of up to 16 bits per channel. The extra bits mean smoother gradations and a more accurate representation of colors in the final image. In contrast, JPEG images are limited to 8 bits per channel, which can lead to a loss of color information and visible banding in gradients.

RAW files are stored in an uncompressed format, ensuring that all the fine details and information captured by the camera sensor are preserved. In contrast, JPEG files are compressed, which can result in a loss of image quality and visible artifacts, especially in areas with high contrast or fine details.

RAW images can capture a more expansive color space, allowing for more vibrant and accurate colors in the final output. On the other hand, JPEG files, due to their compression and limited color depth, may exhibit color shifts and loss of detail, particularly in highly saturated or subtle color areas.

Shooting in RAW gives photographers more creative control over their images. It enables them to adjust to exposure, white balance, contrast, and other settings after you’ve taken the shot. This flexibility allows photographers to fine-tune their images to match their artistic vision and achieve the desired look.

When editing RAW images, the adjustments are non-destructive, meaning the original data remains intact. This safeguard ensures photographers can revisit their edits and make changes without compromising image quality. In contrast, directly editing a JPEG file can result in losing quality with each revision.

One of the significant benefits of shooting in RAW is the ability to convert and save images as PSD (PhotoShop) or TIFF (the Competition) files while retaining all the layers and adjustments made during editing. This feature allows photographers to maintain a master copy of their edited images, enabling future adjustments and re-editing without losing image quality.

While shooting in RAW is essential for maximum creative control and image quality, there are instances where photographers may need to save images as JPEGs. Converting the final edited image to JPEG format reduces file size and ensures compatibility for web uploads, social media sharing, or submission to specific platforms.

By shooting in RAW format, photographers have the flexibility to fully explore their creative vision and create stunning images that retain the true essence of the scene.

The Enigmatic Black Mesa: A Striking Basalt Landmark in Arizona Picture of the Week - Sunflower, Arizona

A view of Black Mesa, a pyramid-shaped basalt mountain in the Mazatzal Mountains
The Enigmatic Black Mesa – A stunning basalt pyramid rising majestically in the rugged beauty of the Mazatzal Mountains.

Welcome back to our exploration of the Mazatzal Mountains and the scenic journey along the Beeline Highway. As we continued our expedition, the changes in scenery required frequent stops for pictures. Although the scenery changes with each bend, over the years, the road has undergone its transformation—from a challenging back road to a modern highway.

My love/hate affair with the Beeline Highway began shortly after I arrived in Arizona half a century ago. At the time, I resided in south Scottsdale and had developed a passion for trout fishing. Despite my work obligations, I jumped at any opportunity to escape and make a Payson run. With a left turn at the end of McDowell Road, I could travel the picturesque route in just 90 minutes, reaching the tranquil Rim lakes where I would indulge in the serene beauty of nature and cast my fishing line.

However, weekends brought out the Beeline Highway’s dark side. State Route 87 north of Fountain Hills was a narrow, two-lane rollercoaster that could quickly diminish the joy of driving. While I found the route challenging and enjoyable under normal circumstances, the presence of holiday travelers towing trailers brought the fun to a screeching halt. A comfortable 90-minute journey became a tedious ordeal lasting several hours. These underpowered tow vehicles crawled up the grades at a snail’s pace, followed closely by a long line of frustrated drivers.

During my recent ride with Fred, I was pleasantly surprised by the Arizona Department of Transportation’s significant improvements to the Beeline Highway. The road has undergone a remarkable transformation. It now boasts four lanes for most of its length, except for a couple of long grades where they added a truck lane. The curve radius has been expanded, the shoulders widened, and other safety measures implemented, bringing the highway’s standard close to that of a freeway.

This week’s photograph was captured approximately 10 miles north of Four Peaks, featured in last week’s post. As we continue along the Beeline Highway, the elevation gradually increases, but at this particular spot, we find ourselves at the same elevation as Four Peaks Road. We haven’t gained much altitude because we recently drove over a pass at a large granite field, descending into another valley. Now, we’re beginning the ascent toward a second pass.

When I arrived at this location, the sun had just cleared the horizon, casting its soft light upon the mountaintops. It was the perfect opportunity to pull over and capture this week’s photograph of Black Mesa. Upon closer inspection of the photo, you can observe the traces of volcanism in black basalt trails running down the ravines on the mountain’s face. However, what truly caught my attention in this scene was the abundant presence of saguaro cacti on the southeast-facing slope. They outnumber the Palo Verde trees.

This is the last point on the road where saguaros thrive. Further up this grade, an imaginary frost line marks the limit for these majestic cacti to survive. As we ascend, the winters become too cold for the saguaros to endure. This splendid grove contrasts sharply with the sparse landscape and yellow grass we encountered last week. This week’s second photo was shot near where I stopped to look at a dense cluster of saguaros—the densest I’ve ever seen. It’s a testament to their resilience in this harsh desert environment, especially considering the recent wildfires that have thinned the surrounding landscape.

Close-up of a cluster of saguaro cacti in the Sonoran Desert
Desert Sentinels: Clusters of Saguaros Embracing the Sonoran Desert – A captivating ensemble of saguaros showcasing the beauty of the Sonoran Desert.

I hope you’ve enjoyed the ride so far. I appreciate your company as we explore the captivating landscapes of the Mazatzal Mountains. If you need a little break, I invite you to take some time to immerse yourself in the larger versions of The Enigmatic Black Mesa, available on my website (Black Mesa Webpage) or my Fine Art America upload (FAA Webpage). These images allow you to delve deeper into the beauty and details of this remarkable landmark. And remember, our adventure doesn’t end here. Join us next week as we explore the rugged Mazatzal Mountains on our way to Payson. There are more wonders to discover, and I look forward to sharing them with you.

Till next time
jw

Techniques: Mastering White Balance

Have you ever wondered at the wonky colors some of your photographs have? A simple answer could be the wrong White Balance adjustment. To the human eye and brain, a white sheet of paper looks white outside in the sun, in the shade, under house lights, or fluorescent bulbs. If you shoot using your camera’s raw data file, then you apply that fix in post-processing. But, if you’re shooting JPEGs or videos, the camera does the processing. Usually, cameras (and phones) have an Auto White Balance setting, but the color of a shirt, the distance of the subject, or even the wall color can easily fool it. It’s undependable.

Let’s look at it this way to keep this lesson short and sweet. The color of the sun we grew up and live with is white. If we lived on a different planet with a different sun, our brains would adjust to a new white in a few days. Scientists use the Kelvin scale as a way to measure relative color. It’s a numerical scale to measure the temperature of white light sources. A low Kelvin is warm and has a yellowish cast, so you add blue for balance. A higher Kelvin value is bluish and needs yellow for balance. For example, daylight is typically around 5500K, while tungsten lighting is around 3000K. So if you’re shooting outside, set your camera (or phone) to 5500k (or pick the sun icon), and if you’re using house lights, choose the light bulb icon (or around 3000k).

There are only a couple of exceptional instances. The first is in open shade—you’re out of the sun but under a blue sky, which are the conditions I had shooting this week’s pictures. Here, the light is being bounced off the sky, and the number needs to be higher to offset the additional blue cast. That Kelvin number is around 6500k, or the camera’s shade icon. The second exception is on cloudy days when there’s no blue sky. This is when you set the white balance to 6000k or use the camera’s cloud icon.

There is another infrequent situation that you may run into. It’s when you’re taking your eBay pictures in the garage, someone at a hospital, or a product in a retail store that has old fashion fluorescent tubes. They don’t emit red rays, so things look green. Not only do you have to adjust for the temperature, but you have to add the missing red. If your camera has a tube setting, you’re golden; otherwise, you’re alone.

If I’ve intrigued your interest and you’d like to dive deeper into white balance, numerous educational resources like this are available on YouTube (White Balance Video). You can also search YouTube for tutorials on “color correction” or “white balance” in your preferred post-processing software. There, you’ll find step-by-step guides and demonstrations to help you master this essential technique for getting natural color in your photographs.