A New Day’s Glow at the Granite Dells Picture of the Week - Prescott, Arizona

A subtle sunrise over the Granite Dells in Prescott, Arizona, highlighting lichen-covered rocks resembling toes and victory signs.
A New Day’s Glow at the Granite Dells – A playful sunrise at the Granite Dells, where imagination meets nature. The subtle glow highlights formations that evoke toes and victory signs, making for a captivating morning scene.

As an undergraduate in college, I signed up for a class in art history for three automatic credits. Many students complain that this required course is lame. Still, I must have accidentally learned something when I thought I was napping in the classroom because now and then, I’ll spot something on TV, and I get to turn to Queen Anne and spout some useless trivia to impress her—it doesn’t work, and I get the usual eye-roll. One of the things I wondered about in that class was why were so many of the Greek and Roman era statues damaged. Later, I found out that looters damaged them when they ripped the artwork from their pedestals. But I still wonder, “What happened to Venus de Milo’s arms, and where are those missing hands and feet?”

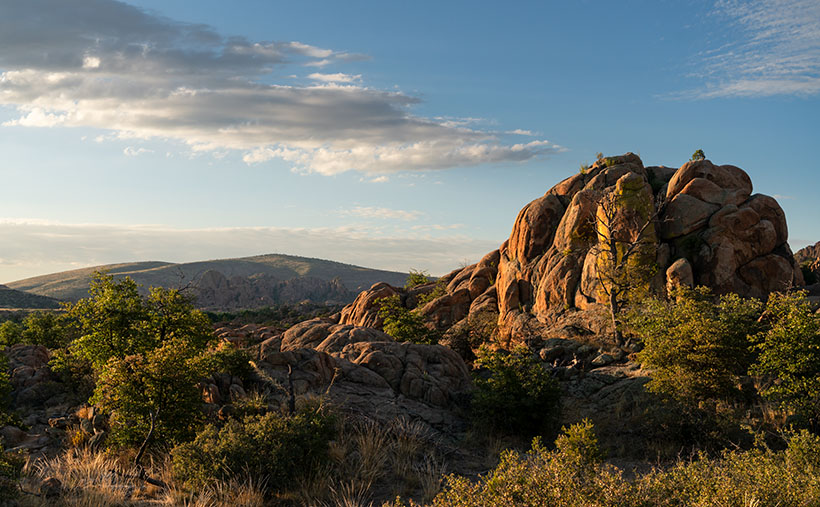
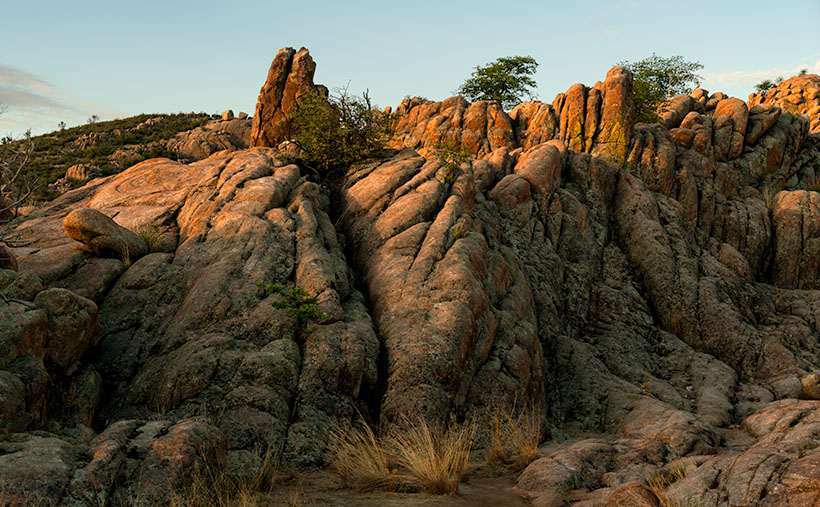
I may have found a partial answer, and it’s in the final image from our Granite Dells project. On my morning outing, when it wasn’t hot, and I had plenty of water, my brain was operating at its peak as I followed the well-worn trail before dawn. My primary focus was not falling, but that still left time for me to snap photos when I wasn’t moving. One of those shots is A New Day’s Glow at the Granite Dells—this week’s featured image. Like last week’s picture, I later saw things in this image that weren’t there when I was on the trail.

At first glance, the image may look like just another example of weathered granite in the Dells. But on closer inspection, it’s as if the place is a secret stash for all those missing statue appendages I wondered about in college. Along the ridge left of the center, there’s a right foot with two toes jutting into the air, obscured partially by the bush. To the right of the center, there’s a left foot, complete with a visible toenail on the big toe. The more you look, the more toes start appearing throughout the photo. Eureka! It’s like I’ve stumbled upon the lost’ foot locker’ of ancient art—a clandestine graveyard of dismembered statue feet! Perhaps they hide it under a blue tarp during the day; otherwise, it would have been discovered by now.

I’m not alone when I look at the Dells and see things that aren’t there. Another group of visionary men did the same thing over a century ago. They were farmers from Chino Valley and Prescott, looking for reliable water sources to irrigate their expanding agricultural lands. Ignoring the rugged beauty of the Granite Dells, they recognized an opportunity in the flow of Willow Creek and Granite Creek. In 1900, they constructed the first dam, damming Willow Creek and forming what is now known as Willow Lake. A few years later, in 1908, they dammed Granite Creek, creating Watson Lake. These manufactured reservoirs transformed the wasteland into valuable water storage and provided the area with dependable year-round water, fueling growth and prosperity. Today, the lakes and the surrounding Granite Dells continue to be a vital resource, offering a balance between human needs and natural beauty.

Evening sun illuminating the granite domes over Lake Wilson, contrasting the rugged rocks with the serene ripples of water.
Water and Rock: Evening at the Dells – A tranquil evening view of the Granite Dells, where the golden light dances on the domes and the calm waters of Lake Wilson whisper reflections. The balance of serenity and strength is captured in a moment.

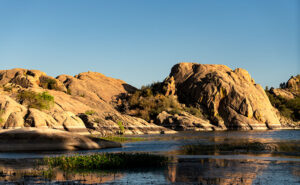
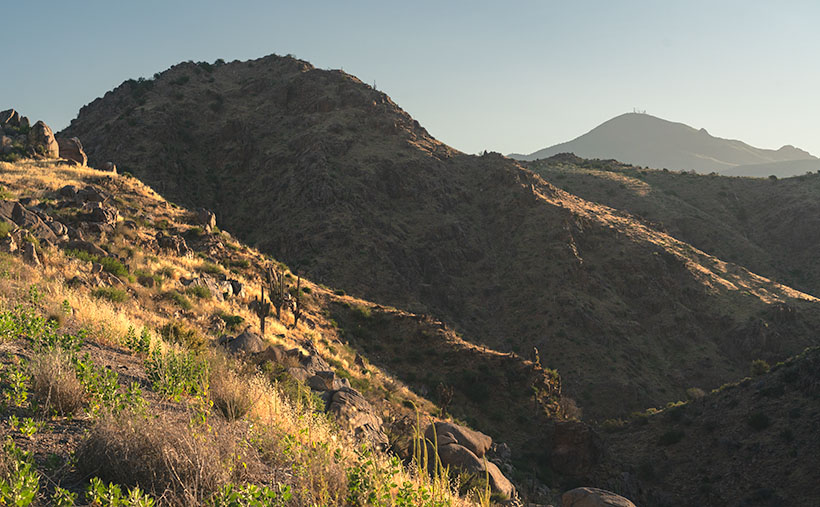
This week’s second photo shows Willow Lake waters lapping the Dells’s eastern shore. When the City of Prescott bought the lakes and surrounding land in 1997, they intended to preserve the area as a recreational preserve. And that’s how it worked out. Hikers, rock climbers, and old photographers use the dry sites, while other outdoor types like to get out on the water.

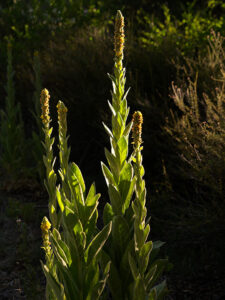
Granite Dells are more than just a collection of impressive rocks. Their charm lies in the subtle details and the stories they seem to tell. From imaginary toes to victory signs, from the gentle embrace of lichen to the lively dance of water plants, every visit unveils a new layer of beauty. We’re glad you joined us on the trails of Granite Dells, and we hope that you didn’t get frightened by the shape-shifting rocks. I have published two larger versions of this week’s image online, should you want to count the little piggies with roast beef. The first is on my Website (Jim’s web page), and the second is on my Fine Art America Page (FAA web page). I think it would be great to hear how many toes you found by leaving your count in the comments section below—of course, any snide remarks are welcome, too. We hope to see you back here next week when we begin a new project to get us through September—usually the last of our hot summer months.

Until next time
jw

Techniques: Playing with Reflections in Water

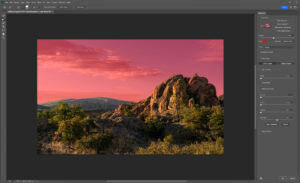
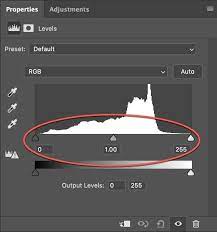
Capturing reflections in water can transform an ordinary photograph into a visually captivating image, providing a unique perspective and adding a sense of symmetry and depth. Whether it’s the clear reflection of a mountain in a calm lake or the distorted ripples of buildings in a bustling city canal, water reflections can be a photographer’s tool to create a sense of harmony and intrigue.

In this week’s second photo—Water and Rock: Evening at the Dells—the reflections in Willow Lake offer a mirror-like portrayal of the rock formations, doubling the visual impact and delivering a parallel world beneath the surface. These reflections emphasize the rock’s unique shapes and capture the colors and textures of the sky and landscape, enhancing the overall composition. Utilizing reflections requires keen observation and sometimes even waiting for the right moment when the wind calms and the water surface becomes still. Consider the angle of the light, the state of the water, and the composition to maximize the reflective effect. By experimenting with different perspectives and settings, reflections in water can become a decisive element in your photographic storytelling, elevating a simple scene into something extraordinary. Despite all that planning, sometimes you have to have dumb luck, as I did with this photo of the Ruby Range and Kluane Lake while on our 2016 Alaska adventure (see it here).

Awakening of the Granite Giants Picture of the Week

Golden morning light illuminating the rugged landscape of Granite Dells, with Glassford Summit in the background.
Awakening of the Granite Giants – A mesmerizing view of the Granite Dells under the soft glow of the morning sun, casting a beautiful light on the weather-worn rocks with Glassford Summit standing majestically in the distance.

My calendar page flipped to August this week, and that means that summer’s half over. In standard years, we would have been inundated with monsoon rains and antsy for the wet season to end. But, in this most unusual year, we’re waiting for the rains to start. We often see afternoon clouds here in Congress, Arizona, but they’ve only been a tease. The new month also means a new photo project, and I decided to stay in the high country—if you consider Prescott the highlands. We will wander the trails in the Granite Dells to capture its natural beauty and fill in my Website portfolio. The exposed cracked and worn boulders are common throughout Arizona, but this patch is the only city park.

The Granite Dells of Prescott, Arizona, is a geological wonder with around 1.4 billion years of history. Their formation began deep beneath the Earth’s surface, where molten magma slowly cooled and crystallized into hard, dense granite. Over hundreds of millions of years, erosion wore away the rock layers above, revealing the granite bedrock. Once exposed to the atmosphere, the granite underwent spheroidal weathering, a process that smoothed its corners and edges into the distinctive, boulder-like shapes we see today. This weathering, coupled with millions of years of further erosion, has sculpted the Granite Dells into their current, stunning form, with the boulders providing unique habitats for diverse flora and fauna.

Close-up study of Common Mullein stalks, brightly lit against a darker, out-of-focus background.
Majesty in the Ordinary – An intimate view of Common Mullein stalks bathed in the golden morning light, their unexpected elegance highlighted against the darker foliage of the Granite Dells.

We will start this month’s photo tour of the Dells with a long shot I took at dawn while hiking the Constellation Trail. At that hour of the morning, I thought I’d have the place to myself, but the parking lot was half full when I arrived, and true to form, I was in everybody’s way as I trudged along with my camera. I was in the middle of the loop when the sun emerged above the cloud layer along the horizon, casting a golden light on the rock formation before me. I can’t begin to tell you how delighted I was to see how it showed off the rounded shape and texture of the granite boulders. The Dells have a sense of anchor in their surroundings with the radio-tower-topped Glassford Summit. I call this week’s image Awakening of the Granite Giants.

We’re so glad that you joined us on the trail this morning. Throughout the rest of the month, we’ll share more images taken on tracks running through Prescott’s most significant city park. And you can count on us to dig up more interesting trivia about the Granite Dells. If you’d like to examine larger versions of Awakening of the Granite Giants, you can visit its page on my Website by following this link (Jim’s Website). You can also pixel peep on my Fine Art America posting by following this link (FAA Post). Be sure to return next week when we present another image of the intriguing Granite Dells.

Till next time
jw

Techniques: Restoring Dark Areas In Back Lit Images

In last week’s session, I showed how I manage shots to prevent blowing out the highlights when shooting in lighting conditions too broad for the camera’s sensor to capture—like the dawn, dusk, or back-lit situations. We concluded that discussion by predicting that the darker areas would be too dark to be pleasing. In this post, I will explain how I balance the exposure in Photoshop so the image looks natural.

Quick Selection Tool - I use this tool in the Tool Palate to select the areas that I want to work. It's the fastest and most accurate selection tool in Photoshop.
Quick Selection Tool – I use this tool in the Tool Palette to select the areas I want to work on. It’s the fastest and most accurate selection tool in Photoshop.

Artificial Intelligence (AI) has recently been in the news, with stories ranging from how it helps doctors find cancer in patients earlier to how it will eventually eat our brains—like Zombies. Well, Adobe has an AI-driven tool in Photoshop that enables you to select complex areas of your images. It’s called the Quick Select Tool. It seems to be mainly used to cut models—and their fly-away hair—from one background so they can be pasted into another. I use it to select the dark areas in my landscapes that need lightening. My process involves three steps: Selecting, Refining, and Correcting.

Refine Selection Workspace - With this tool, you can nudge and perfect which areas you want to be active within your adjustment layer.
Masking Workspace – With this tool, you can nudge and perfect which areas you want to be active within your adjustment layer.

After doing my color corrections and setting my Black and White points in my workflow, I try to balance my image’s exposure. Using the Quick Select (QS) Tool, I roughly select the area I want to work with, and that’s usually everything below the horizon. At this point, I’m not trying to be precise. After I drag the QS brush over the area I want to modify, I click on the Select and Mask button at the top of the workspace, which opens a Masking Workspace showing the selected areas of the image. I use a red mask set to 40% opacity to see which areas of the image will be affected by the following steps. Within the right panel, there’s a bunch of number settings that I’ve fiddled with over the years before settling on these: Radius=0, Smooth=2, Feather=2.5px, Contrast=25%, and Shift Edge=-2% (be sure to check the tiny little box tabled ‘Remember Settings‘ otherwise you’ll constantly have to reset these values). Using these values, I choose the Brush Edge Tool—the second from the top in the brush palate—and run it along the edge of the selected areas. What the AI does for me is pick out all of the little trees and other objects (like the leaves in the second photo this week) and separate them from the sky—an otherwise impossible task. Once I’m happy with the selection, I click ‘OK,’ the screen returns to the original workspace with the selected area now outlined with ‘dancing ants’—a term used to describe the animated dotted line showing the selection.

The next step is to correct for the darkness, and to do that, I choose a new Exposure layer from the list, which opens with the new mask in place. In the new layer, I use the slider to adjust the area to the lightness that looks good to me—usually between ¼ to a complete stop (.25-1.0), but with the sensor on my Sony camera, I’ve been able to lighten the dark areas by 2½ stops without causing a loss of detail in shadows or other unwanted digital artifacts (such as pixelation or banding).

Remember, by working with layers, you can go back and change your adjustments later. Also, remember to save your work frequently, especially after making significant adjustments.

Mountains, Canyons, and Sycamore Creek: Swimming in the Beauty of Arizona’s Wilderness Picture of the Week - Sunflower, Arizona

Scenic view of the Mazatzal Mountains and Sycamore Creek Canyon in Arizona.
Mountains, Canyons, and Sycamore Creek: Swimming in the Beauty of Arizona’s Wilderness – Immerse yourself in the breathtaking beauty of the Mazatzal Mountains and the picturesque Sycamore Creek Canyon.

Welcome back to our journey through the picturesque Mazatzal Mountains, where nature’s timeless artistry unfolds beneath our feet. In our continued exploration, we delve into the geological wonders that have shaped this majestic range, revealing the secrets of its ancient past. Join us as we uncover the captivating stories etched in rock and discover the remarkable forces shaping this rugged landscape.

With this terrible heat, wouldn’t it be nice to walk into Baskin Robbins and order a delicious burgundy-cherry cone? Although the ice cream cools your tongue, the heat melts it so fast you have to lap it up to keep it from running down your arm, and you get brain freeze. Wait, I can make it better. What if you returned inside with the empty cone and asked for a free refill? That’ll never happen, but that’s sort of the geological story of the Mazatzal Mountains.

The Mazatzal Mountains, with their rugged beauty, hold within their rocky layers a fascinating geological history that spans millions of years. Formed through intense tectonic activity and volcanic eruptions, these ancient mountains have witnessed the collision of ancient island arcs with the North American continent, creating a massive mountain range. Over time, erosion and subsequent uplift events shaped the Mazatzals into the awe-inspiring landscape we see today. Composed primarily of Precambrian and Paleozoic rock formations, these mountains showcase the power of tectonic forces, as evidenced by their uplifted and tilted nature.

On our imaginary drive through the Mazatzal Range, we reached Rincon Pass near Crabtree Butte. We stopped at this spot to shoot this week’s featured image. East of the Beeline Highway is a 400′ deep canyon carved by Sycamore Creek on its journey to the Verde River at Fort McDowell.

As we stand at the top, soaking in the awe-inspiring beauty of the canyon, the west-facing slopes still lie in shadow while the rising sun casts a warm and enchanting glow on our side. Like interlocking fingers, the ridgelines gracefully descend into the canyon, creating a mesmerizing pattern of diagonal lines. Through the distant haze, our eyes are drawn to Mount Ord, adorned with a majestic crown of communication towers. Rising to an impressive height of 7,128 feet, it proudly claims the title of the highest point in Gila County. Amidst this picturesque scenery, we can’t help but feel a sense of hidden treasure, including the irresistible allure of a rumored swimming hole waiting to be rediscovered.

My previous dentist told me that there was a deep swimming hole at this canyon’s bottom. It held cool water throughout the year, where you could soak in complete isolation. He was an avid backpacker, so we took his word for it. I can’t vouch for his story because the creek isn’t visible from the highway. The only way to verify his story was by hiking down to it. As I’ve whined before, I’d need a personal riding drone—but I’ve grown older since then, and today, I’m looking for a flying walker.

Close-up of a desert bush adorned with delicate white flowers in Arizona.
Weeds or Wildflowers? – Witness the delicate beauty of native Arizona flowers as a desert bush showcases its intricate white floral clusters.

As we conclude our stop at the top of Rincon Pass, we find ourselves halfway to Payson, but our adventure through the breathtaking Mazatzals is far from over. The beauty and allure of these mountains extend beyond the Beeline Highway, waiting to be discovered on either side. If you’d like to experience a larger version of Mountains, Canyons, and Sycamore Creek, click on this link (Web Version) to visit the web page or this link (FAA Version) to view my upload on Fine Art America. Join us again next week as we take a refreshing detour along the enchanting Sycamore Creek.

Till next time
Jw

Technique: Setting an image’s black point and white point

Ansel Adams was the master photographer that influenced my work the most. Setting aside his spectacular subject matter and sense of composition, I’m awed by the full range of tones he got in his prints. If you’ve never seen one in person, you’re missing out—the reproductions in magazines and books are different. It’s the equivalent of listening to your favorite music on a cheap transistor radio instead of a live performance. The tune is recognizable, but the song’s not right without the deep bass and sparkling trebles.

Throughout his long career, Ansel worked with a technique called the Zone System. In those days, black and white photo paper could only reproduce ten distinctive shades of gray from the blackest black (zone 0) to paper white (zone 10). His experience meant that he could look at a scene and visualize how it should look on paper. He got his desired results using different exposures, developers, papers, and toning. I tried to learn the Zone System, but I’ll never be that meticulous.

Fortunately for those like me, digital photography has made it easier to master getting full-range photographs, and the PhotoShop tool I use is Levels (all photo editing software have a variation of this tool). After cropping and color balance, my workflow’s third step is setting the black and white points. So I can go back and tweak it later; I always work with adjustment layers.

A screen shot of PhotoShop's Levels Tool.
PhotoShop’s Levels Tool – This handy tool makes setting the black and white points in photographs easy.

You can make several modifications with the Levels Tool, but I’m a simpleton, so I use the default settings and only make these small changes. Within the tool, a histogram (graph) sits on a baseline and three sliding arrows beneath it. Under the arrows are three boxes with value numbers tied to the sliders. If you move the arrow, the numbers change; if you change the number, the slider moves.

To set the black point, I move the left arrow to the right until it aligns with the graph’s left value. The right arrow will affect the white point, so move it to the left until it’s under the graph’s right end. If the histogram goes from wall to wall, the points are already good, don’t mess with them. I’ve done this process so often that I can usually type in the needed values. The final setting I make with the Levels Tool is setting the midpoint. Its default setting is 1. If my image is for the internet, I set the midpoint (gamma among the in-crowd) to .90 by shifting the center arrow to the right. If I’m making a paper print, I need to lighten it, so I move the center arrow left to set the value to 1.10 (the difference is that the first is a translucent light source, and the second is a reflective light source). After you’ve made your adjustments, you can click on the eyeball icon to turn the layer on and off to see the effect. Your picture will look livelier with rich blacks and sparkly whites.

Have I thoroughly confused you? Well, good. To help you, I found a YouTube tutorial explaining the levels tool (YouTube Levels Tutorial). You can ignore all the other gibberish in this video, but pay attention to his explanation of Adjustments vs. Adjustment Layers and what happens when he moves the sliders. After you watch the clip, you can return here and reread this section—it will make much more sense then.

Valencia Peak Vista: Capturing the Essence of Montaña de Oro Picture of the Week - Morro Bay, California

Landscape view of Bluff trail winding through grassy field with majestic mountains in the background at Montaña de Oro State Park in California
Valencia Peak Vista: Capturing the Essence of Montaña de Oro – Immerse yourself in the breathtaking beauty of Montaña de Oro State Park as you follow the beautiful Bluff trail, surrounded by rolling grassy fields and towering mountains. Discover this hidden gem’s serenity and natural wonders on California’s central coast.

Welcome back to our San Luis Obispo County project. As I tried to explain last week, it’s one of our favorite spots on the planet. Usually, the purpose of our trips involves wine tasting, so we spend most of our time traveling the roads that run past the vineyards and traverse the coastal mountains—the Santa Lucia Range. With an extra day set aside for photography, Queen Anne and I made a pact to explore places in San Luis Obispo County that were new to us.

On the morning of our shoot—after I dragged her majesty out of bed while we ate breakfast—I showed her a road I found on our California Gazetteer. It began in Morro Bay and made its way along the coast on the Montaña de Oro headlands to Pismo Beach. I told her my plans to drive down to the resort town and then return via the 101 Freeway. She thought that was a great idea as long as there was a candlelight dinner and a glass of Chardonnay at the road’s end. However, halfway through the drive, we found a locked gate preventing us from going further. It turned out that someone built the Diablo Canyon Nuclear Generating Station in our way and closed the road—how inconsiderate.

Our day wasn’t a total loss because, between Morro Bay and the gate, we drove through three nature preserves: Morro Bay Estuary, El Morro Elfin Forest, and Montana de Oro State Park. Since we had to double back, I’d have to settle with subjects along our route—oh, pity the poor photographer because each place is worthy of an afternoon—if not longer.

Morro Bay Estuary: A coastal wetland teeming with diverse wildlife and stunning vistas. A network of trails to explore that wind through the estuary offers opportunities to spot various bird species, including majestic herons and graceful egrets. If you remember to bring your mukluks, you may even try digging for clams or annoying the critters you’ll find in the tidal pools.

El Morro Elfin Forest: Unique and magical woodland. Marvel at the twisted, dwarfed trees that named the forest, creating an ethereal atmosphere. Stroll along the well-maintained trails, enjoying the tranquil ambiance and the delicate balance between the forest and the surrounding coastal dunes. Keep your eyes peeled for rare plant species and enjoy the peaceful serenity of this hidden gem.

Montana de Oro State Park: A coastal paradise of rugged cliffs, golden beaches, and sweeping vistas. Hike along the stunning bluffs overlooking the Pacific Ocean, witnessing the power of crashing waves and the dramatic coastal scenery. Explore the tide pools, where you can encounter a fascinating array of marine life, and venture further into the park to discover hidden coves and secret beaches.

I took this week’s image at the Bluff trailhead in the State Park. From the parking area, we had a choice of taking the trail down to the ocean or venturing across the street to embark on the course that led us into the majestic mountains. As we made our way along the path, the peaks rising to Valencia Peak stood before us, their commanding presence adding a sense of grandeur to the surrounding landscape. Amidst this natural beauty, my attention was drawn to the display of a bright orange Indian paintbrush. I knew that capturing this scene would encapsulate the essence of Montaña de Oro’s breathtaking vistas.

We invite you to visit the web version of this image, where you can view a larger version of Valencia Peak Vista: Capturing the Essence of Montaña de Oro. Immerse yourself in the stunning scenery, the rich colors, and the sense of serenity captured in this image. It’s a visual testament to the beauty in San Luis Obispo County.

Mark your calendars, and come back next week for another captivating tale and image. Until then, keep exploring, keep capturing moments, and remember that every step you take can lead to new and remarkable discoveries.

Till next time
jw

Techniques: Utilizing Leading Lines in Your Photographs

Leading lines such as the trail, the line of peaks, and the swale in this week’s image are powerful compositional elements that add depth and guide the viewer’s eye through the image. They create a visual pathway, drawing attention and creating a sense of movement. Whether straight, diagonal, or curved lines enhance the overall composition and introduce a three-dimensional quality.

These lines don’t have to be literal; the arrangement of objects or elements can imply them. By utilizing leading lines effectively, you can elevate your images’ impact and storytelling potential, inviting viewers to explore and discover hidden depths within the frame.

You can transform a simple scene into a captivating visual story by incorporating leading lines into your photography. Experiment with different types of lines and their placement to create a dynamic narrative within your image. Consider how leading lines interact with other elements and the mood they evoke.