The Verdant Slopes of Paso Robles Picture of the Week - Paso Robles, California

Vast vineyard in Paso Robles with rows of grapevines leading up to a tree-covered hill.
Nature’s Golden Arrow: Pointing to Paso Robles’ Treasures – Follow nature’s golden arrow, leading us to the crown jewels of this Paso Robles vineyard.

Thumb-deep in the pages of my trusted wall calendar (see more on calendars below)—a tome that’s seen more flips than a circus acrobat—I’m struck by the revelation that November has tiptoed in. This month, we salute not only the leafy tapestries of autumn but also indulge in the time-honored pursuit of pumpkin plundering. The ultimate spoils? Whisking those grim jack-o’-lanterns into pie perfection! And let’s not forget each stellar pie deserves a vinous virtuoso by its side. This month, our glasses are poised for just that.

Paso Robles beckons us back, teasing with three vineyards yet untouched by the footprints of Queen Anne and yours truly. San Luis Obispo County—our seaside serenade in Cambria—lures us with its labyrinthine backroads, rustic seafood haunts, and the siren call of Paso Robles’ vine-clad hills, a wooded sanctuary just a ten-hour drive away.

The “Pass of the Oaks” isn’t merely another dot on the wine map; it’s a chapter from an 18th-century vintner’s diary. With the Mission San Miguel’s historic tendrils, the grape gospel here has been preached for centuries. In this Edenic enclave, broiling daytime heat waltzes with the cool nocturnal breezes—a climatic duet the grapes practically waltz to solar caresses, coaxing ripeness, nightly whispers preserving zest.

But the tale doesn’t end with the meteorological. The Salinas River, a silent matriarch, cradles Paso in a diverse geological lullaby. It’s a mosaic of terroir, each parcel boasting its own soil story and climatic character. Amidst the hidden theatrics of the fault line beneath the 101 Freeway, a sanctuary for over 40 grape varietals thrives.

While the east side of the freeway is renowned for its sandy soils, giving birth to the robust flavors of well-known labels like Robert Hall and Tobin James, it’s also a chessboard of corporate plays. Giants like Julio and Ernesto have swept through, snapping up vineyards and shuttering public tasting rooms, sealing them away from the thirsty public. It’s a reminder that behind every serene row of vines lies the pulsing heart of business—sometimes nourishing, and sometimes, like a wise game of Monopoly, reshaping the very access to these bottled elixirs.

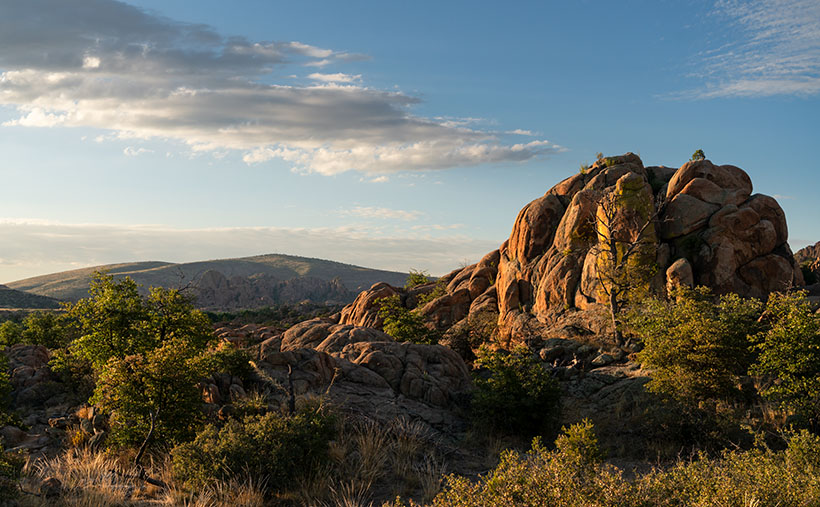
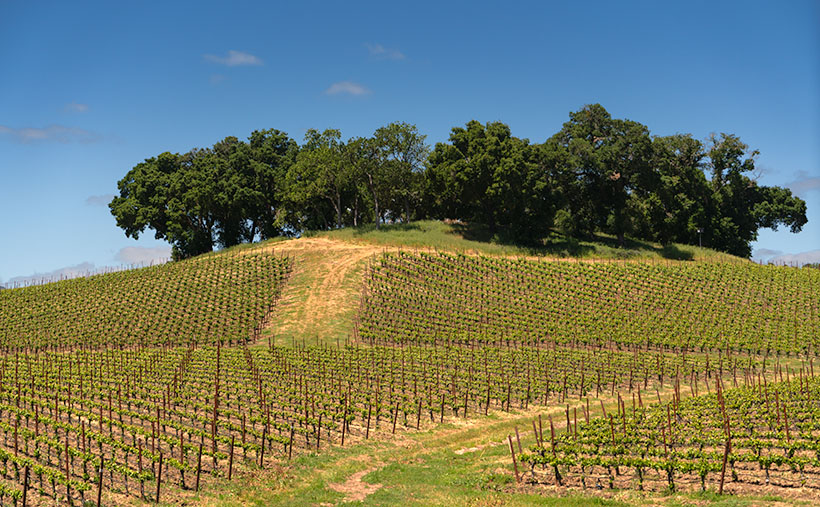
Our visual offering this week captures the ascending vines off Adelaida Road, cresting in an arboreal amphitheater of Live Oaks. Envision us there: Queen Anne and I, picnic basket in hand, seeking reprieve under those leafy sentinels, feasting simply yet sumptuously, all while the tapestry of Paso unfolds beneath us.

Curious about those precision-planted vineyard rows or the storied slope where Queen Anne played Jill—her hill-tumbling fame secured? Navigate to my website <Jim’s Web> or journey to the Fine Art America Page <FAA Page>. Prepare for our next vineyard chapter—it promises to be a symposium of the senses!

Until then, keep your spirits high and your humor dry;
jw

Techniques: The Subtle Art of Polarizing in Photography

In the sprawling vineyards of Paso Robles, a polarizing filter can be as crucial to a photographer as a corkscrew is to a wine enthusiast. It enhances the lush greens of the leaves and deepens the blues of the sky, much like a fine wine enriches a meal. However, the key to using this tool is subtlety, akin to adding just a pinch of spice to perfect a dish.

While a polarizing filter can dramatically reduce glare and enrich colors, the adage “less is more” applies beautifully here. After finding the point of maximum effect by rotating the filter, dial it back a touch. This ensures the scene retains its natural charm without oversaturated colors appearing and the sky unnaturally dark.

Authenticity: Over-polarization can make your images look artificial, robbing them of their authentic feel—something significant in landscape photography, where realism is often the goal.

Dynamic Range: Maintaining some natural light reflections helps preserve the image’s dynamic range, avoiding the ‘flat’ look that can come from over-polarization.

Viewer Connection: A scene that is too perfect can feel alienating. By keeping the location more natural, your audience can connect more deeply with the image, feeling like they could enter it.

As you stand amidst the rolling hills, let your polarizing filter accentuate the contrasts and textures gently. Allow the sky to retain some lightness and the leaves their natural sheen. This way, when you capture the essence of Paso Robles’ terroir, it’s not just the vibrant colors that speak to the viewer but also the nuanced dance of light and shadow that gives the landscape life.

Think of your polarizer not as a tool to transform the scene but to refine it—bringing out its character in a way that’s palpable but not overpowering. By mastering the subtle use of this filter, your images will hold truth to nature that’s as honest and inviting as the region itself.

BTW:

Since there’s only one month left on my wall calendar, I need to order a new one for next year. If you’d like me to print a copy for you, please let me know before Thanksgiving. They’re 8½ X 11 inches on sturdy stock with a spiral ring at the top. I have no idea how much they will cost. Currently, Vista Print wants $14 apiece plus shipping, but they often mark them down later in the month. If you’re willing to roll the dice, let me know (please don’t leave your email in the comments).

Awakening of the Granite Giants Picture of the Week

Golden morning light illuminating the rugged landscape of Granite Dells, with Glassford Summit in the background.
Awakening of the Granite Giants – A mesmerizing view of the Granite Dells under the soft glow of the morning sun, casting a beautiful light on the weather-worn rocks with Glassford Summit standing majestically in the distance.

My calendar page flipped to August this week, and that means that summer’s half over. In standard years, we would have been inundated with monsoon rains and antsy for the wet season to end. But, in this most unusual year, we’re waiting for the rains to start. We often see afternoon clouds here in Congress, Arizona, but they’ve only been a tease. The new month also means a new photo project, and I decided to stay in the high country—if you consider Prescott the highlands. We will wander the trails in the Granite Dells to capture its natural beauty and fill in my Website portfolio. The exposed cracked and worn boulders are common throughout Arizona, but this patch is the only city park.

The Granite Dells of Prescott, Arizona, is a geological wonder with around 1.4 billion years of history. Their formation began deep beneath the Earth’s surface, where molten magma slowly cooled and crystallized into hard, dense granite. Over hundreds of millions of years, erosion wore away the rock layers above, revealing the granite bedrock. Once exposed to the atmosphere, the granite underwent spheroidal weathering, a process that smoothed its corners and edges into the distinctive, boulder-like shapes we see today. This weathering, coupled with millions of years of further erosion, has sculpted the Granite Dells into their current, stunning form, with the boulders providing unique habitats for diverse flora and fauna.

Close-up study of Common Mullein stalks, brightly lit against a darker, out-of-focus background.
Majesty in the Ordinary – An intimate view of Common Mullein stalks bathed in the golden morning light, their unexpected elegance highlighted against the darker foliage of the Granite Dells.

We will start this month’s photo tour of the Dells with a long shot I took at dawn while hiking the Constellation Trail. At that hour of the morning, I thought I’d have the place to myself, but the parking lot was half full when I arrived, and true to form, I was in everybody’s way as I trudged along with my camera. I was in the middle of the loop when the sun emerged above the cloud layer along the horizon, casting a golden light on the rock formation before me. I can’t begin to tell you how delighted I was to see how it showed off the rounded shape and texture of the granite boulders. The Dells have a sense of anchor in their surroundings with the radio-tower-topped Glassford Summit. I call this week’s image Awakening of the Granite Giants.

We’re so glad that you joined us on the trail this morning. Throughout the rest of the month, we’ll share more images taken on tracks running through Prescott’s most significant city park. And you can count on us to dig up more interesting trivia about the Granite Dells. If you’d like to examine larger versions of Awakening of the Granite Giants, you can visit its page on my Website by following this link (Jim’s Website). You can also pixel peep on my Fine Art America posting by following this link (FAA Post). Be sure to return next week when we present another image of the intriguing Granite Dells.

Till next time
jw

Techniques: Restoring Dark Areas In Back Lit Images

In last week’s session, I showed how I manage shots to prevent blowing out the highlights when shooting in lighting conditions too broad for the camera’s sensor to capture—like the dawn, dusk, or back-lit situations. We concluded that discussion by predicting that the darker areas would be too dark to be pleasing. In this post, I will explain how I balance the exposure in Photoshop so the image looks natural.

Quick Selection Tool - I use this tool in the Tool Palate to select the areas that I want to work. It's the fastest and most accurate selection tool in Photoshop.
Quick Selection Tool – I use this tool in the Tool Palette to select the areas I want to work on. It’s the fastest and most accurate selection tool in Photoshop.

Artificial Intelligence (AI) has recently been in the news, with stories ranging from how it helps doctors find cancer in patients earlier to how it will eventually eat our brains—like Zombies. Well, Adobe has an AI-driven tool in Photoshop that enables you to select complex areas of your images. It’s called the Quick Select Tool. It seems to be mainly used to cut models—and their fly-away hair—from one background so they can be pasted into another. I use it to select the dark areas in my landscapes that need lightening. My process involves three steps: Selecting, Refining, and Correcting.

Refine Selection Workspace - With this tool, you can nudge and perfect which areas you want to be active within your adjustment layer.
Masking Workspace – With this tool, you can nudge and perfect which areas you want to be active within your adjustment layer.

After doing my color corrections and setting my Black and White points in my workflow, I try to balance my image’s exposure. Using the Quick Select (QS) Tool, I roughly select the area I want to work with, and that’s usually everything below the horizon. At this point, I’m not trying to be precise. After I drag the QS brush over the area I want to modify, I click on the Select and Mask button at the top of the workspace, which opens a Masking Workspace showing the selected areas of the image. I use a red mask set to 40% opacity to see which areas of the image will be affected by the following steps. Within the right panel, there’s a bunch of number settings that I’ve fiddled with over the years before settling on these: Radius=0, Smooth=2, Feather=2.5px, Contrast=25%, and Shift Edge=-2% (be sure to check the tiny little box tabled ‘Remember Settings‘ otherwise you’ll constantly have to reset these values). Using these values, I choose the Brush Edge Tool—the second from the top in the brush palate—and run it along the edge of the selected areas. What the AI does for me is pick out all of the little trees and other objects (like the leaves in the second photo this week) and separate them from the sky—an otherwise impossible task. Once I’m happy with the selection, I click ‘OK,’ the screen returns to the original workspace with the selected area now outlined with ‘dancing ants’—a term used to describe the animated dotted line showing the selection.

The next step is to correct for the darkness, and to do that, I choose a new Exposure layer from the list, which opens with the new mask in place. In the new layer, I use the slider to adjust the area to the lightness that looks good to me—usually between ¼ to a complete stop (.25-1.0), but with the sensor on my Sony camera, I’ve been able to lighten the dark areas by 2½ stops without causing a loss of detail in shadows or other unwanted digital artifacts (such as pixelation or banding).

Remember, by working with layers, you can go back and change your adjustments later. Also, remember to save your work frequently, especially after making significant adjustments.