It’s June already and our wall thermometer is reading over 100º so it’s time to shoot somewhere a little cooler. Queen Anne and I racked our brains to come up with a scene close enough for day trips, and we decided to focus on Jerome this month. It’s a ghost town close by, it is a mile high clinging to the side of Mingus Mountain, and it is cooler than here. I have personal recollections about Jerome that I plan on sharing later this week, but Sunday’s are reserved for new picture announcements, so let’s get on with it.
I’ve photographed Jerome several times over previous decades and I already have a library of the town’s familiar buildings, so on this trip, I wanted to look for details that give Jerome character—you know—the artsy pictures. I got some shots that fit that bill, but to set the stage for Jerome Month, I wanted to start with an image that would give people who have never visited the town an idea of its geographical placement, and I think this week’s featured image does that.
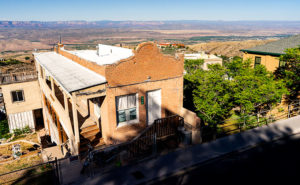
House with a View – Building and maintaining a home on a mountainside is a daunting task. But like this house in Jerome, the views are priceless.
I call this image House with a View and it is one of the few private residences that has survived intact. It’s a modest home that is one story on the street but has three levels at the back. It’s a brick building indicating that it was home to a family of means—like a mine manager. To me, it shows how steep the slope of the lot it’s on and how much engineering it took to keep the house from sliding into Clarkdale below. Conversely, the upside of being tethered to a mountainside is the million dollar view of the Verde Valley two-thousand feet below—and to the north, the red rocks of Sedona. Can you imagine having cocktails on that veranda while watching the sunset on the southern edge of the Colorado Plateau?
You can see a larger version of House with a View on its Web Page by clicking here. I hope you enjoy viewing my newest entry and join Queen Anne and I as we show off Jerome this month.
This week’s featured photo concludes our May adventure to Alamo Lake’s mud cliffs. I have another couple of detail shots that would fit nicely into this grouping, but I’ve run out of weeks this month and we have other places to go. I suppose I could put together a set of six and make up a folio like Santa Lucia Fog, or maybe I’ll go back and shoot enough images to complete a portfolio. I’ll have to think about that—what do you think?
False Cave – This appears to be the opening of a shallow cave, but it’s not that simple.
May’s final image looks like I shot the mouth of a shallow cave with—if you squint and let your imagination go wild—a pair of cherub heads as keystones, and that’s exactly what it looks like when you approach this structure in the field. But there’s something in the photo that gives a clue that this isn’t a cave. It’s the light shining on the floor past the opening. If you crawled into the cave where that light area is, you could stand up—or you could just walk around the pile of mud to the left, and come back down the stream bed. This is actually a low arch that is torso high. If I had a model, her legs would show in the lower opening while her head and shoulders would be visible on top. It would make a unique open shower design—like you would have poolside.
In all honesty, I wasn’t creative enough to come up with that idea. The woman in spring’s photo class, whose images inspired me to visit this place, came here with a group, and one of her friends posed behind the arch. Except he was a guy and he wasn’t naked. When I walked up to this spot, I wasn’t sure it was the same because it’s so well camouflaged. If I do go back for a reshoot, I’ll need to have a model join me. What are the odds of that happening: me—a toothless old geezer—convincing an attractive woman to go with me to this barren wasteland so that we could shoot that picture? Yeah, I didn’t think so either.
You can see a larger version of False Cave on its Web page by clicking here. I hope you enjoy viewing my newest entry and join Queen Anne and I as we present new photos from a different location—this time in Yavapai County.
I’ve been helping my local photo club conduct weekly photo sessions for the last couple of months. The classes were well attended and the feedback that we got was positive. We tried our best to keep to the basics so we wouldn’t lose anyone. After all, our attendees weren’t there to learn photo-stitching; they just wanted to take better photos with their phones and I think we did well.
Slide Drawer – Years of 35mm slides in hanging files stored in basic categories.
That wasn’t always the case. Sometimes the students asked questions about advanced concepts. One question we heard was how to organize their photos to make them easier to find. It’s a topic I’ve been dealing with ever since I got my first box of slides back from the lab. Since there isn’t a right way to store photos, I thought that I’d share my system with you. Maybe that will help with your organization, or perhaps you have a better system and you’ll share your ideas with us in the comments.
As I said, there isn’t a perfect system for organizing photographs. The best you can do is to create a system that you can efficiently retrieve the item that you want without having to go through them one-by-one. Since we don’t all think the same way, what works for me may be cumbersome for you, so feel free to make your own tweaks.
The first step in organizing photos is giving them meaningful names. If you’re a cyborg and the camera generated file name triggers your memory, you could just use those names. For me, a file name like “_DSC6658.AWR” doesn’t mean anything, so it doesn’t work. For example, consider this week’s picture. When I look at it I see a local mountain south of Wickenburg. Fortunately, by looking on a map, I found that it has a name; Black Butte. Since this is the first time I shot it, I used that as the title. If I shoot this mountain again, I’ll add a descriptor to the title; like Black Butte 2019 or Snow on Black Butte. Something that reminds me of what I saw that made me take another shot. When I save that file on my hard drive, I could file it in a folder called Photos, but I have several thousand files like it. That would be like putting all of them in a bucket. If I forgot its name, I would have to look through all of them before I found it. That’s not acceptable.
Early on in my photo career, I quickly learned that I could file things by categories. Three of them to be exact: People, Places, and Things. If I knew what I was looking for, I only needed to root around in the correct pile and ignore the others. As my catalog grew, I found that I shot in certain locations often so I’d add sub-categories, like Arizona. In Arizona, I liked to go to the Grand Canyon, so I made another subfolder for it. That’s how my filing system grew; one group at a time. The Things folder has folders for things on wheels, another for buildings, aircraft, food, and so on. If I find that I have more than two dozen photos of a subject, I make a new subcategory.
It didn’t stop there because even then, I was searching through too many files, so in those cases, I sub-divided them again by year. For example, we visited New Zealand five times and so in the New Zealand directory, I have a folder for each year that we went. I’ve followed this logic—unintentionally—in laying out my Website. On the Project Index page, you’ll see that I have a link to Arizona Landscapes, but there are also projects for the Grand Canyon and the Sonoran Desert. Perhaps I should organize those like my file system and move them inside the Arizona project to keep everything uniform.
That’s how my system works and it allows me to quickly retrieve a photo that I’m looking for. I hope that I’ve given you an idea of something that you can do with your photos. I’ve found that if you don’t have a management system, those files grow out of control like bacteria. Let me hear how you manage your files.
The Wickenburg Art Club photo classes have started and have brought some surprises that we hadn’t anticipated. We had more attendees than we expected. Over twenty people have shown up each week and they’re asking questions and fully participating. The other thing that surprised me was how many people want to learn how to use the camera on their smartphone. Stan Strange—our resident iPhone expert—conducted the phone class and he was surprised that in his session Android devices outnumbered the Apple phones three to one.
Since Stan didn’t have a lot of experience with the Android Operating System, I decided to do a little research to help out and because I’m ignorant about smart-phones I had to learn the basics. For me, that means getting the images out of the phone and into a computer so you can do editing on an adult size screen. With my old-guy eyes, I can’t see anything on those tiny phone screens. Besides, although I don’t own a smartphone—or any cell phone for that matter—Queen Anne does and she’s collected enough stuff in the last year that she was out of storage space, so we killed a couple of birds using one stick.
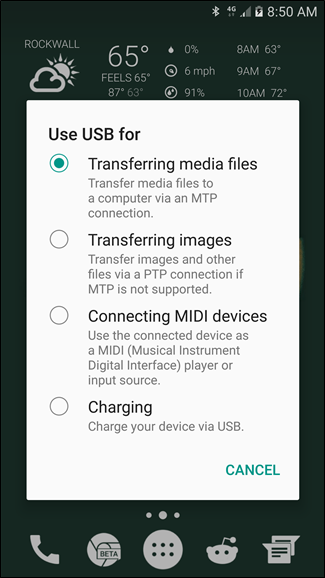
Android USB Configuration – Once you connect your phone and computer, you’ll need to root around in your configurations so the phone will allow files to be transferred.
Having a computer background, I foolishly thought that all that I needed to do was to connect the phone and computer with a USB cable, but when I did that, I got a message in the file window saying, “This folder is empty.” What I didn’t know is that the phone has to be set up to talk with the computer. Anne’s phone was configured so the USB port could only be used for charging. This is an easy fix. While the phone is connected to the computer via USB cable, touch and hold the area at the screen’s top—where the time and battery icons are—then drag down toward the screen’s center. There should be a box labeled “USB Configuration.” If you tap on that banner, it will open an applet that exposes the settings to configure the port. For picture transfers, you want to select: “Transferring Media Files” Once you select that option the phone will expose the phone’s files to the computer. Now in Windows Explorer (if you’re using a Mac computer, you’ll need to get specific instructions elsewhere, but they’re generally the same) your phone’s data should show up (either as a phone or a storage device) as a new drive letter and when you open it you will see an item that says “Internal Storage” or something like that. Once you open that item by double-clicking it, there will be a display of the various folders inside.
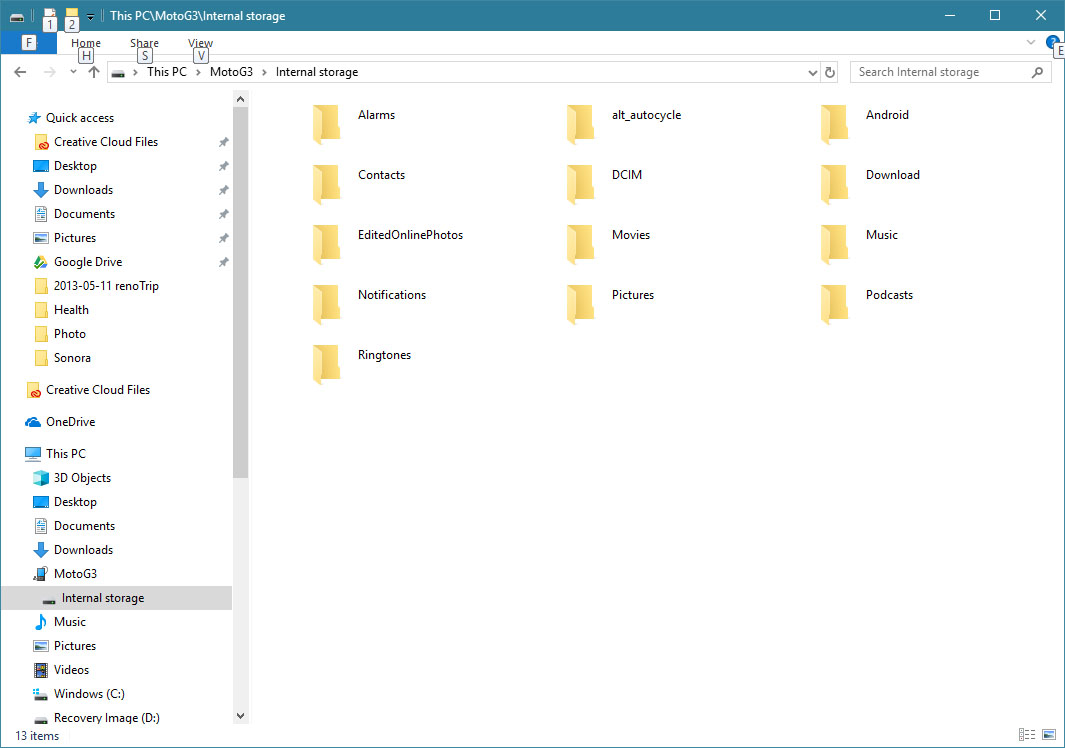
Internal Storage – When properly connected, the phone’s internal storage is visible using Windows Explorer.
By consensus, camera manufacturers store images in the DCIM folder, either at the root level or, as in Anne’s phone, a sub-folder named Camera. Once you’ve found your images you are ready to copy or move them to your computer. Unless you have created a specific folder for holding your transfers, you can copy or move your photos from the phone to the computer’s Pictures file you can see in the left frame. You can either drag each image or manually copy and paste if that’s your preference.
App Folders – In the phone’s Internal Storage are the application folders. By consensus, camera manufacturers store images in the DCIM folder.
If you only shoot a couple of pictures a month, keeping your images in the Pictures directory will work, but if you’re like me and you’re shooting hundreds or thousands of photos a year, you may want to consider a better file strategy. That’s a topic that I’ll talk about in my next photo tip installment.
I’m a visual person. I learn quicker from one YouTube video than reading a stack of manuals. I like looking at pictures whether they’re drawings, paintings, or photographs. I look for several aspects of images; the locations, light quality, and creativity. As a photographer, I get inspiration from seeing other people’s work. I try to understand what the artist saw and learn, so I can blend those ideas into my work. As you would guess, a lot of frogs get tossed back in the water before a princess appears.
At times, when people find out that I’m a so-called photography expert, they’ll pull me aside to ask for my advice about cameras or shooting. I’m not a big equipment techie as I think most cameras are more capable than their users are, so when they ask me which body to buy, I just usually steer them to the brand they want. I really believe that newbies get more from learning technique first. Those skills transfer across camera brands. If my coaching is successful, the next thing that usually happens is that they treat me to a pile of their vacation photos (vacation, kids, pets, goats, etc. are all interchangeable here).
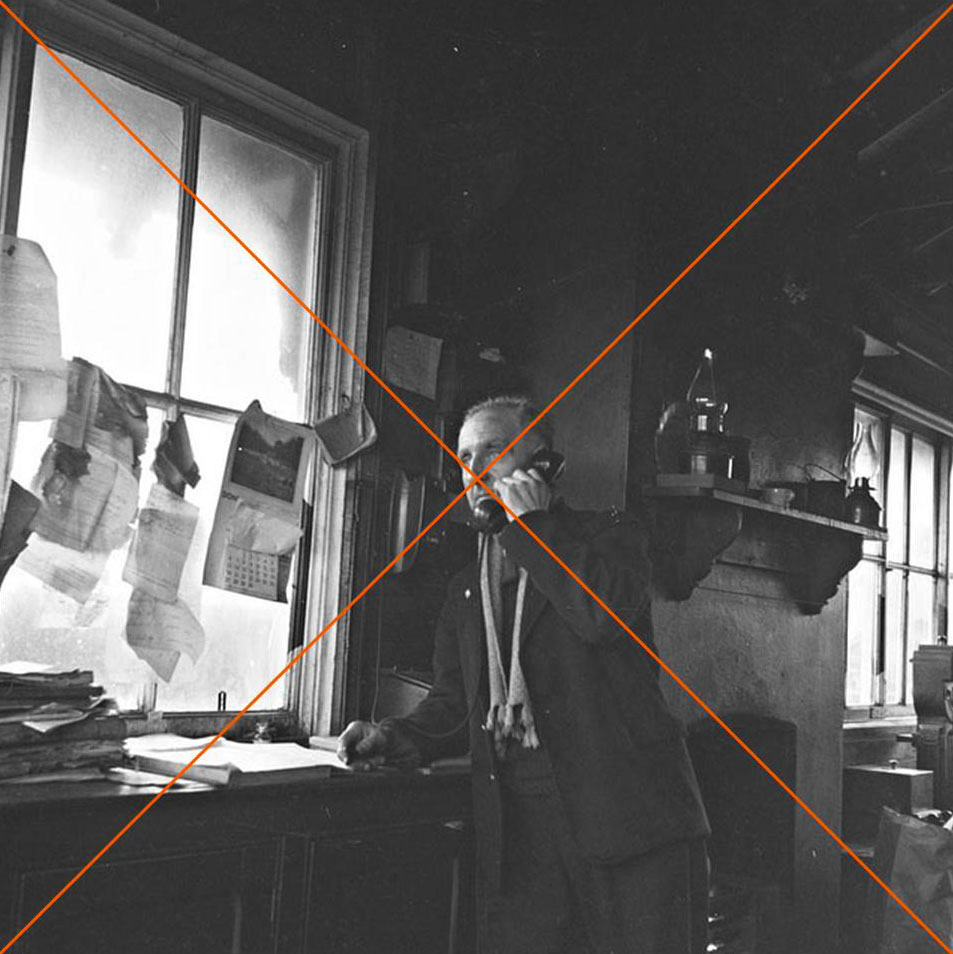
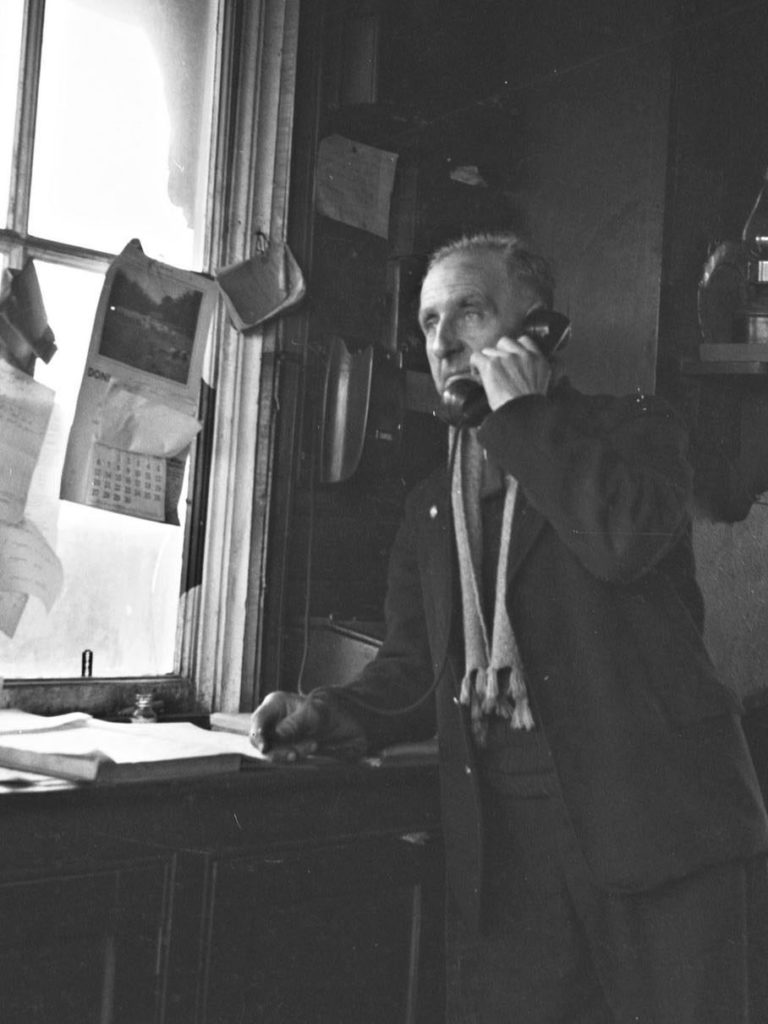
As I look through their image stack, I have so many suggestions that it’s hard to know where to start. A common thing I notice is subject placement, or more specifically, consistently centering the subject. It tells me that instead of composing, they’re aiming. I sometimes get in trouble when my stupid mouth automatically blurts, “Well, if you were using a gun, you would have killed (him, her, it).” As an example, I found an image on Flicker’s Public Commons section titled Christy Mahon on the Telephone. In spite of what I just said, I like this image; it works regardless of what I’m talking about, so I’ll use it to illustrate my point. As you can see from my markings, the poor ol’ railway signalman would have “taken-it” in the left nostril. The composition makes me wonder if the photo is a picture of the office or of Christy?
In this photograph from the archives, the photographer has centered the subject’s head. Is this the best subject placement for the story you’re telling?
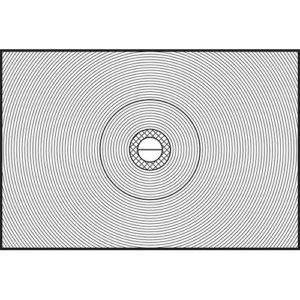
It’s easy to fall into this trap because cameras often have visual clues that trip you. The focus screen below is an example of what I mean. Although the circle is a focusing aid, it acts like the bull’s eye on a rifle scope urging you to center on your target. It’s a common beginner’s trap that photographers quickly learn to avoid.
Good or bad, many cameras have subtle cues that can encourage center placement.
So, what’s wrong with centering? Well, err … nothing, and if that’s what you want, then have at it. Centering is actually how we see. We go through life looking at a series of scenes on which our eyes stop for an instant before moving to the next. Our brain processes the information so fast that it seems to flow—like in a movie. We focus using our vision’s center, while our peripheral vision is fuzzy—out of focus. If we detect movement in the corner of our eye, our eyes instantly flick in that direction. For self-preservation, we need to know what was moving. If the movement’s not a threat, then all’s well and we relax. The brain is constantly centering the world around us. If a subject is centered and balanced in an image, we experience calm before we move on … or take a nap.
Now, if we move the subject off-center, our brain tries to restore equilibrium. In this micro-struggle we sense tension and that creates a wee bit of emotion. Remember back to your Psych 101 class when you learned that people remember things more intensely when there’s an emotional attachment. You want your viewers to stop in their tracks when looking at your work and that’s why artists have learned to intentionally use this tension in their work for centuries.
The point that I’m making is that the center of your viewfinder, screen, pad, paper, canvas, or whatever is unimportant. Instead, concentrate on how your subject relates to the edges or frame. Stop aiming and think about composing within that frame. Train yourself to scan the entire area and become aware of what you’re including in your composition. Equally important, is knowing what to leave out. Where are you placing your subject? Where is the horizon (if there is one)?
A question often asked at this point in this discussion is, “Where should my subject be if not centered?” Fortunately, it’s not a secret. Leonardo Da Vinci, Rembrandt, O’Keefe, et Al., used this technique. The ‘feel good’ spot is around the one-third mark, and recent scientific studies seem to confirm its validity (a topic I’ll save for another discussion). An accepted guideline is to divide your canvas into thirds—in a tick-tack-toe pattern. Where those lines intersect, are your composition’s power points and the most effective place for your subject. X marks the spot if you will.
The shot is a vertical crop of the original moving the signal-man off-center. How does this story compare to the original?
Returning to the example photograph of Christy, I have two versions of the image cropped using the so-called Rule of Thirds; one horizontal and the other vertical. Look at the versions and see what you think. Each revision has the same two players; Christy and the depot. For you, how does the story change between the editions?
In this version, I’ve cropped the original image horizontally while leaving Christy off-center. Has the story changed? Is it for the better or is it worse?
In this post, we’ve discussed the camera’s viewfinder. Every camera has one and often it’s misused to aim the lens at the subject. I argue that it is a more powerful tool when used to compose your image as intended. A first step in seeing a photograph is intentionally placing your subject for the best impact on the story you’re telling. By choosing where to frame your subject, you’re beginning to see like a photographer. I know, the process seems cumbersome and tedious, but you wouldn’t still be here if you weren’t willing to try. I assure you that with practice, this skill becomes ingrained and you’ll stop thinking about it.
Have you ever noticed something good but didn’t want to spoil it by talking about it? That’s been the past couple of weeks for me. Now I think it’s safe to say that summer’s finally over! The temperature hasn’t broken the century mark in Phoenix for almost a month and in Congress, it hasn’t cracked 80° for the last week. I’ve even broken out a light sweater to ward off the morning chill—relief at last.
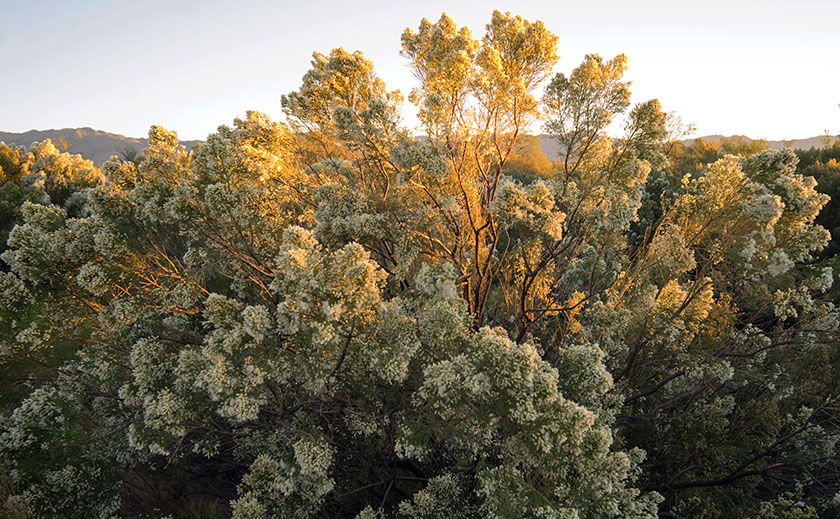
Much like spring, the Sonoran Desert autumns only last a couple of weeks before winter sets in. Of course, our winters pass for other people’s summers. We have nice sunny days, but you may need a jacket now and then. It just rains more often. We don’t get fall color like they do in Flagstaff, the cactus stays green. The only plant that takes fall seriously around here is the desert broom which flowers and releases clouds of feathery seeds that cover everything in sight. It’s as if your dryer vent went berserk and spewed lint over the neighborhood. Unlike the leaves in Vermont, it’s not a cherished sight that tourists flock to see.
In fall, the desert broom flowers and then spews millions of feathery seeds into the air. It’s more annoying than cherished.
It’s that time of year when we clean and put away our travel gear. We don’t go abroad now. Instead, the rest of the world comes and lives with us. It’s the beginning of the annual snowbird migration. Locals are busy planning shows, galas and festivals to entertain them … and to help separate them from that last quarter in their pocket. We work hard at it and save up all the money we take in so that next summer we can afford to travel and get fleeced by someone else.
It’s also time to shift away from last year’s travel stories and photographs and begin to plan our trips for next summer. In the coming months, I’ll don my velvet jacket and sit by the fire, pipe in hand, scouring camera catalogs and studying how-to videos to improve my photography. It’s an endless journey.
At the same time, I committed to helping my local photography club host weekly photography seminars. A few of us are putting together a syllabus so that we can share our experiences with newbies. We’re planning to start these sessions after New Years and we’re gathering material for our presentations.
I think that some of this stuff may interest you too. How do you feel about being a ‘beta-tester’? As my thoughts congeal into coherent ideas, I want to post them here. My hope is that you can give me feedback like: was the idea clear, was it too technical, did it help or was too basic—or too advanced? Perhaps you already have a photo questions that you’d like to ask. You can ask a free-range of topics (Just don’t ask about the velocity of a fully ladden swallow). Do you want to know about cameras, improving your pictures, making frames, or putting your work on the Web? If you ask, I’ll try to get you an answer even if it’s from someone else.
I’m also open to having guest experts write articles. If you’re familiar with a camera or a technique, I invite you to share your knowledge with us. There is so much to learn about photography, it’s impossible for one person to know all of it. My plan is to start simple and try to disentangle the complex.
I’m excited about collaborating with the club group. I can see that it will take up my free time, but I can also see that these sessions will be helpful and rewarding. Isn’t that what retirement is for? I hope that you’ll join in on our experiment.