Above the Yardarm Photography Tip

Bartlett Hotel
Bartlett Hotel – The ruins of the Bartlett Hotel in Jerome. Summertime shooting in the southwest deserts means being ready when the light comes in.

Spring is ending and there are signs of its imminent demise everywhere. This year’s crop of quail chicks, which looked like gray dust bunnies a few weeks ago, has already grown to three-quarter size. I’ve seen normally wary jackrabbits come in off the desert looking for water. Tropical storm Bud managed to bring rain throughout the valley except at the airport where the Weather Service records official measurements. It brought a welcome break from the heat and an early arrival of the summer monsoon storms. As far as I’m concerned, summer started when the thermometer exceeded the century mark several weeks ago. The Summer Solstice is tomorrow—the official start of summer and the longest day of the year. You’d think that all this extra daylight would be better for picture-taking. Not in the Sonoran Desert—not for me.

As an art-photographer, I consider myself average at best. The reason is partly that I’m not that creative and I’m too lazy to really work hard at it, and partly because I work too fast. I’m comfortable knowing this, but to compensate I use every advantage I can. I use high megapixel cameras so I have lots of margins when editing. I print on high-quality paper and mat to museum standards so my product has lasting value. I’m learning to make my own frames to differentiate them from cheap import stuff. And finally, I only shoot when the light is best—the Golden Hour or the Blue Hour—the short period before or after the sun transits the horizon. The rest of the time, the sun is over the yardarm—the term sailors on tall ships used when it was time to go below deck and drink rum. In photography, the light has lost color. The landscape goes flat, there’s too much contrast, and—especially in the desert—there’s too much glare. Photographers say, “We’ve lost the light.”

In the desert southwest, there are still periods when the light is pleasing in spring and summer, they’re just very short. I joke when I say, “morning’s golden hour lasts 5 minutes,” but I’m not far off. I don’t have the luxury of wandering around and shooting multiple subjects; I must plan and be there when the light is right. The reason for this phenomenon—here in the desert—is the sun’s angle. Because we’re so close to having the sun directly overhead this time of the year, the light comes straight through the atmosphere and that’s when the sun’s light is the whitest. The lack of humidity here plays havoc too. In the dry air, light reflects off objects which washes out the colors. Just wear a pair of polarized sunglasses to see what I mean.

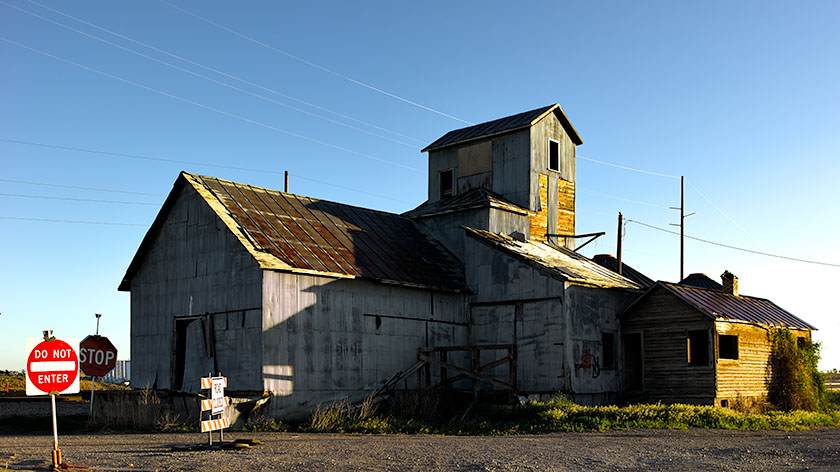
This light thing doesn’t happen globally. I’ve read internet posts, written by northern photographers, longing for the long summer days and better light. The first time I noticed a difference was when Queen Anne and I visited New Zealand. As we explored the islands, we agreed on a schedule where I could shoot in the morning then travel to a new place where I could shoot again at day’s end. I kept messing up our plans because the light was still good and I was still working at 11:00 am; something I normally wouldn’t do. I had the point really hammered home to me a couple of years ago when we were traveling through Idaho. While there, I got up before sunrise to shoot a grain elevator and as I walked to the scene, I looked for the brightest part of the sky to guess where the sun would come up. It surprised me to find that the sun didn’t rise that day—at least vertically like I’m used to—instead it slid west along the horizon for several degrees before clearing some distant trees. The light on the grain elevator was a different angle than I expected and I had to move the camera to compensate. I got my shot went back to the trailer and, before 6:00 am, I crawled back in the sack. When we packed and left later that morning, we drove by that old building and the light was still good. I could have slept in, had a cup of coffee and still got my shot.

Madison Grain Silo
Madison Grain Silo – In northern latitudes, the golden hour takes its time.

My argument can be condensed into this; the working length of good light changes with latitude during summer. It’s longer in the north and shorter here in the south (yes, in the southern hemisphere the water circles the toilet backward). It all has to do with the sun’s light angle through the atmosphere. Evidently, this isn’t a new idea because I found this neat sun-angle calculator on the Internet. It’s really slick. You put in the day and place, and the map will display the angle of sunrise and sunset. Then you can move the pointer north or south and watch as the angles change.

To get through this period of long (hot) days, I have a couple of strategies that get me by. I slow down my productivity. As I said, instead of wandering and looking for something to photograph, I’ll scout sites out. After finding a good subject, I’ll go back at a time when the light will be right. If I have all the details worked out, I’m out and back within an hour. You could call it, Hit and Run shooting. My favorite coping mechanism is to go where the light is better. If the light won’t come to you, then you go to the mountain. In Arizona, we have an old tribal word for such behavior—snowbird.

Until next time — jw

On seeing a photograph – Part 1 If you want to shoot something, just use a gun.

I’m a visual person. I learn quicker from one YouTube video than reading a stack of manuals. I like looking at pictures whether they’re drawings, paintings, or photographs. I look for several aspects of images; the locations, light quality, and creativity. As a photographer, I get inspiration from seeing other people’s work. I try to understand what the artist saw and learn, so I can blend those ideas into my work. As you would guess, a lot of frogs get tossed back in the water before a princess appears.

At times, when people find out that I’m a so-called photography expert, they’ll pull me aside to ask for my advice about cameras or shooting. I’m not a big equipment techie as I think most cameras are more capable than their users are, so when they ask me which body to buy, I just usually steer them to the brand they want. I really believe that newbies get more from learning technique first. Those skills transfer across camera brands. If my coaching is successful, the next thing that usually happens is that they treat me to a pile of their vacation photos (vacation, kids, pets, goats, etc. are all interchangeable here).

As I look through their image stack, I have so many suggestions that it’s hard to know where to start. A common thing I notice is subject placement, or more specifically, consistently centering the subject. It tells me that instead of composing, they’re aiming. I sometimes get in trouble when my stupid mouth automatically blurts, “Well, if you were using a gun, you would have killed (him, her, it).” As an example, I found an image on Flicker’s Public Commons section titled Christy Mahon on the Telephone. In spite of what I just said, I like this image; it works regardless of what I’m talking about, so I’ll use it to illustrate my point. As you can see from my markings, the poor ol’ railway signalman would have “taken-it” in the left nostril. The composition makes me wonder if the photo is a picture of the office or of Christy?

Christy Mahonin the cross hair.
In this photograph from the archives, the photographer has centered the subject’s head. Is this the best subject placement for the story you’re telling?

It’s easy to fall into this trap because cameras often have visual clues that trip you. The focus screen below is an example of what I mean. Although the circle is a focusing aid, it acts like the bull’s eye on a rifle scope urging you to center on your target. It’s a common beginner’s trap that photographers quickly learn to avoid.

Nikon Split Ring Focus Screen
Good or bad, many cameras have subtle cues that can encourage center placement.

So, what’s wrong with centering? Well, err … nothing, and if that’s what you want, then have at it. Centering is actually how we see. We go through life looking at a series of scenes on which our eyes stop for an instant before moving to the next. Our brain processes the information so fast that it seems to flow—like in a movie. We focus using our vision’s center, while our peripheral vision is fuzzy—out of focus. If we detect movement in the corner of our eye, our eyes instantly flick in that direction. For self-preservation, we need to know what was moving. If the movement’s not a threat, then all’s well and we relax. The brain is constantly centering the world around us. If a subject is centered and balanced in an image, we experience calm before we move on … or take a nap.

Now, if we move the subject off-center, our brain tries to restore equilibrium. In this micro-struggle we sense tension and that creates a wee bit of emotion. Remember back to your Psych 101 class when you learned that people remember things more intensely when there’s an emotional attachment. You want your viewers to stop in their tracks when looking at your work and that’s why artists have learned to intentionally use this tension in their work for centuries.

The point that I’m making is that the center of your viewfinder, screen, pad, paper, canvas, or whatever is unimportant. Instead, concentrate on how your subject relates to the edges or frame. Stop aiming and think about composing within that frame. Train yourself to scan the entire area and become aware of what you’re including in your composition. Equally important, is knowing what to leave out. Where are you placing your subject? Where is the horizon (if there is one)?

A question often asked at this point in this discussion is, “Where should my subject be if not centered?” Fortunately, it’s not a secret. Leonardo Da Vinci, Rembrandt, O’Keefe, et Al., used this technique. The ‘feel good’ spot is around the one-third mark, and recent scientific studies seem to confirm its validity (a topic I’ll save for another discussion). An accepted guideline is to divide your canvas into thirds—in a tick-tack-toe pattern. Where those lines intersect, are your composition’s power points and the most effective place for your subject. X marks the spot if you will.

Christy Mahone in vertical composition.
The shot is a vertical crop of the original moving the signal-man off-center. How does this story compare to the original?

Returning to the example photograph of Christy, I have two versions of the image cropped using the so-called Rule of Thirds; one horizontal and the other vertical. Look at the versions and see what you think. Each revision has the same two players; Christy and the depot. For you, how does the story change between the editions?

Christy Mahone in Horizontal Crop
In this version, I’ve cropped the original image horizontally while leaving Christy off-center. Has the story changed? Is it for the better or is it worse?

In this post, we’ve discussed the camera’s viewfinder. Every camera has one and often it’s misused to aim the lens at the subject. I argue that it is a more powerful tool when used to compose your image as intended. A first step in seeing a photograph is intentionally placing your subject for the best impact on the story you’re telling. By choosing where to frame your subject, you’re beginning to see like a photographer. I know, the process seems cumbersome and tedious, but you wouldn’t still be here if you weren’t willing to try. I assure you that with practice, this skill becomes ingrained and you’ll stop thinking about it.

Until next time … jw