Echoes of a Bygone Era: Vulture City’s Assay Office and Vintage Relic Picture of the Week - Vulture City, Arizona

Historic rock-faced Assay Office in Vulture City with a rusted 30s-era Ford sedan in the foreground, set against a clear blue sky.
Echoes of a Bygone Era: Vulture City’s Assay Office and Vintage Relic – Vulture City’s Assay Office: Where tales of gold and dreams converged, with the silent witness of a bygone era—the rusted Ford—standing guard.

Welcome back to the ever-mystifying Vulture City. Every corner here whispers tales of yesteryear, and as we look closer, I must admit it feels like someone—or something—is watching. Spine-tingling.

Imagine our main character, Henry Wickenburg. Not your typical gold-seeking caricature, but a slender gentleman in a coat and tie. I know; I, too, sometimes imagine prospectors as chubby caricatures in tattered hats with picks in hand, somewhat like that character the Arizona Lottery loves to flaunt. But Henry? Far from it. This Prussian immigrant, born Johannes Henricus Wickenburg, once mined coal back in his homeland and found himself on the wrong side of the law for poaching the King’s coal on the family farm. Landing in New York in 1847, the lure of California’s gold rush pulled him westward to San Francisco.

Henry’s journey, like my attempt at a diet, seemed doomed. He hit the Bay area just after the gold had panned out. Journeying further, he reached Yuma, only to find he was late to the party again when prospector A.H. Peeples and his crew discovered the Rich Hill find. Still, Henry, ever the optimist, pitched his camp beside the Hassayampa River, holding onto his golden dreams.

Then, as luck would have it, during an expedition with King Woolsey—an Arizona rancher, businessman, and Lieutenant-Colonel in the Arizona Militia—Henry spotted a promising quartz outcrop. While he failed to convince his comrades to investigate, he returned the following year in May 1864 with a new crew. They filed a claim, establishing the Vulture Mining District, and birthed one of Arizona’s most prolific gold mines. But as you’d expect in such tales, it wasn’t all peaches and cream, but more on that next week.

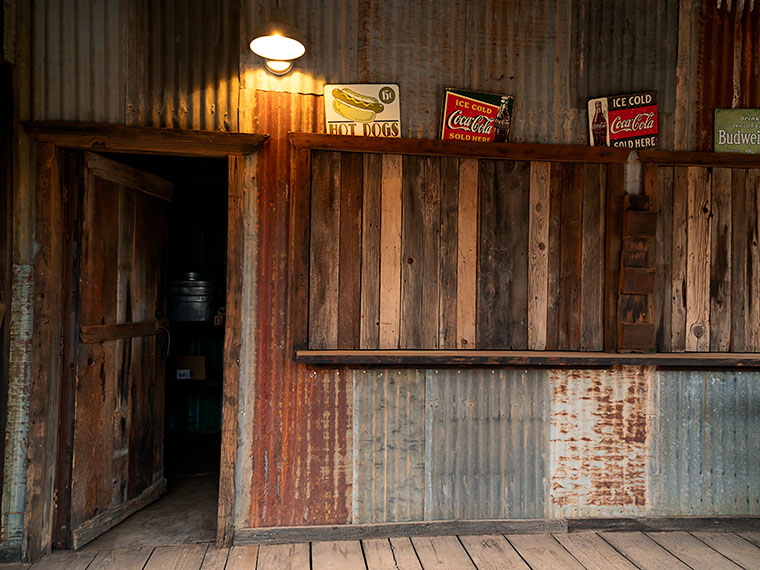
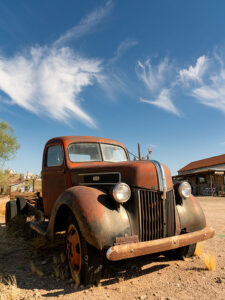
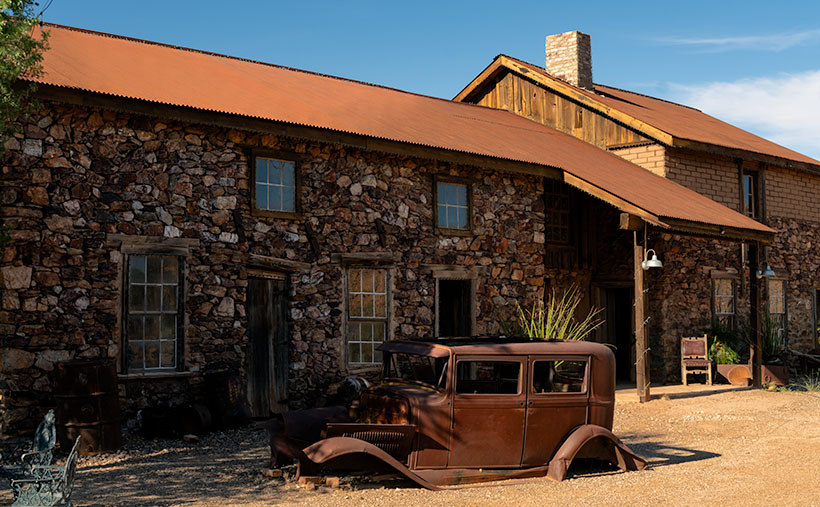
Today, the assay office stands proudly, echoing those golden times. Its walls, crafted from mine tailings rumored to contain gold, house tales of affluence and decline. The preservation efforts by the current owners ensure that its stories won’t crumble to dust. Though not from the gold rush era, the yard’s rusting Ford provides a curious juxtaposition against this historical backdrop.

Stay tuned as next week, we’ll dig deeper into the Vulture Mine’s intricate tapestry. To get up close with the Assay Office, swing by my Website (Jim’s web page) or its dedicated Fine Art America Page (FAA link). And, with Halloween around the corner, beware of the naughty pumpkins lurking in the shadows. Stick close, and stay alert.

Until next time
jw

Techniques: The Evolution of Architectural Perspective—From View Cameras to Photoshop.

Those towering buildings can play tricks on the eye in architectural photography. Point your camera up or down, and suddenly, those sturdy, straight lines appear to lean and converge. We’ve all seen those dramatic New York skyscraper shots that seem to stretch forever into the sky, making the buildings look as if they’re toppling.

Photographers had two main tools to correct this perspective distortion in the days before digital took over. The first was the view camera—which looks like an accordions and requires you to drape a cloth over your head. These cameras allowed for lens and film plane adjustments, ensuring buildings stood tall in photos. But they were bulky, required a tripod, and slowed you down.

Then, there was a clever darkroom method for those who didn’t have access to a view camera or wanted to correct images in post-production. Photographers could wrestle those leaning lines back into place by tilting the easel while projecting the negative. It was a delicate dance: tilt too much, and parts of the image would blur. While not as precise as today’s tools, it showcased the hands-on artistry of photography.

With the digital era in full swing, these older techniques are primarily of historical interest. Software like Photoshop provides a handy lens correction tool that quickly straightens skewed perspectives, found under Filter→Lens Correction.

Consider this week’s image of the Vulture City Assay office. I got up close and personal with my wide-angle lens to capture the sedan and the chimney. However, this meant some verticals weren’t… well, vertical. Enter Photoshop’s lens correction tool. After a few tweaks, everything was right again.

However, as with all things digital, this magic touch has critics. Some purists argue that such corrections can degrade image quality. While this is a valid concern, especially for large prints, it’s generally a non-issue for images meant for online display. Like with any tool, the key is using it judiciously.

Fading Echoes: Vulture City’s Cantina After Dark Picture of the Week - Vulture City, Arizona

Weathered metal exterior of Vulture City's Cantina featuring vintage food and drink signs, captured in dim light after sunset.
The weathered metal exterior of Vulture City’s Cantina features vintage food and drink signs captured in dim light after sunset.

October has finally graced us with its presence. That’s significant for us desert dwellers for a couple of reasons. Most importantly, summer’s relentless grip has finally loosened. It’s still hot during the day and will be for several more weeks, but we can go out on the back deck, enjoy a cup of java, and watch the doves run for their lives in the cool mornings. The other nice thing about October is that it’s the beginning of the festive gauntlet, where celebrations stack up on one another. If the calendar were a wheel, we’d have to take it to the tire shop to balance it.

Queen Anne’s favorite holiday is Halloween, of course. What else would you expect from a woman who wears a black pointed hat and always has a broom at arm’s length? All through the month, she buys bags of miniature Heath Bars at Safeway—not to give to kids trick-or-treating at the door (they don’t grow out here), but so she has plenty of stock when she watches Spaced Invaders looping constantly. So, what better way to celebrate Halloween than to spend the month in a ghost town? It’s one we haven’t visited before and is at the bottom of Vulture Mine Road. Of course, I’m talking about Vulture City, the mine that gave birth to Wickenburg.

A rusted, vintage Ford truck stands in a ghost town, framed by timeworn buildings and a sky punctuated by twisted arrowhead-shaped cirrus clouds.
Iron Beauty: Aging Gracefully in Vulture City – his Ford’s not going anywhere fast, but its enduring character keeps it forever at home in the forgotten corners of Vulture City.

Vulture City’s history starts long before any crusty prospectors unstrapped a pick from their burro. Judging from the mix of rocks you can see along Vulture Mine Road, the Vulture Mountains formed through a symphony of molten eruptions and earth-shattering shifts over millions of years. The evidence is the basalt layers and limestone blocks you see along the road. The area is rich in gold because hydrothermal activities carried gold from the Earth’s mantle to the crust. Like Queen Anne, Mother Nature has a flair for flaunting her geological bling.

Before European settlement, the Hohokam primarily inhabited this region and later the Apache—specifically the feared Yavapai Apache. While there is no definitive evidence, native tribes did engage in rudimentary mining and likely found semi-precious stones, but gold was not their primary focus. The natives considered many of the natural formations sacred, adding an extra layer of mysticism to the area. It was as if the land crooned a mystical siren’s song long before tourist-hot-spot was even in the lexicon. And then came the white man, which we’ll get into next week.

This week’s photo is of the mining town’s cantina, mess hall, cafeteria, or whatever they called the place where they fed workers. Ho ho! Staring at a sleeping princess may feed the soul, but you need sustenance to swing a pick all day in a dark mineshaft. When I took this image, it was well after sunset on a cloudy evening, so the lights were on, and I was captivated by the geometric dance of perpendicular rectangles. The porch light infuses a golden glow to the otherwise cold and dusty scene. Although the food signs jammed into the window frame add color, I don’t believe they’re authentic to the period. I mean, 15 cents for a hot dog would have been a lot of money back then—besides, I don’t think Costco yet invented the little sausages of mystery meat.

I’m pleased that you joined us on this month’s spooky adventure. Stick close together unless you fancy being spirited away by one of Vulture City’s resident phantoms who takes on pumpkins’ color and shape. We’ll return next week with stories of the mine’s beginnings and how one man was responsible for a town’s creation. If you want to search this week’s image closely for ghostly apparitions, visit my website (Jim’s web link) or the Fine Art America page I made for it (FAA link). Don’t go near the pumpkins—they’re cute, but bite your face off.

Till next time
jw

Techniques: The Soft Glow of Overcast Skies—A Detail Photographer’s Dream

Capturing minute details in photography often feels like trying to corral a greased pig—you think you’ve snagged the perfect shot, only for the little nuances to elude you. But here’s where the misunderstood overcast sky swoops in like a caped crusader. Acting as nature’s softbox, it scatters sunlight to tone down harsh shadows and even out contrast, setting the stage for those intricate details to take the limelight—from the weather-worn wood of a rustic barn door to the delicate veins of an autumn leaf. However, be warned: while overcast light is your friend for showcasing detail, it can sometimes render textures like corrugated metal or rocky surfaces a bit flat. For those, a dash of direct sunlight might be the secret sauce to elevate the texture to center stage.

Think of overcast light as the sotto voce of the photographic world. It’s the quiet, unassuming tone that lets the content shine. Where bright, direct sunlight is the boastful tenor, belting out high notes and obscuring the subtler instruments, an overcast sky gently elevates the bassoons and cellos—the intricate details that offer richness and depth. This makes your subject the show’s star, allowing viewers to appreciate complexities they might otherwise overlook.

Of course, while overcast light provides a naturally diffused glow, you’ll still need to stay vigilant about your exposure settings. Cloudy skies can occasionally trick your camera’s metering system into underexposing the shot, making it appear gloomier than intended. A quick tweak to the exposure compensation can often rectify this, ensuring your details stand out crisply without veering into the realm of the overblown or washed-out.

BTW:

If you’re curious about our previous adventures, my new YouTube video on the Colorado Portfolio just went live. Feel free to take a gander.

Storm-Lit Skies Over Date Creek Range Picture of the Week - Congress, Arizona

Golden-light silhouette of Joshua Trees with a dark, stormy sky over Date Creek Range in Arizona.
Storm-Lit Skies Over Date Creek Range – Caught in the golden embrace of the setting sun, the Date Creek Range and its Joshua Tree sentinel defy an impending storm. Can you spot the elusive rainbow?

In last week’s US 93 escapade, I put the pedal to the metal, racing the encroaching dark clouds to bask in the vanishing golden hour. I even detoured to Burro Creek campgrounds, where the only thing I found was…more clouds. Alas, as soon as I wrapped up my Burro Creek pit stop, those looming clouds won the race, swallowing the sun whole.

Disappointed, I set aside my camera’s relentless search for that perfect shot and started a leisurely drive home. No rush, right? Queen Anne was busy wallowing in precious metals at the jewelry store with her gal-pals, and I had miles of asphalt ahead of me. Soon enough, the highway carried me through the Joshua Tree Parkway, and then it began—Arizona’s version of ‘will it or won’t it’—raining from the sky.

Yes, this arid state has two kinds of summer rain. First, there’s the gully washer, the frog strangler, the cob-floater, a torrential rain that I can’t even see the house across the street. This type of downpour is the VIP guest that shows up uninvited, fills up the washes, and turns rattlesnakes into accidental Olympians. You should see them. Snorkels on their snouts, doing the backstroke like they’re auditioning for ‘Snakes on a Swim Team.’

Then there’s the other kind, today’s specialty: a rain so indecisive it could give Hamlet a run for his money. It’s like the weather gods couldn’t agree, and we get this annoying drizzle that teeters on the edge of being useful. You find yourself in this wiper-limbo, perpetually toggling between ‘kinda need it’ and ‘oh, the horror of that screeching noise.’ The local washes don’t even bother to fill up; rattlesnakes smirk and break out their snorkels for practice laps, just waiting for the next aquatic extravaganza.

Just when I was about to award myself the title of ‘Arizona’s Rain Philosopher,’ the universe decided to show off. The sun, ever the dramatic artist, slipped beneath the heavy cloak of the western clouds, making a brief but stunning encore. It was as if it said, ‘You thought I was done for the day? Hold my solar flare.’ And just like that, the golden hour was back on stage for its final act.

Dodging highway traffic and raindrops, I perched myself by a barbed-wire fence to capture what I’ve aptly named Storm-Lit Skies Over Date Creek Range. The Joshua Trees pop like jack-in-the-boxes from a golden sea of creosote, crowned by the glowing Castle Rock. For the eagle-eyed among you, squint a little harder. A subtle rainbow makes a cameo on the right of the taller Joshua Tree.

If you’re squinting at this on your smartphone, do yourself a favor—upgrade to a bigger screen. Trust me, this photo deserves it. You can see the bigger versions by browsing my website [Jim’s Page] or checking out my Fine Art America gallery [FAA Page]. Do make sure to swing by next week. The best is yet to come.

Till next time
jw

Techniques: Capturing Storms: The Drama Before, During, and After

Grab your umbrellas and wellies because today, we’re talking storms. And I don’t mean the kind you have with your spouse over who left the toilet seat up. We’re diving into the cinematic, the dramatic, the eye-candy kind of storms that would have made even Ansel Adams pause and say, “Well, would you look at that!”

Ah, the golden hour. That ethereal moment before the sky erupts into a Van Gogh painting or descends into gloom. But have you ever tried capturing a storm during this time? The universe throws you a curveball, saying, “Hey, here’s beauty and chaos, all wrapped in a corn tortilla of opportunity.” Remember Ansel Adams’ Clearing Winter Storm? The dude knew when to click that shutter.

You might think, “Jim, storms are just wet messes! How am I supposed to capture that?” Ah, my dry-weather fans, this is where things get electrifying. Capturing lightning requires some specialized equipment or mad reflexes. But the results? They’re shockingly good.

The storm has passed, but don’t pack up that camera yet. The sky now looks like hungover clouds meandering aimlessly, bumping into mountains, and trying to remember where they parked their cumulus cars. The aftermath can offer as many Kodak moments as the storm itself.

So, the next time you see those dark clouds looming, don’t just think about whether you’ve left the laundry out. Think about the once-in-a-lifetime shots that could be waiting for you. Embrace the wild mood swings of Mother Nature. After all, when the weather can’t decide, it might just be helping you make up yours about that next epic shot.

Do you have any of your own storm-chasing or weather-defying photography tales? We’d love to hear them! Please share your stories in the comments below, and let’s swap some epic weather adventures.

Mountains, Canyons, and Sycamore Creek: Swimming in the Beauty of Arizona’s Wilderness Picture of the Week - Sunflower, Arizona

Scenic view of the Mazatzal Mountains and Sycamore Creek Canyon in Arizona.
Mountains, Canyons, and Sycamore Creek: Swimming in the Beauty of Arizona’s Wilderness – Immerse yourself in the breathtaking beauty of the Mazatzal Mountains and the picturesque Sycamore Creek Canyon.

Welcome back to our journey through the picturesque Mazatzal Mountains, where nature’s timeless artistry unfolds beneath our feet. In our continued exploration, we delve into the geological wonders that have shaped this majestic range, revealing the secrets of its ancient past. Join us as we uncover the captivating stories etched in rock and discover the remarkable forces shaping this rugged landscape.

With this terrible heat, wouldn’t it be nice to walk into Baskin Robbins and order a delicious burgundy-cherry cone? Although the ice cream cools your tongue, the heat melts it so fast you have to lap it up to keep it from running down your arm, and you get brain freeze. Wait, I can make it better. What if you returned inside with the empty cone and asked for a free refill? That’ll never happen, but that’s sort of the geological story of the Mazatzal Mountains.

The Mazatzal Mountains, with their rugged beauty, hold within their rocky layers a fascinating geological history that spans millions of years. Formed through intense tectonic activity and volcanic eruptions, these ancient mountains have witnessed the collision of ancient island arcs with the North American continent, creating a massive mountain range. Over time, erosion and subsequent uplift events shaped the Mazatzals into the awe-inspiring landscape we see today. Composed primarily of Precambrian and Paleozoic rock formations, these mountains showcase the power of tectonic forces, as evidenced by their uplifted and tilted nature.

On our imaginary drive through the Mazatzal Range, we reached Rincon Pass near Crabtree Butte. We stopped at this spot to shoot this week’s featured image. East of the Beeline Highway is a 400′ deep canyon carved by Sycamore Creek on its journey to the Verde River at Fort McDowell.

As we stand at the top, soaking in the awe-inspiring beauty of the canyon, the west-facing slopes still lie in shadow while the rising sun casts a warm and enchanting glow on our side. Like interlocking fingers, the ridgelines gracefully descend into the canyon, creating a mesmerizing pattern of diagonal lines. Through the distant haze, our eyes are drawn to Mount Ord, adorned with a majestic crown of communication towers. Rising to an impressive height of 7,128 feet, it proudly claims the title of the highest point in Gila County. Amidst this picturesque scenery, we can’t help but feel a sense of hidden treasure, including the irresistible allure of a rumored swimming hole waiting to be rediscovered.

My previous dentist told me that there was a deep swimming hole at this canyon’s bottom. It held cool water throughout the year, where you could soak in complete isolation. He was an avid backpacker, so we took his word for it. I can’t vouch for his story because the creek isn’t visible from the highway. The only way to verify his story was by hiking down to it. As I’ve whined before, I’d need a personal riding drone—but I’ve grown older since then, and today, I’m looking for a flying walker.

Close-up of a desert bush adorned with delicate white flowers in Arizona.
Weeds or Wildflowers? – Witness the delicate beauty of native Arizona flowers as a desert bush showcases its intricate white floral clusters.

As we conclude our stop at the top of Rincon Pass, we find ourselves halfway to Payson, but our adventure through the breathtaking Mazatzals is far from over. The beauty and allure of these mountains extend beyond the Beeline Highway, waiting to be discovered on either side. If you’d like to experience a larger version of Mountains, Canyons, and Sycamore Creek, click on this link (Web Version) to visit the web page or this link (FAA Version) to view my upload on Fine Art America. Join us again next week as we take a refreshing detour along the enchanting Sycamore Creek.

Till next time
Jw

Technique: Setting an image’s black point and white point

Ansel Adams was the master photographer that influenced my work the most. Setting aside his spectacular subject matter and sense of composition, I’m awed by the full range of tones he got in his prints. If you’ve never seen one in person, you’re missing out—the reproductions in magazines and books are different. It’s the equivalent of listening to your favorite music on a cheap transistor radio instead of a live performance. The tune is recognizable, but the song’s not right without the deep bass and sparkling trebles.

Throughout his long career, Ansel worked with a technique called the Zone System. In those days, black and white photo paper could only reproduce ten distinctive shades of gray from the blackest black (zone 0) to paper white (zone 10). His experience meant that he could look at a scene and visualize how it should look on paper. He got his desired results using different exposures, developers, papers, and toning. I tried to learn the Zone System, but I’ll never be that meticulous.

Fortunately for those like me, digital photography has made it easier to master getting full-range photographs, and the PhotoShop tool I use is Levels (all photo editing software have a variation of this tool). After cropping and color balance, my workflow’s third step is setting the black and white points. So I can go back and tweak it later; I always work with adjustment layers.

A screen shot of PhotoShop's Levels Tool.
PhotoShop’s Levels Tool – This handy tool makes setting the black and white points in photographs easy.

You can make several modifications with the Levels Tool, but I’m a simpleton, so I use the default settings and only make these small changes. Within the tool, a histogram (graph) sits on a baseline and three sliding arrows beneath it. Under the arrows are three boxes with value numbers tied to the sliders. If you move the arrow, the numbers change; if you change the number, the slider moves.

To set the black point, I move the left arrow to the right until it aligns with the graph’s left value. The right arrow will affect the white point, so move it to the left until it’s under the graph’s right end. If the histogram goes from wall to wall, the points are already good, don’t mess with them. I’ve done this process so often that I can usually type in the needed values. The final setting I make with the Levels Tool is setting the midpoint. Its default setting is 1. If my image is for the internet, I set the midpoint (gamma among the in-crowd) to .90 by shifting the center arrow to the right. If I’m making a paper print, I need to lighten it, so I move the center arrow left to set the value to 1.10 (the difference is that the first is a translucent light source, and the second is a reflective light source). After you’ve made your adjustments, you can click on the eyeball icon to turn the layer on and off to see the effect. Your picture will look livelier with rich blacks and sparkly whites.

Have I thoroughly confused you? Well, good. To help you, I found a YouTube tutorial explaining the levels tool (YouTube Levels Tutorial). You can ignore all the other gibberish in this video, but pay attention to his explanation of Adjustments vs. Adjustment Layers and what happens when he moves the sliders. After you watch the clip, you can return here and reread this section—it will make much more sense then.

The Enigmatic Black Mesa: A Striking Basalt Landmark in Arizona Picture of the Week - Sunflower, Arizona

A view of Black Mesa, a pyramid-shaped basalt mountain in the Mazatzal Mountains
The Enigmatic Black Mesa – A stunning basalt pyramid rising majestically in the rugged beauty of the Mazatzal Mountains.

Welcome back to our exploration of the Mazatzal Mountains and the scenic journey along the Beeline Highway. As we continued our expedition, the changes in scenery required frequent stops for pictures. Although the scenery changes with each bend, over the years, the road has undergone its transformation—from a challenging back road to a modern highway.

My love/hate affair with the Beeline Highway began shortly after I arrived in Arizona half a century ago. At the time, I resided in south Scottsdale and had developed a passion for trout fishing. Despite my work obligations, I jumped at any opportunity to escape and make a Payson run. With a left turn at the end of McDowell Road, I could travel the picturesque route in just 90 minutes, reaching the tranquil Rim lakes where I would indulge in the serene beauty of nature and cast my fishing line.

However, weekends brought out the Beeline Highway’s dark side. State Route 87 north of Fountain Hills was a narrow, two-lane rollercoaster that could quickly diminish the joy of driving. While I found the route challenging and enjoyable under normal circumstances, the presence of holiday travelers towing trailers brought the fun to a screeching halt. A comfortable 90-minute journey became a tedious ordeal lasting several hours. These underpowered tow vehicles crawled up the grades at a snail’s pace, followed closely by a long line of frustrated drivers.

During my recent ride with Fred, I was pleasantly surprised by the Arizona Department of Transportation’s significant improvements to the Beeline Highway. The road has undergone a remarkable transformation. It now boasts four lanes for most of its length, except for a couple of long grades where they added a truck lane. The curve radius has been expanded, the shoulders widened, and other safety measures implemented, bringing the highway’s standard close to that of a freeway.

This week’s photograph was captured approximately 10 miles north of Four Peaks, featured in last week’s post. As we continue along the Beeline Highway, the elevation gradually increases, but at this particular spot, we find ourselves at the same elevation as Four Peaks Road. We haven’t gained much altitude because we recently drove over a pass at a large granite field, descending into another valley. Now, we’re beginning the ascent toward a second pass.

When I arrived at this location, the sun had just cleared the horizon, casting its soft light upon the mountaintops. It was the perfect opportunity to pull over and capture this week’s photograph of Black Mesa. Upon closer inspection of the photo, you can observe the traces of volcanism in black basalt trails running down the ravines on the mountain’s face. However, what truly caught my attention in this scene was the abundant presence of saguaro cacti on the southeast-facing slope. They outnumber the Palo Verde trees.

This is the last point on the road where saguaros thrive. Further up this grade, an imaginary frost line marks the limit for these majestic cacti to survive. As we ascend, the winters become too cold for the saguaros to endure. This splendid grove contrasts sharply with the sparse landscape and yellow grass we encountered last week. This week’s second photo was shot near where I stopped to look at a dense cluster of saguaros—the densest I’ve ever seen. It’s a testament to their resilience in this harsh desert environment, especially considering the recent wildfires that have thinned the surrounding landscape.

Close-up of a cluster of saguaro cacti in the Sonoran Desert
Desert Sentinels: Clusters of Saguaros Embracing the Sonoran Desert – A captivating ensemble of saguaros showcasing the beauty of the Sonoran Desert.

I hope you’ve enjoyed the ride so far. I appreciate your company as we explore the captivating landscapes of the Mazatzal Mountains. If you need a little break, I invite you to take some time to immerse yourself in the larger versions of The Enigmatic Black Mesa, available on my website (Black Mesa Webpage) or my Fine Art America upload (FAA Webpage). These images allow you to delve deeper into the beauty and details of this remarkable landmark. And remember, our adventure doesn’t end here. Join us next week as we explore the rugged Mazatzal Mountains on our way to Payson. There are more wonders to discover, and I look forward to sharing them with you.

Till next time
jw

Techniques: Mastering White Balance

Have you ever wondered at the wonky colors some of your photographs have? A simple answer could be the wrong White Balance adjustment. To the human eye and brain, a white sheet of paper looks white outside in the sun, in the shade, under house lights, or fluorescent bulbs. If you shoot using your camera’s raw data file, then you apply that fix in post-processing. But, if you’re shooting JPEGs or videos, the camera does the processing. Usually, cameras (and phones) have an Auto White Balance setting, but the color of a shirt, the distance of the subject, or even the wall color can easily fool it. It’s undependable.

Let’s look at it this way to keep this lesson short and sweet. The color of the sun we grew up and live with is white. If we lived on a different planet with a different sun, our brains would adjust to a new white in a few days. Scientists use the Kelvin scale as a way to measure relative color. It’s a numerical scale to measure the temperature of white light sources. A low Kelvin is warm and has a yellowish cast, so you add blue for balance. A higher Kelvin value is bluish and needs yellow for balance. For example, daylight is typically around 5500K, while tungsten lighting is around 3000K. So if you’re shooting outside, set your camera (or phone) to 5500k (or pick the sun icon), and if you’re using house lights, choose the light bulb icon (or around 3000k).

There are only a couple of exceptional instances. The first is in open shade—you’re out of the sun but under a blue sky, which are the conditions I had shooting this week’s pictures. Here, the light is being bounced off the sky, and the number needs to be higher to offset the additional blue cast. That Kelvin number is around 6500k, or the camera’s shade icon. The second exception is on cloudy days when there’s no blue sky. This is when you set the white balance to 6000k or use the camera’s cloud icon.

There is another infrequent situation that you may run into. It’s when you’re taking your eBay pictures in the garage, someone at a hospital, or a product in a retail store that has old fashion fluorescent tubes. They don’t emit red rays, so things look green. Not only do you have to adjust for the temperature, but you have to add the missing red. If your camera has a tube setting, you’re golden; otherwise, you’re alone.

If I’ve intrigued your interest and you’d like to dive deeper into white balance, numerous educational resources like this are available on YouTube (White Balance Video). You can also search YouTube for tutorials on “color correction” or “white balance” in your preferred post-processing software. There, you’ll find step-by-step guides and demonstrations to help you master this essential technique for getting natural color in your photographs.